Build a Continuous Wort Hopper

A few years ago, Sam Calagione of Dogfish Head started producing some unusual IPAs, barleywines and other over-the-top beers. Conventional brewing practice dictates the addition of hops at specific times during the boil. In contrast, Dogfish Head has designed a series of beers that are continuously hopped throughout the entire boiling process. Their 60 Minute IPA, 90 Minute IPA and 120 Minute IPAs have hops added throughout their 60, 90 and 120 minute boils, respectively.

Being an avid homebrewer, I wanted to brew beers like these guys were making . . . big, hoppy beers full of too much of everything, especially hops. Being somewhat of a gadget type person, I also wanted to build and use a continuous wort hopper, similar to the one at Dogfish Head.
I wanted a device that would drop a steady stream of hop pellets into my kettle throughout the entire boil. My plan was to come up with something like Dogfish Head’s hop feeder, which they call Sir Hops-a-Lot. Of course, mine would be a lot smaller, made from easily obtained components and everyday tools. The result of my quest was my “homebrewed” continuous wort hopper, which I named the Zopinator.
The planning phase involved a lot of deliberation and a few failed designs. I toyed with the idea of using a small motor driven auger, but decided against it. Instead, I opted to use a one RPM motor as a drive for a spinning, perforated disk inside a tubular reservoir.

One Part Design . . .
I found a one RPM motor at Grainger, a national equipment supply company, for around $35.00 (U.S.). It is equipped with a 3/8” steel drive shaft. The motor must turn an 18” (46 cm) length of 3/8” threaded rod that will operate a rotating port (valve). To attach the motor drive to the port, I made up a simple coupling by drilling a 3/8” hole through a piece of steel round stock (1” long, 3/4” in diameter). I drilled small holes (2 opposed on
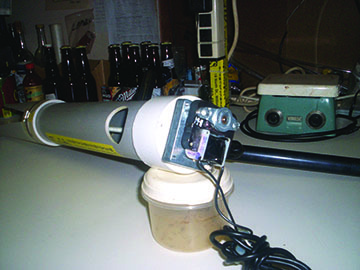
each end) and threaded them with a 1/4” X 20-thread tap. A couple of 1/4” Allen screws on each end lock onto the motor shaft on the motor end, and also connect to the drive shaft on the other end of the coupling. Inserted into the drive end would be a length (16–18”/41–46 cm, depending on the length of your PVC pipe) of 3/8” threaded steel rod. The threaded shaft turns a small rotating “valve” that allows hops to drop through.
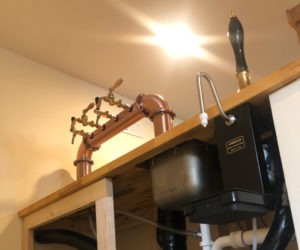
The main housing for the Zopinator is a 2’ (61 cm) length of 4” diameter PVC pipe. The 1 RPM motor easily mounts to a conventional PVC end cap. The length of the pipe is not a critical dimension, but 2’ (61 cm) keeps the motor a safe distance from the steam exiting during the boiling cycle.
So, with the motor mounted on one end and a threaded shaft attached via your homemade coupling, you now have a drive that operates a valve on the other end. This is where the design got a little tricky.
I attached a common PVC coupling to the pipe on the opposite end of the motor. I then cut a 1/16” thick disc of plastic to the exact inside diameter of the coupling. I wanted a pretty tight fit so it could revolve inside the coupling so hop pellets wouldn’t “leak out,” but not so tight that it would be restrictive. The inside of a PVC coupling has a small step in it that could act as a surface the plastic valve could be in contact with. After a little filing and sanding, the plastic disc fit nicely inside the coupling. I then drilled a 3/8” hole in the center of the disk and attached it to the 3/8” threaded drive rod so that it had a locking nut and a washer on both sides of the plastic valve, effectively locking it in place.

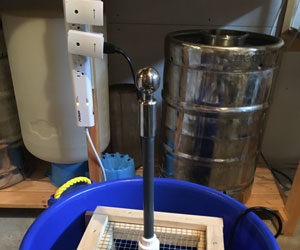
Next, I drilled a 3/8” hole about halfway up the PVC and attached the entire assembly to a camera tripod. Any support you choose must stand a foot or so (at least 30 cm) above your boil kettle so the hops can drop in. A 45° angle down toward the brew kettle seemed to be enough to allow the hops to drop fairly consistently.
. . . One Part Trial and Error
The hop pellets I sell at my homebrew shop have a similar diameter, but are various lengths. This was an early concern of mine. I wondered if the hops would bunch up as they packed down and would not drop through the hole as planned. However, with the Zopinator on a roughly 45° angle, the hops did drop out pretty consistently. Occasionally, however, the hops would pack up above the hole and not drop. To solve this problem, I drilled four small holes in the valve about 1” (2.5 cm) from the center mounting hole. To these, I attached four small bolts. These turn along with the rotating plastic valve, effectively keeping the hops from bunching up. After drilling and cutting increasingly larger openings in the thin plastic disk, I came up with an orifice size that was suitable. Finally, I drilled a 1” (2.5 cm) hole about an inch (2.5 cm) or so below the motor location as a place to insert the hop pellets.
Test Check One Two
On testing day, I loaded the Zopinator with pellet hops, set a timer and placed a small scale below the hopper. I observed that the pellets dropped a few at a time, a little time would pass and then a few more would drop. It seemed inconsistent. However, over time, the non-linear drop rate evens out and things worked smoothly. When measured in 10 minute increments, the hop rate remained constant.

Crunching the Numbers
Theoretically, to calculate total IBUs for a continuous hop addition, you would have to calculate an IBU value for each hop pellet (or group of hop pellets) that fell in the wort then add these values together. To make the calculations a little less daunting, I grouped the hop additions into the amount of hops dropped in a 10-minute period — about 1.1 ounces (31 g).
For a continuous addition throughout a 60-minute boil, using hops with 5% alpha acids, I calculated 94 IBUs. (Your calculations may vary, depending on the assumptions you make and — of course — the drop rate of your hopper.)
To achieve less hop bitterness, you could use lower alpha hops, run the hopper for a shorter amount of time or boil a larger amount of wort. (A 10-gallon/38 L batch, made with the above procedures, would yield 47 IBUs.)
To achieve more bitterness, you could add higher alpha hops or run the hopper longer (say, for 90 minutes instead of 60). You could also “spike” the wort with added hops at specific times.
The original purpose of the Zopinator was to aid in making unusual hoppy beers. I wanted their hop profiles a little bit different than the regular run of the mill ales. I find that in BJCP beer competitions, judges seem to like a little change from the regular, and award high points to unusual examples (that are still within style guidelines).
In truth, the real reason I designed and built the Zopinator was to do the same as Sam of Dogfish fame did . . . that is, to brew some real off centered beers with some profound hop flavors and aromas that would show off what we homebrewers (and adventurous commercial brewers) live for — individuality. Now, whenever I design a beer recipe, I put my “signature” on it with the Zopinator.
Paul T. Zocco is the owner of Zok’s Homebrewing Supplies, Willimantic, Connecticut. The terms “Sir Hops-a-Lot” and “continual hopping” are trademarks of Dogfish Head.
60 Minute IPA clone
(Dogfish Head)
(5 gallons/19 L, all-grain)
OG = 1.064 FG = 1.019
IBU = 60 SRM = 6 ABV = 5.8%
Ingredients
12 lb. 15 oz. (5.86 kg) 2-row pale malt
6.4 oz. (0.18 kg) Thomas Fawcett amber malt
11.2 AAU Warrior hops (60-35 mins)
(0.70 oz./20 g of 16% alpha acids)
3.6 AAU Simcoe hops (35-25 mins)
(0.28 oz./7.9 g of 13% alpha acids)
5.6 AAU Palisade hops (25-0 mins)
(0.70 oz./20 g of 8% alpha acids)
1 tsp. Irish moss (15 mins)
0.70 oz. (20 g) Palisade hops (whirlpool, 0 mins)
0.59 oz. (17 g) Amarillo hops (dry hops)
0.59 oz. (17 g) Simcoe hops (dry hops)
0.59 oz. (17 g) Glacier hops (dry hops)
Wyeast 1187 (Ringwood Ale) or
other English ale yeast
(1.5 qt./~1.5 L starter @ SG 1.030)
7/8 cup corn sugar (for priming)
Step by Step
Mash at 152 °F (67 °C) for 60 minutes. Boil wort for 60 minutes. Begin hopping wort with a continuous stream of Warrior hops at a rate of 0.28 oz. (7.9 g) per 10 minutes. Warrior should run out with 35 minutes left in boil. (Target IBU for Warrior additions = 39 IBUs.) Refill hopper with Simcoe hops and resume hopping until 25 minute remaining mark. (Target IBU for Simcoe additions = 10.5 IBUs.) Refill hopper with Palisade hops for remaining part of boil. (Target IBU for Palisade additions = 10.5 IBUs.) Add Irish moss with 15 minutes remaining. Add whirlpool hops after boil and begin cooling. Aerate cooled wort and pitch yeast. Ferment initially at 71 °F (22 °C), but let temperature rise to 74 °F (23 °C) towards the end of fermentation. Warm condition for 3 days (to remove diacetyl), then cool beer and add dry hops, allowing 2 weeks contact time.
Extract option:
Steep 1.5 lbs. (0.68 kg) of 2-row pale malt and 6.4 oz. (0.18 kg) of Thomas Fawcett amber malt at 152 °F (67 °C) in 2.25 qts. (2.1 L) of water. (This is technically a partial mash, so follow temperature and volume guidelines closely.) After 45 minutes, rinse grains with 1 qt. (~1 L) of 170 °F (77 °C) water. Add water to “grain tea” make 4 gallons (15 L). (To save time, heat ~3.5 gallons (13 L) of water during “steep.”) Stir in 4.0 lbs. (1.8 kg) Muntons Light dried malt extract and bring to a boil. During the boil, do not let wort volume drop below 3.5 gallons (13 L). Add boiling water if wort volume dips near this mark. Follow the hopping instructions given in the all-grain recipes. With 15 minutes left in the boil, turn off the heat and stir in 2.0 lbs. 14 oz. (1.3 kg) of Muntons Light liquid malt extract and Irish moss. Resume heating once extract is dissolved. After chilled wort is transferred to fermenter, add water to make 5 gallons (19 L). See the all-grain instructions for remaining details.
Thanks to Bryan Selders and Sam Calagione of Dogfish Head for the information used in compiling this clone.