Turbid Mashing
As Belgian-inspired beers grow in popularity and continue to nudge their way into North American beer culture, the desire to brew better, more adventurous, creations pushes brewers forward to find the next best ingredient or yeast for the style. Sometimes, though, it may benefit the brewer to look backwards, to see how some beers were brewed historically. Turbid mashing is a method that is still practiced in a few smaller lambic breweries in Belgium, such as Cantillon and Boon. If you have interest in brewing lambic-styled beers, wit beers, low-gravity or small session beers — or you just want to try an experiment — then utilizing a turbid mash may push your Belgian-inspired beer to the next level.
Few homebrewers have ever performed a turbid mash. Many, perhaps most, have never even heard of turbid mashing. References to the technique pop up here and there, but it remains an avenue largely unexplored by most homebrewers. As our knowledge of mixing various brewing styles, like a Belgian yeast strain with an American IPA hop-bill, grows and with the trend towards barrel (oak) aging, perhaps the turbid mash may find a new home in the homebrew crowd.
The Enigma
Turbid [adj.] (1) not clear or transparent; clouded; opaque. (2) confused; muddled; disturbed.
Both definitions of the word “turbid” have some relevance to the process of turbid mashing. The wort produced from this style of mashing will come out with a very cloudy, translucent white appearance when performed properly. On the other hand, all-grain brewers who have never heard of turbid mashing have been known to quickly become confused, muddled and may be downright disturbed by the turbid mashing process. Certainly, many aspects of turbid mashing fly in the face of what we now think of as solid procedures for producing wort.

History
The style of mashing that has come to be known as a turbid mashing today started to take shape in Belgium, in 1822, when breweries started getting taxed based on the size of their mash tun. Brewers were therefore pushed towards very thick mashes. An additional constraint was that many of these brewers utilized large proportions of wheat in their mash. To properly deal with this, a step mash was required. And, because raw wheat was also often used, the mash regime also needed to deal with this adjunct.
Taking wheat through a glucan rest of 115–145 °F (46–63 °C) can help prevent a stuck sparge. Mash tuns back then were not directly heated, so the brewers had to add boiling water to raise the temperature of the mash through the glucan rest. Brewers responded by pulling liquid out of the mash in order to fit the boiling water and raise the total temperature of the mash. After the main mash had run its course, all the liquid that had been pulled was pumped back into the mash tun and the grains were sparged. This allowed brewers to make brews with lots of wheat malt, and frequently some unmalted wheat as well, in very small mash tuns. The final twist to the turbid mash came when brewers started heating the pulled turbid portion, effectively denaturing the diastatic enzymes.
The tax lasted all the way until 1885, at which time the mash tun tax was revoked and a new set of regulations was put into place. But since most of the brewers had invested in the small mash tuns, and honed their skills on them, the practice did not disappear overnight. And, because the techniques of turbid mashing are thought by some to produce lambics and wits superior to infusion mashed brews, turbid mashing did not completely vanish. During World War II, turbid mashing proved to be an effective technique due to the food rationing of the era. Many British soldiers stationed in the region were amazed at the complexity and body found in the glasses of “small” Belgian table beers — beers with original gravities in the 1.020-1.030 range. The high concentration of unfermentables left in the wort (coupled with low attenuation during fermentation) allowed these beers to retain lots of body and mouthfeel during the beer’s short lifetime.
The Mash Tun
The mash tuns themselves evolved over time into fairly complex devices. Through a series of steps, the turbid mash tun went from a simple vessel to a complex machine, complete with multiple branching hollow arms or rakes that acted to both stir the mash and drain any available liquid found within the mash. These rakes rotated around the mash tun powered by a gear system, assuring the brewer that the thick mash was well mixed and was not allowed to set.
The original turbid mash tuns were nothing out of the ordinary apart from the fact that brewers used an oversized wicker basket, known as a brewer’s basket or stuykmanden, which was lowered onto the top of the mash. As the basket was pushed down, liquid would seep through the pores of the wicker weave and pool in the basket. The mash these brewers were dealing with was quite thick, in the 0.6 qt./lb. range (~1.2 L/kg). Therefore this was the best option for removing the turbid portion from the mash tun during the first goopy liquid pulling. The brewer could now siphon the pooled liquid from the basket into a kettle to be heated. Eventually brewers found that a copper version of the basket achieved their goal with improved efficacy. The copper basket then evolved into UFO-shaped discs, concave circular discs with tiny holes for liquid to diffuse through. The discs were attached to arms that came out from the center of the tun. The whole contraption faintly resembled a disc plow when in use. Multi-branching arms which extend out from the main arms finally replaced the concave discs in the most modern turbid mash tuns to rake the grains. Just like the discs, these branching arms acted like a rototiller, stirring the mash while allowing liquid to drain through piping in the arms’ interior.
The foundation of the turbid mash is built around extracting liquid from a wet grain bed that was more reminiscent of spackle then the typical thin oatmeal appearance of an infusion mash with well-modified grains. The grain bed would quickly stick if the brewer attempted to draw first runnings down through the false bottoms. The brewers also knew that keeping the first runnings from the later temperature steps of the mash, improved the base or body of the final beer. So the stuykmanden was employed to withdraw the vital turbid portion. The turbid portion was then warmed enough so that the enzymes, most importantly the diastatic enzymes, denatured. The heating also allowed the white starch granules floating in the turbid liquid to dissociate in the liquid, making the starch a solute but not allowing them to convert into simple sugars. The exact technique Belgian brewers utilized to achieve this goal changed from brewery to brewery and over time, but that basic foundation remained constant.
Why Turbid Mash?
Turbid mashing is time-consuming, requires some specialized equipment and produces cloudy, starchy wort — something we homebrewers generally strive to avoid as starch causes haze and may lead to biological instability in our beers. So why would anyone want to try this in their homebrewery? A few of the reasons include:
Authenticity
Traditionally the lambic family, wit-styled beers and low-gravity ales from Belgium were brewed utilizing a turbid mash. If you are interested in producing these beers as they were in the past, you may be interested in turbid mashing.
High Adjunct Proportions
Some lambic and wit beer recipes call for unmalted wheat in high proportion in the mash, and in some cases oats or rye. While the use of unmalted wheat may not be necessary, I often hear the opinion that unmalted wheat adds more character to a beer than the malted variety. Ungelatinized raw wheat needs special treatment such as boiling or a glucan rest to be sure the lautering process proceeds smoothly. Turbid mashing should sufficiently breakdown the sticky glucans and large proteins found in the unmalted wheat, but leave the protein haze characteristic of wit-beers.
Likewise, if you ever thought about brewing an experimental beer with some unmalted grain from your local supermarket, or grains you’re growing yourself, this style of mashing is a good candidate to handle unmalted adjuncts (provided you don’t expect to fully degrade their starches). See the sidebar for further information on using unmalted wheat.
Starch for Souring
If you are ready to delve into the world of lambic-style brews, or brew any kind of experimental sour beer, one key to getting a lot of sour character is to be sure there is still some unconverted starch left in the final wort. The starch will provide fodder for the microorganims in a sour beer to work on after the brewers yeast consumes all the simple sugars, such as maltose. Turbid mashing should leave a good concentration of unconverted starch in the wort. There are easier ways to do this, of course — including just adding a small amount of starch in the boil — but the easiest way is not always the best way.
Experimentation
A turbid mash will produce a cloudy, dextrinous wort that has great potential to add an interesting twist to many beer styles.
Equipment
The basic turbid mash — originally presented to North American brewers by Martin Lohdal from information gathered by brewers at the Brouwerij Cantillon and later brought down to homebrew scale by Jim Liddil — can be performed with one large (10 gallon/38 L) hot liquor tank (HLT), a smaller (~2 gallon/7.6 L) pot, a dedicated mash tun, the stuykmanden (see below) and a good mash paddle. You will also need another vessel, preferably the kettle, to hold the liquid first drained from the mash tun after the saccharification step has finished in the main mash.
A basic device to emulate the action of the stuykmanden is a colander. By pushing the colander down onto the top of the grain bed, free liquid from the mash will seep in to the center bowl, which then can be siphoned out. Try to find a small, but deep colander which will fit in the top of your mash tun. Also be sure that any extended temperature probes in the mash tun will not interfere with the colander sinking into the mash. If you are more dedicated and want to make your own stuykmanden, you may try to recreate the traditional wicker basket. The weave needs to be pretty tight and the wicker should be fairly stout in order to withstand the compression when it is pushed into the mash.
In The Brewhouse
Below is a suggested turbid mash protocol. The overall procedure is fairly complicated, even compared to a decoction mash, so it pays to familiarize yourself with the schedule before jumping in. The first time you try this, focus on hitting the temperature marks first, and volumes and mash thicknesses second. The temperatures follow the basic steps found in many step infusion or decoction mashes, so feel free to substitute your favorite series of rests for those suggested below. Because most homebrew mash tuns have more than enough volume to hold the grains for a 5-gallon (19-L) batch, you will have plenty of space to thin the mash if the thickness becomes unmanageable. A willingness to “wing it” and the diligence to take good notes will let you learn from your first turbid mash and be able to perform subsequent mashes more easily. The flow chart below outlines the process.
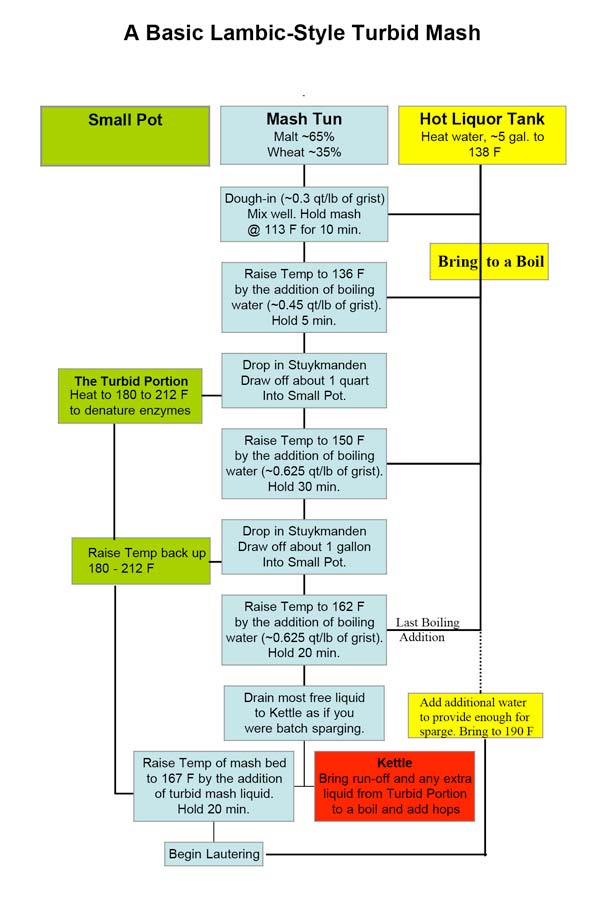
Your turbid mash begins in a manner similar to a regular infusion step mash, albeit much thicker. Dough in to 113 °F (45 °C). Your liquor to grist ratio at this point will be around 0.3 qt./lb. (~0.7 L/kg). Bring the water in the hot liquor tank (HLT) to a boil and, after the mash has rested 10 minutes, raise the temperature to 138 °F (59 °C) by stirring in boiling water. This should bring the mash to an overall thickness around 0.45 qt./lb. (~1 L/kg). Hold for 5 minutes at this rest.
At this point, the unusual aspects of the turbid mash begin. Draw off about 1 qt. (1 L) of turbid wort (if brewing a 5-gallon/19-L batch of beer). Do this by sinking your colander into the mash and scooping or siphoning off the wort. An auto-siphon comes in handy for this. Do not collect any grain solids in this volume. (Skim them out with a strainer, if your colander lets some solid bits through.)
Place the turbid wort in your small pot and heat it. An easy way to do this is to float the small pot in the boiling water in your hot liquor tank. You want the turbid portion to reach at least 180 °F (82 °C).
Now, stir in more boiling water to raise the temperature to 150 °F (66 °C). Hold at this temperature for 30 minutes, stirring often. The mash will still be thick, so you’ll have to work fairly hard at this.
Next, it’s time to use the colander again. This time, the mash is a bit thinner — although still thicker than a normal mash — and you will collect about a gallon (3.8 L) of wort (again assuming you are brewing 5-gallons/19-L). Combine the wort you draw off with the first turbid wort in the small pot. Heat this portion as before, aiming to raise it to at least 180 °F (82 °C). For the final mash rest, stir in boiling water to raise the temperature to 162 °F (72 °C) and rest for 20 minutes. While waiting to lauter, add water or otherwise cool the water in the HLT to 190 °F (88 °C).
Collecting the wort involves some unusual steps compared with normal wort collection procedures. First drain off some of the wort to the kettle — roughly the same volume that you have contained in your small pot. Replace the wort you ran off with the wort in the small pot. This should bring the mash temperature to 167 °F (75 °C). Hold for 20 minutes, then vorlauf and run off the rest of the wort, sparging with 190 °F (88 °C) water from the hot liquor tank.
From my experience with utilizing a turbid mash there are a few pointers to keep in mind to assure success when following the procedure laid out:
- Before starting, make sure your stuykmanden (colander) fits in the mash tun
- Make sure that, by pressing down with the colander, you won’t be bending any temperature probes or crushing any screens or manifolds.
- Adding 0.5–1 lb. (0.23–0.45 kg) of rice hulls to the mash during the saccharification rest is a smart choice when using unmalted wheat. This is an added buffer to assure against a stuck sparge.
My research into making an authentic kriek led me into the realm of the turbid mash and eventually into this article. Hopefully it will lead some brewers — especially those who are “Belgian-inspired” — to try this interesting and authentic method of mashing.