Growing Hops in Containers
 Many homebrewers may be interested in growing the hop plant (Humulus lupulus), but lack a suitable in-ground space to do so. This leaves the option of growing hops in a container. Growing hops in containers can be a challenge, but — if you understand a few key elements of container gardening — you can grow healthy plants that will yield a bountiful harvest of cones. I’ve grown hops in containers for four years now and have figured out what it takes. Some folks will say that growing hops in containers can’t be done. Then again, the same kind of person will say that about tomatoes, too, and I’ve grown them successfully in containers for 10 years.
There are advantages and disadvantages to growing hops in containers. The main advantage, of course, is being able to grow hops where you normally wouldn’t. And, if you use an adjustable trellis, harvesting the cones is also much easier compared to with a regular trellis. It is also a great way to propagate rhizomes, as first year rhizome growth often exceeds that of in-ground hops.
The primary disadvantage of growing hops in a container is that it takes a bit of work. Likewise, overall growth and crop yield is less than with in-ground hops.
Location
The first thing you need is to scout a suitable location. This can be a porch, patio, deck, driveway, yard or anywhere that gets the right amount of light. To determine this, look around your prospective growing area every hour for an entire day. The pattern of light and shade will change as the sun arcs across the sky. If you live in a prime hop growing latitude, look for a location that gets sun all day long. If this isn’t available, find an area that gets as much sun as possible from the late morning to afternoon.

If you live in the South, hot summer weather can make it harder to grow hops. In the hottest parts of the US, hops will die in the summer heat, even if watered adequately. However, if Southern hop growers locate their plants so that they get morning sun, but are shaded in the hottest part of the day, you grow them successfully.
The pattern of sun and shade will also migrate as the growing season progresses and the sun climbs progressively higher in the sky. A nice benefit of growing hops in containers is that you can move them to take advantage of this, if needed.
 Required Materials
 Required Materials
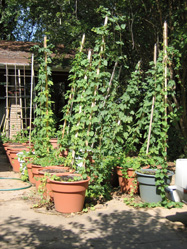
Once you’ve selected a spot, you’ll only need a few items that can be found at almost any nursery or home and garden center. For starters, you’ll need a container. In order to give the roots enough room to spread, you’ll need a pot or planter with a minimum 20-inch (51-cm) diameter. When growing hops in a container, the biggest shortfall you will need to overcome is the fact that you are cramping the plant’s roots. Everything you do when planting and tending the plant during the growing season will be aimed at mitigating this deficiency.
A simple adjustable trellis can be made from a 1” x 2” X 8’ or similarly sized stake, a #6 (or similar) hook and eye and some hop twine. You will also need some regular twine (jute or sissel or whatever works for you). You can also employ any trellis system that works with in-ground hops, for example, stringing hop twine down from the edge of your roof.
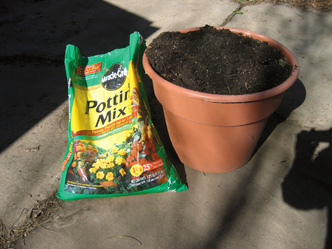
Also, you need a medium to grow the hops in. Even with a large planter, you will be cramping the roots of the hop plant and therefore you need your growing medium to fit this application as best as possible. Specifically, you need a medium with excellent drainage. Ordinary mineral soil — i.e. the “dirt” in your backyard — is a poor choice for this. Instead, use potting mix. This medium, sold at all nurseries and garden centers, provides excellent drainage and is very lightweight when dry. For each 20” planter, you will need a little over 2.0 cu. ft. (0.06 m3) of potting mix.
Finally, you will need hop rhizomes and some liquid fertilizer. Each planter will hold one rhizome and require up to 2 cups of a balanced all-purpose liquid fertilizer over the growing season.
Preparation
Planting the rhizomes is easy. Begin by filling the planter with potting mix. Add the mix all the way to the top (or even until there is a slight hill). Shake the pot to settle the mix, but do not compact it with your hands. Over the growing season, the “soil” will compact a little every time you water it. You’ll notice this most the first time you water the plant.
Do not put gravel or mineral soil in the bottom of the pot and top up with potting mix — you need the entire container filled with potting mix. (Also, contrary to nearly universal belief, gravel in the bottom of a pot actually hampers drainage.) With a container full of potting mix, you will have a medium that will hold the right amount of water for the plant, but let the rest flow out of the container.
If you choose to use the adjustable trellis I describe, set it up when you plant the rhizome. Adding it later can cause damage to the plant’s growing roots. To install the trellis, just screw a hook and eye into the end of a stake and insert this into the pot. Wiggle the stake front to back and side to side, which will create a little space around the wood. Tamp more potting mix into this space to give the stake added support.
Finally, plant the rhizome. To do this, just dig a little trench or hole and plant the rhizome 2 or 3 inches (5.1–7.6 cm) below the “soil.” I have planted rhizomes horizontally and vertically and both methods work fine. Replace the potting mix above the rhizome and keep it moist until the first sprouts appear.
Growth and Care
Once your hops have been planted, you will need to tend them over the growing season. Even though your planters may look large, the volume that a hop’s root system would normally occupy is much larger. As such, your primary goal in caring for your hops is to compensate for this.
First off, however, you’ll need to train the growing shoots to a trellis. Commercial growers train 4 to 6 shoots per rhizome to their trellis wires. To partially compensate for the constriction on root volume, I initially train only two shoots to my trellis wire. I feel it’s better to grow two to three healthy, productive vines than more that grow slowly and yield only small cones.
If you use my adjustable trellis idea, just thread the hop twine through the hook and eye and train the shoots to one end. Loosely tie off the other end to the base of the stake. (I’ll explain how to adjust this later.)
Watering
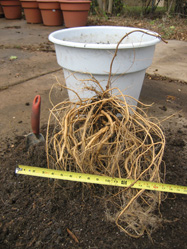
When watering your hop plant, you should think about its root system. You planted a rhizome, a woody, below-ground structure that sends out both shoots — which grow into the above-ground bines — and little white, fibrous roots. By fairly early in your first growing season, these roots will completely fill the container. By late in this growing season, the space the roots occupy will be much less than it would be for an in-ground plant. So, the way you water the plant needs to take this into account.
When I water my hops plants, I make sure to soak their entire growing matrix. I add water until I see it draining from the bottom of the pot. This ensures that every bit of root surface area has access to water. I then wait for the potting mix to almost dry out and repeat. (In the hottest stretches of my summer, when the high temperatures get above 100 °F (38 °C) every day, I need to soak the plants every day.)
Keep in mind that you need to water your hop plants according to their needs, not according to a calendar. Every time you water, you should seek to add it just before the plants really need it. Don’t wait until the leaves start wilting to water; instead monitor the top layer of potting mix. When wet, potting mix looks black, but it becomes progressively more grey as it dries. Learn to spot when the planter is running low on water and add water before the lack of it begins to stress the plant. Remember that potting mix has great drainage properties, so you really can’t overwater unintentionally. As such, I tend to err on the side of watering too often.
This “drench and dry” approach to water is far superior to adding smaller amounts of water on a more regular basis. If you do this, all you’re doing is keeping the roots in the top layers of the potting mix wet. The bottom of the planter will dry out and its roots will die back, leaving a reduced amount of root volume to support the above-ground growth.
Nutrients
 Nutrients
Plants need adequate sunlight and water to survive, and they also require a small amount of nutrients. When “feeding” a plant, it pays to think again about the plant’s roots. In a container-grown plant, you need to supply all the necessary nutrients through a reduced root system. However, adding too much fertilizer can “burn” the plant and actually cause the roots to die back. The solution is to add a slow, steady stream of nutrients to the plant and disperse these nutrients, as best as possible, throughout the container. The obvious solution here is a liquid fertilizer. Liquid fertilizers are available almost everywhere garden supplies are sold and these are great for all container-grown plants. Some are sold as liquids, others as powders that are dissolved in water, then applied to the plants. Compost and manure, while providing excellent nutrition for plants, have poor drainage properties and don’t work well when growing hops in containers. Time-release granular fertilizers will also work.
My approach to adding fertilizer is to dilute some liquid fertilizer to one-quarter the recommended strength and soak the planter with this solution. I then strive to add the next feeding right before the plant needs it. Healthy hop leaves look dark green and healthy hop vines will grow steadily throughout the growing season. If your leaves turn yellow or purple or growth slows to a crawl, this is likely a sign that you need to apply some fertilizer. Over the course of a growing season, a typical container-grown hop plant will use somewhere between 1⁄2 and 2 cups of powdered fertilizer mix.
A short spell of nutrient deficiency can be corrected quickly by adding fertilizer, whereas over-fertilization can take longer to correct. As such, I try to add just enough nutrients to keep the plants vigorous and healthy and not overdo it. Adding too much fertilizer will simply spur excessive growth, which the plant’s root system will then struggle to support.
A balanced fertilizer is your best bet throughout the growing season. Once the plants flower, you may want to consider a one-time addition of a phophorous-rich fertilizer. (Phosphorus is the “P” in the NPK rating found on fertilizers.) Last year, I added about 1/4 cup of bone meal to each plant upon flowering.
Adjustable Trellis
If you set up the adjustable trellis as described earlier, the hop vines will soon grow towards the top of the stake. When they are a few inches below the eye, untie the twine from the base of the stake and feed out a few feet of twine, letting the vine droop a bit. You may need to pull the vine gently downward to get the twine to slide through the hook and eye. Then, loosely tie the twine to the stake again.
As the vine grows, you’ll need to feed out more twine every time it approaches the top of the stake. In the part of the season when the vines grow the fastest, you may need to adjust it every week. If you keep making this adjustment, the tips of the vines will always be growing upwards, approaching the top of the stake. The bulk of the vine will eventually be coiled on the ground next to the planter. This doesn’t seem to bother the plant, but make sure the leaves don’t stay wet or get infested with insects. Once the vine touches the ground, I like to tie a loop of regular twine around the vine and the stake. This keeps the vines from getting whipped around too much when it is windy. A nice benefit of the adjustable trellis is that you can harvest the cones progressively, and they’ll all be at an easily reachable height. And if they aren’t, just adjust the trellis. Containers eliminate many worries about space.
Growing hops is a very rewarding activity, and you don’t need to have a green thumb to do it. If you merely keep your container hops adequately watered, they will grow. If you follow the rest of the advice in this article about pruning and nutrient additions, you can grow healthy, productive vines that yield plentiful hop cones for your brewing. So go grow some hops.