Canning Yeast Starters
A properly made yeast starter ensures that you have a large number of healthy yeast cells to pitch on brewing day. But, making a starter is fairly time consuming. If you ever wished that you could have starter wort on hand, ready to go at a moment’s notice, you need to can it — the wort that is. By using the methods of home canning, you can make and store starter wort for use whenever you want. For those of you that never helped your Mom can fruits and vegetables, read on.
Home canning is a simple and effective process for preserving starter wort in handy, ready to use, quantities. Of course, you can just cook up a batch of starter and let it cool to bring your dormant yeast to life, but that’s one more thing to remember to do in a busy brewing process. Also, canned wort is sterile and already at the correct temperature (if stored properly) for yeast propagation, so it is both safe and convenient.
The basic canning process is designed to sterilize and seal the contents of the canning vessel (typically a glass jar) for long-term storage. To accomplish this, clean jars, lids, and screw-on bands are held in boiling water while the starter wort is also at a slow boil. The boiling wort is then used to properly fill the empty jars, which are then each covered with a lid and secured with a band. The filled jar is then returned to the boiling water bath for “processing.” “Processing” is simply holding the filled jars at 212 °F (100 °C) — in a boiling water bath — for at least a half hour to be sure everything is sterilized. When the jars are removed from the boiling water bath and allowed to cool, the lid creates a secure seal and the contents remain sterile until the lid is removed.
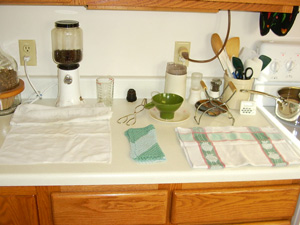
Here’s what you’ll need to produce a gallon of starter wort:

Ingredients:
12 ounces (0.34 kg) dried malt extract
2 teaspoons yeast nutrient
1 gallon (3.8 L) water
Equipment:
8 pint-sized canning jars
8 bands to fit jars
8 lids to fit jars
Soup ladle
Canning jar funnel
Canning jar tongs
Kitchen tongs
Clean dishcloth
Clean dishtowels
Canning kettle (or large pot) with false bottom
Pot for wort
Saucepan for lids and bands
The original gravity of this starter wort will be around 1.034. At this gravity, the yeast will grow happily — assuming you aerate the wort well immediately prior to pitching the yeast to the starter — and they will not be stressed by a high-gravity fermentation. As an option, you may want to add a few hop pellets to the starter wort. If you do, keep the addition under a quarter ounce (7 g) of hops per gallon of wort. Another option would be to add a small amount of yeast nutrients to your starter wort. A quarter teaspoon per gallon (3.8 L) would work fine.
Sanitizing the Jars
Once you have all the ingredients and equipment rounded-up, the first order of business is to wash and rinse the jars to make sure they are clean and then place them in the canning kettle (or large pot), cover them with water and turn on the heat. It is important that you have some type of false bottom in the pot, and kettles sold for canning purposes come with a wire or perforated metal insert. This is so the jars are not sitting directly on the bottom of the pot where steam pockets could develop under them and bounce the jars around, possibly causing breakage.

Bring the pot with the jars to a gentle boil. At the same time place the screw-on bands with a lid inserted into each one in a saucepan, cover with water and also bring to a gentle boil.

Boiling the Wort
In a third pot, bring a gallon (3.8 L) of water to a boil, then turn off the heat and gradually add the dried malt extract and yeast nutrient, stirring constantly to be sure everything dissolves completely. Then bring the pot of starter wort back to a gentle boil, without letting it boil so vigorously that it boils over.

So now you should have a canning pot with eight pint jars at a low boil, eight bands with lids in another saucepan of water at a low boil and a pot with a gallon of wort at a low boil.
Filling The Jars
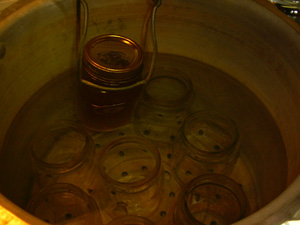
Next you will retrieve the jars from the canning pot, fill them with wort, secure a band and lid to each and return them to the canning pot for processing. You should do this by removing, filling, and replacing one jar at a time, not taking them all out then filling them in succession in a row.
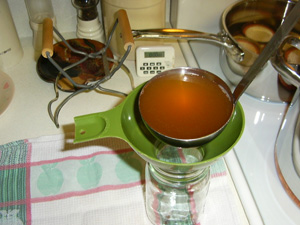
Using the canning jar tongs, grasp a jar by the neck and empty the water back into the canning pot. Then place the jar on the counter. Place the funnel in the mouth of the jar and carefully ladle wort into the jar leaving about a half-inch (~1.3 cm) of head space, unfilled with starter wort.

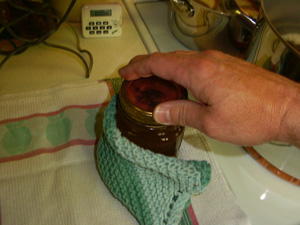
Wiping off excess wort from the rim of the jar.
Wipe the rim of the jar with a clean dishcloth to remove any wort that would interfere with a good seal. Retrieve a band and lid from the saucepan, leaving the water behind, and place it on the mouth of the jar. Secure the band so that it is snug, but don’t twist it on tightly. When the jars are heated in the boiling water bath, the expanding air in the headspace of the jar needs to be able to escape under the lid and band if necessary. Then immediately return each filled jar to the canning pot. Repeat the process with all eight of the jars until they are all properly filled and immediately returned to the canning pot.
As you fill the jars and return them to the canning pot, the filled jars will obviously displace more water than when they were open. When the water level in the pot rises more than a few inches (~7 cm) over the filled jars, you can empty the water from subsequent jars in the sink instead of back into the canning pot.
Sanitizing the Closed Jars
Once all the jars are filled, fitted with a lid and band and placed back in the canning pot covered with at least a couple inches of water, bring the water in the pot to a gentle boil if it is not there already. Let it continue boiling gently for at least a half an hour. During this processing-time, the jars and their contents will be sterilized from the heat.
If the water level looks like it will drop to the point that the jars are no longer submerged, add boiling water to the pot to restore a level of 2–3 inches (5–8 cm) above the jars.

Removing and Cooling the Jars
At the end of the processing time, carefully remove the jars from the boiling water bath with the jar tongs and place them on a clean dishtowel with at least a half-inch (2.3 cm) of space between the jars. Cover the jars with the rest of the (or another) dishtowel to prevent excessively rapid cooling.
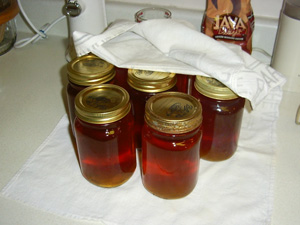
At this point, you want the jars to cool gradually at room temperature. Don’t place the jars by an open window or other source of rapid cooling or the jars may crack from too rapid of a temperature change. As the jars cool you may hear the characteristic “dink” sound as the lids are drawn downward as the wort and air in the jar headspace cools and contracts sealing the lid securely to the jar.
The Finished Product
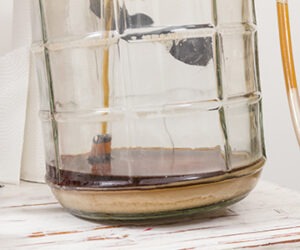
Once the jars are cooled to room temperature, they can be moved to a cool, dry cupboard for long-term storage. If everything went as planned, the sterile wort should last almost indefinitely. If the wort becomes discolored or the lid begins to bulge upward, all is not well and any suspect wort should be dumped down the drain. However, I have been using this method for many years and have yet to have a failure.
Alternate Method
The method described here is what many home canners use for canning fruit or tomatoes or other “high-acid” foods. If “low acid” foods, such as meat or most vegetables, are to be preserved, a alternate method of canning is used in order to minimize the possibility of botulism (see sidebar on page 46).
The alternate method of canning is to use a pressure cooker instead of a pot of boiling water as your sterlizer. You follow the same basic procedure as described, except the jars are boiled inside the pressure cooker. The jars sit in 2–3 inches (5–8 cm) of water — instead of being submerged — and are boiled for 10 minutes in a closed, but not sealed, presure cooker. After 10 minutes, the pressure cooker is sealed and the jars are heated under pressure for 30 minutes.
The pressure cooker is then removed from the heat and left to slowly depressurize at room temperature. (Attempting to cool the pressure cooker or rapidly release the pressure will crack the jars.)
The jars are then removed and allowed to cool as in the previous method.
Making Your Yeast Starter
So now when you are getting ready for another busy brewing session, just grab your jars of starter wort to get your yeast going ahead of time. All you need to do is clean and sanitize a one-gallon (3.8-L) or half-gallon (~2 L) brewpub growler and a fermentation lock. Pour pints of starter wort into your container, aerate (either by shaking or injecting oxygen), pitch your yeast and let your starter ferment. For a small starter, you could even just open the jar, pitch the yeast and set the lid back on loosely. If you used preserved wort to make your starter, you will have a vigorous colony of yeast ready to go to work to produce your next batch.
Botulism Warning
In home food preservation, foods are divided into “high-acid” foods, with a pH below 4.6, and “low-acid” foods, with a pH above 4.6. High-acid foods can be safely canned using the boiling water method. It is recommended that low acid foods be canned in a pressure cooker, where the increased pressure means that water boils at 240 °F (116 °C) or higher. The pH of boiled, unfermented wort is around 5.0–5.2, making it a low-acid liquid.
The reason for the high-acid/low-acid distinction is that spores of the bacterium Clostridium botulinum can survive in low-acid foods, even if they have been heated to 212 °F (100 °C). Clostridium botulinum produces 7 different classes of botulinum toxin, labeled A through G, and all are powerful neurotoxins. Botulinum type A, the most toxic, is 15,000 times more potent than VX nerve gas.
Botulinum toxins stop impulses in the nervous system from triggering muscular contractions. Symptoms of botulism usually arise 24–36 hours after exposure to the toxin and include dry mouth, weakness, double vision, vomiting, depressed breathing and a progressively intensifying paralysis leading to death.
The presence of Clostridium spores in raw honey is why doctors recommend not feeding it to infants or small children.
Although spores of the bacteria are found almost everywhere, cases of botulism are actually relatively rare. Most years, around 110 cases are reported in the US, with most occurring in infants or small children that have eaten honey or other affected foods. On average, less than 30 cases per year result from improper home canning.
In fermented wort (i.e. beer), the alcohol content, low pH (4.0–4.4) and anti-bacterial components in hops prevent C. botulinum from surviving. In preserved, unfermented, lightly-hopped wort, it is possible for the bacteria to grow. Although the bacteria will die if the wort is fermented, any toxins produced by the bacteria will not be neutralized.
To minimize the possibility of botulinum poisoning, can your starter wort using a pressure cooker or add acid — such as phosphoric or lactic acid — to your starter wort such that its pH is 4.6 or below if you are using the boiling water method. (High hopping levels alone are likely not enough.)
The boiling water method is presented here because it has been used successfully for many years, but it does allow for the possibility of botulinum poisoning. Although the probability of this is low, the consequences can be severe if it does occur.