Delicious Dry Stout

Some beer styles are fairly easy to brew. Others are difficult. I’ve always thought that it is easy to brew a good dry stout, but difficult to brew a great one. (My opinion here may be influenced by the fact that I brewed a long line of really mediocre dry stouts before I finally turned the corner and got it right.) In most ways, a dry stout is a simple ale. So, if you understand and focus on the main idea of the brew — it’s a pleasantly roasty session ale — you can brew a great example at home.
Defining Dry Stout
Dry stout is a dark beer. Sitting on a table or bar it looks black, but if you hold it up to a light, it will look dark brown with ruby highlights. The best dry stouts have a nice cap of white or tan foam on top. Dry stouts have an enticing roasty aroma reminiscent of coffee. The flavor is likewise roasty, with a solid hop bitterness. The roast character and bitterness are prominent, but not so aggressive to keep the beer from being a highly drinkable session beer. In fact, given the low alcohol content of dry stouts, they are one of the very best session beers as they are wonderfully flavorful, but not imposingly alcoholic.
The mouthfeel of a stout can vary widely and is strongly influenced by whether or not it is pushed with nitrogen. Nitrogen taps and the “widget” cans deliver very fine bubbles and a creamy mouthfeel that mixes well with the overall roasty character. (See the sidebar on the facing page for more info.) However, dry stouts that undergo and are served with “ordinary” carbonation may lack this character and still be excellent beers.

Finally, a dry stout is . . . well, dry. The roast flavors take center stage in this brew because there is little sweetness or body to compete with them. Just as a great American IPA relies on the specialty malt character and body taking a back seat to the hop assault, a great dry stout revolves around not letting other elements of the beer interfere with the expression of the roasted grain characters. In fact, I would draw an explicit parallel between the approaches to these two styles. In an American IPA, it’s all about the hops. Everything you do — from ingredient selection to recipe formulation to process — is focused on getting the best expression of the hops. In a dry stout, it’s all about the roast. And likewise, everything you do as brewer should be aimed at getting the best expression from your darkly roasted grains.
Roasted Grains
The heart of a dry stout is the dark roasty character and this style can be made with a variety of roasted grains. However, the primary roasted grain used in the classic examples of the style — Guinness, Murphy’s and Beamish — is roasted (unmalted) barley (around 500 °L). You can let roasted barley (500 °L) be the only dark grain in your grist, or you can blend it with other dark grains. Roasted barley is available from many different maltsters, and — although all are similar in their coffee-like roastiness — each has slightly different characteristics. If brewing a great dry stout is a goal of yours, experimenting with different sources of roasted barley is worthwhile. Keep in mind you may want to blend roasted barley from different maltsters if you find two or more with characteristics you like.
Two other dark roasted grains that can be used in dry stout are chocolate malt and black malt. A little chocolate malt thrown in the mix adds a chocolate-like aroma and flavor that works well with the coffee-like notes of roasted barley. Black malt (500 °L) — a malt closely associated with robust porter — can add an “sharp” edge to the flavor of a dry stout, although it does little for the aromatics. (See the sidebar on page 44 for how these grains are made.)
Less darkly-roasted grains, such as roasted barley (300 °L), coffee malt or pale chocolate malts can be used in small amounts, for complexity. However, these should comprise only a small percentage of the dark grains in your grist — you need most of your roast character coming from a very dark grain.
Roasted barley, and other darkly-roasted grains and malts, supply more than just roast to your beer. By their nature, darkly roasted grains are also bitter. In addition, they are more acidic than pale grains. And finally, darkly roasted grains are more likely than pale grains to add astringency to a beer. (In a dry stout, a hint of astringency can be a good thing, but if the beer is puckeringly astringent, it is not going to be a pleasant session beer.)
The amount of combined darkly roasted grains in a dry stout recipe is typically around 10% of the grain bill. There is a relatively small window of acceptable roast character in a dry stout. Too much and it becomes too harsh and bitter. Too little and you get a thin, coffee-flavored beer with little to recommend it. Just the right amount, however, and you have a wonderfully aromatic and roasty beer that you can drink all night.
Getting the right amount of roast character, and having it be appealing, involves more than just having the correct percentage of dark grains in your grist. As you will see, it also depends on not oversparging these grains (and extracting overly bitter or astringent elements from them) and manipulating the chemistry of your brewing liquor to balance their acidity.
Other Sources of Roast
If you’re willing to think outside of the box, there are other sources of roast character that you can incorporate into your dry stout, specifically actual coffee or chocolate. A small dose of espresso added at bottling or kegging can add some complexity to the aroma and flavor of a dry stout. The same goes for adding small amounts of (unsweetened) cocoa powder to the boil or “dry beaning” the brew with cacao nibs. Depending on the amount you add, these “non-beer” beer ingredients can add a small amount of complexity in an otherwise straightforward dry stout, or they can turn the brew into a specialty beer.
Base Malt
Some brewers will tell you that, in dark beers, your base malt does not matter — the intense flavors of the dark grains will just overpower it. I disagree. Even though the focus in a dry stout is on the roast, I think the base malt makes a difference. Choose a good quality base malt for your dry stout. The obvious choice would be a nice English pale ale malt, perhaps made from Maris Otter barley, or a Scottish pale malt made from Golden Promise. But don’t overlook the possibility of using a quality malt from the US, Belgium or Germany, or throwing a little Vienna malt in the mix.
Wheat malt can be used in small amounts (under 10% of the grist) to add a hint of wheaty “zing” and give a boost to the beer’s foam.
Adjuncts in Your Dry Stout?
Guinness is brewed with flaked barley as an adjunct and other dry stout makers use sugar as a kettle adjunct.
Flaked barley is just unmalted barley that has been extruded through rollers. There is a widely-held belief among North American homebrewers that this adds creaminess to the beer. However, this idea does not seem to exist anywhere outside of the homebrewing community. Professional brewers (who didn’t get their start in homebrewing) simply look at flaked barley as an adjunct.
Using cane or corn sugar as a kettle adjunct allows the brewer to make a drier stout compared to an all-grain beer. Both of these sugars are completely fermentable by brewers yeast. Adding them will boost your original gravity (OG) a bit, but your final gravity (FG) will remain the same. Adding up to 12% cane or corn sugar will yield an appropriately dry stout. Over that amount and the beer will simply seem thin and watery.
Sugar is not required when brewing a dry stout. There are many elements in the beer that contribute to its dry character and you do not need to maximize each one. As long as the beer has an overall dry feel to it, it can be a fine dry stout.
Using Malt Extract
If you are an extract brewer, you have two main considerations when brewing a dry stout. The first is whether you are going to use flaked barley. Your best bet would be to leave this out of your extract brew. However, if you do want to include some, you will need to “steep” some pale malt along with it at 150–158 °F (66–70 °C). Enzymes from the pale malt will degrade the starches in the flaked barley, which could otherwise serve as a food source for many contaminating microbes. For every unit of flaked barley in your recipe, add a minimum of two units of pale malt. (Three would be better if you use a UK pale malt.)
Your second consideration is making a wort that can be fermented to dryness. Malt extracts differ in their fermentability and you may need to replace some of your malt extract with refined sugar (corn or cane). Hopefully, you’ll have brewing notes to guide you on the FG and flavor of beers you’ve previously brewed with your favorite malt extract. If you’ve brewed reasonably dry beers before with a particular malt extract, you may only need to swap about 5% of extract for sugar. If your extract brews frequently seem a bit cloying in their sweetness, you may need to replace as much as 30% of the extract with sugar.
Dry Stout Strength
Dry stouts are session beers and, as such, are not very strong. The BJCP gives the range of acceptable starting original gravities (OGs) as 1.036–1.050, with 1.007–1.011 as target final gravities (FGs). The range of alcohol levels is given as 4–5% alcohol by volume (ABV). When formulating a dry stout recipe, keep in mind that a low original gravity (OG) translates to a low final gravity (FG), contributing to the overall dry feel of the beer. However, as mentioned, the dry aspect of the beer does not need to be maximized. You can brew a good dry stout near the high end of the specified OG range if you compensate for this in other areas.
Hops
In dry stouts, hop bitterness combines with the bitterness associated with the dark grains to enhance the roasty character in the beer. Bitterness levels are what we might today — in this age of double IPAs — call moderate. The BJCP give 30–45 IBUs as the appropriate target. Because dry stout is a session beer, the level of bitterness, although firm, should not keep it from being a highly quaffable pint. (On the other hand, given the shift in our perceptions, homebrewed dry stouts may be more hoppy and still qualify as a session beer for serious lupulophiles.) Dry stouts don’t typically show a lot of hop flavor and aroma, but modest late additions are acceptable as long as they don’t take the focus off the roast. For 5.0 gallons (19 L) of beer, I would recommend keeping the total amount of late hops under 0.50 oz. (14 g).
English hops are an obvious choice, given the style’s ties to Ireland. For bittering, Challenger, Target or other high alpha hops are appropriate. You could also use Kent Goldings or Fuggles, and these two hops would also work well for late additions. You could also use any “neutral” hop for bittering. The distinctive, citrusy American hops used in many IPAs are not expected in a dry stout.
Ale Yeast
Wyeast and White Labs both offer an Irish ale yeast — 1084 and WLP004, repectively — and these are popular choices for dry stouts. However, many English ale strains will do a good job in a dry stout, especially if they are relatively highly attenuative. Likewise, a “neutral” American strain — including the very popular strain available as Wyeast 1056, White Labs WLP001 or Safale US-05 — is also a good choice. If the yeast has enough character on its own to distract from the roast character, then it’s not appropriate.
Keep in mind that, although dry stouts are meant to be dry, they don’t have to be bone dry. You do not need to shy away from your favorite English ale yeast if it is only moderately attenuative. Dry stouts start at fairly low original gravities (OGs), so you can reach an appropriately low final gravity, even if your yeast strain is not among the highest attenuators.
Brewing Water
Just as the sulfate level can be adjusted in an American IPA to better accentuate the hop flavor and aroma, getting the right water chemistry for a dry stout will best showcase the aromatic roast character.
Darkly-roasted grains are more acidic than pale malts and — in a beer with a substantial portion of dark grains in the grist — the mash pH can be lowered to a degree that is detrimental. Likewise, the beer itself can end up too acidic and have a nearly sour character to it. When this happens, the roast character in the beer is rarely pleasant. With the proper water chemistry, however, the mash pH will fall into the correct range and the roast character in the beer will be presented in its best light.
To counteract the acidity of the dark grains, you may need to adjust your water chemistry.
If you are familiar with brewing water chemistry, then all you need to know is that you should adjust the residual alkalinity (RA) to match the color of the beer. (See “It’s the Water: Understanding residual alkalinity and pH” in the May-June 2005 issue for more on this.)
You can also try two other approaches to manipulating your water chemistry. The best of these two methods is to monitor the pH of your mash and adjust it accordingly. To do this, mash in as you normally would and let the mash sit for 2–3 minutes. Then, take a small sample and check its pH with a pH meter. If the pH is below 5.2, stir in a small amount of either calcium carbonate or sodium bicarbonate. For a 5.0-gallon (19-L) batch, add approximately a teaspoon at a time. Sodium bicarbonate has a larger effect on mash pH than calcium carbonate, so use it if you know that your water is soft or if your initial mash pH is 4.9 of less.
Continue checking the pH and adding carbonate until you reach a pH of 5.2. Stir the mash thoroughly with each addition and let it sit for 2–3 minutes before checking the pH again. Record how much carbonate you added to the mash and dissolve this same amount into your first wort. (Because of pH, it’s easier to dissolve carbonates into the mash or wort than to dissolve them into water.)
Finally, you can simply take a stab at hitting the right water chemistry, based on your previous brewing experience. If your brewing water contained sufficient calcium, but no carbonates at all, you might need to add as many as 2 tsp. (about 9 g) of sodium bicarbonate to every 5.0 gallons (19 L) of your brewing liquor. Based on this, a “shot in the dark” approach would go something like this:
If you typically brew a lot of dark stouts and porters and they taste fine, then your water chemistry likely does not need to be adjusted. If your best beers are almost always those that are the lightest in color, add sodium bicarbonate at the rate of 2 tsp. (8.8 g) per 5.0 gallons (19 L) of brewing liquor. (Stir roughly half of this into the mash at mash in; add the rest to the first wort.) If your best beers are usually amber, add sodium bicarbonate at the rate of 1 tsp. (4.4 g) per 5.0 gallons (19 L). You can adjust these numbers in subsequent brews.
Obviously, this last method is fairly crude, but you don’t need to have exactly the right level of carbonates to brew a successful dry stout.
However you choose to approach the preparation of your brewing liquor, always take good tasting notes and be prepared to make adjustments if needed. Even if you hit the proper mash pH, the final beer can still end up being too acidic. Conversely, if you overshoot on your carbonate additions, your beer can become overly astringent or even take on an unpleasant soapy character.
If you are an extract brewer, you should follow these same guidelines regarding how much to add. Stir roughly half of your total planned carbonate addition into your steeping water. Add the remaining amount when you dissolve your malt extract. If you are boiling less than your total volume of wort, add half of your total carbonate addition to the steep, a quarter to the boil and the final quarter to the beer in the fermenter.
Brewing Process
The process of brewing a dry stout is similar to brewing most other ales. However, as with other aspects of brewing this style, you need to focus on how your choices affect the roast character in the beer.
With their low original gravities (OG), dry stouts require less grain than normal-strength or strong beers. If some of the extract for the brew comes from sugar, this is doubly true.
When brewing an average strength ale, a common homebrew practice is to collect wort until the full pre-boil volume is reached. In a dry stout, this will lead to an overly astringent beer.
There is an optimal amount of wort that can be collected from any grain bill. Below this amount, the brewer has left fermentable sugars in the lauter tun. Over this amount and the brewer has likely extracted too many tannins from the grains. Dark grains are especially likely to give up their tannins if oversparged, so dry stout brewers should pay careful attention to the amount and quality of wort they collect.
After you have collected your first wort and started sparging, you will see your wort start to lighten. At this point, begin checking the specific gravity of your runnings. (A refractometer is a good tool for this, because you only need a drop and you do not need to cool the sample, as you would with a hydrometer.) When the specific gravity falls below 1.010, stop collecting wort. You should also taste your final runnings to gauge if they are becoming too astringent. After you stop collecting wort, add water to reach your pre-boil wort volume. From that point forward, follow your normal ale brewing procedures.
Brewing a great dry stout requires focusing all of your attention — from ingredient selection to process — on achieving a dry beer with an appealing roasted grain character. If you do this, you will be rewarded with a delicious dry stout — a wonderful session beer.
Dispensing a Stout with Nitrogen
If you’d like to push your dry stouts with nitrogen, to acheive the same effect as when Guinness or other stouts are, you’ll need some additional equipment beyond a standard keg set up. The techniques for preparing the beer to be served are also slightly different, but if you are able to keep a CO2 keg system running, you should have no problems with a nitrogen system.
Mixed gas cylinders are different from those that contain carbon dioxide. The threads on mixed gas cylinders are left-handed so that a mixed gas regulator cannot accidentally be attached to a CO2 cylinder. Additionally, the gauges have higher maximum readings because both the tank and dispensing pressure of the gas blend is higher.
Another difference between a CO2 setup and one with mixed gas is the faucet for dispensing nitrogen beers. Typically, these are taller and thinner. They are designed for mixed gas only.
Beers served with nitrogen are typically equilibrated and pushed with a 75%:25% blend of nitrogen:carbon dioxide. Nitrogen gas (N2) is much less soluble in beer than carbon dioxide — around 80 times less at beer serving temperatures. And, as with carbon dioxide (CO2), it does not react with beer.
American Pilsners have around 5,000 mg/L of CO2 dissolved in them. In contrast, beers served with nitrogen typically contain around 2,400 mg/L of CO2 and only about 20 mg/L of N2. Even though the gas mix is mostly nitrogen, the difference in solubility ensures that only a small amount of nitrogen enters the beer, compared to CO2.
The dispensing pressure for beers on mixed gas is considerably higher than for other beers. Guinness recommends, and most bars push nitro beers with, about 30 PSI of gas pressure.
To prepare your stout for a nitrogen tap, ferment as usual, but carbonate it very lightly. For example, if a dry stout is fermented at 68 °F (20 °C), it will already have nearly 0.8 volumes of dissolved CO2. Increasing this to the recommended 1.2 volumes (the target CO2 level for Guinness) would require only a little force carbonation if the beer is chilled to the recommended serving temperature of 43 °F (6.1 °C).
Force carbonation should be done with pure CO2. Trying to accomplish this with mixed gas requires much more time. (Even though the overall gas pressure on the beer is higher, the amount of CO2 in the mix is lower and thus the partial pressure of CO2 is correspondingly lower.)
To get a real “nitro pour,” you need to equilibrate the beer with the mixed gas. As with CO2, this can be accomplished by letting cold beer sit under pressure. However, given the low solubility of nitrogen, this can take a week or more. A faster way is to inject mixed gas into the beer through a carbonation stone. To do this, turn the regulator to 30 PSI and bubble the gas from the stone through the beer. You will need to release the keg’s headspace pressure whenever the flow of gas slows.
Ashton Lewis, Master Brewer at Springfield Brewing says, “We gas for 30 minutes, rest for 30 minutes and gas for 30 minutes.” Once the beer is ready to go, connect the gas fitting of the keg to the mixed gas regulator and cylinder, and the beer fitting to the dispensing line. Open the mixed gas cylinder fully, adjust the pressure at the regulator, if needed, to serving pressure.
With 30 PSI of pressure behind it, won’t your dry stout shoot out of the tap as if from a fire hose? The answer is no, because a key element of a nitro tap is a small disc called a restrictor plate. This plate forces the beer to flow through through tiny holes (usually five). This agitates the beer and causes nitrogen bubbles to be released so it has a cascading head when first poured. The plate also counteracts the high serving pressure and slows the beer to a reasonable flow rate. If you’re a big fan of dry stouts, the extra expense and effort required to get a nitro pour is worth it.
Dark Roasted Grains
A variety of dark grains are available for the homebrewer here are brief profiles of three of the most popular:
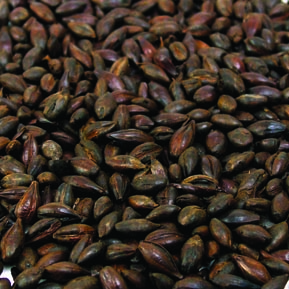
Roasted Barley
Roasted barley is made by roasting unmalted barley at 221–233 °F (420–450 °C) for about 3.5 hours. After this time, it reaches approximately 500 °L. Roasted (unmalted) barley is highly aromatic, with coffee-like notes being the most prominent aroma.
Chocolate Malt
Chocolate malt is a malt which, as the name implies, has a flavor and aroma reminiscent of chocolate. The roasting profile for chocolate malt is 221–233 °F (420–450 °C) for around 2.5 hours. This produces a dark malt with a color of 350–500 °L. US versions are generally on the lower end of the color scale while British versions are darker. There are also dehusked chocolate malts that are less bitter than their regular counterparts. In addition, there are chocolate versions of rye malt and wheat malt.
Black Malt
Black malt, or black patent malt, is kilned at 221–233 °F (420–450 °C) for up to 4 hours. It has essentially the same roasting profile as roasted barley. However, because it is malted, almost all of the volatile compounds are driven off in the kiln. Since much of what we perceive as flavor is really aroma, black malt is fairly neutral, with a bitter, deeply roasted (but not burnt) character — it is more subtle than you may have been led to believe.


