A Walk on the Wild Side
Years ago, while I was serving as a US Peace Corps volunteer in Ghana, West Africa, I loved ending my day with a drink or two of whatever local beverage that might be available in town. In my community, located in the rainforests of the hinterlands, that beverage was palm wine. There were two different types to be found in my area, coconut palm wine and wine made from the oil palm tree. Coconut palm wine was made by tapping the top of the coconut tree and allowing the palm sap to drip into a container. The sap would catch bacteria and yeast living amongst the palm fronds and ferment spontaneously. The result was a tart and fruity beverage that reminded me a lot of a hard apple cider with just the faintest whisper of sulfur. On the other hand, wine from the oil palm tree was made by cutting down trees, cutting a hole in the center of the trunk, and placing a container underneath that hole to collect the sap. The sap from the oil palm collected bacteria and yeast from the trunk of the tree, the collection vessel, and the surrounding soil. Oil palm wine tastes very sweet and crisp, almost like a sparkling dessert wine with no hint of the sulfur notes found in coconut palm wine.
As a brewer, what struck me was that from community-to-community, town-to-town, coconut palm wine always tasted crisp, tart, and sulfury, and oil palm wine always tasted like sparkling dessert wine. This suggested something that I had been taught was unachievable in a spontaneous ferment — consistency. Palm wine is a beverage that reflects the birth of the human love affair with fermentation. It presents itself as nearly complete, needing little technology beyond a cutting edge and collection vessel, yet in the tropical heat, the sap of the palm tree transforms into a beverage whose progeny has been credited with the development of civilization.
While it could be argued that palm wine is a unique case, Ghana was full of spontaneous ferments, each made by brewers that took just as much care in their product as modern Western brewers do. In northern Ghana, palm wine was replaced by pito, a beer made from millet. It is produced in a manner that would be recognizable to any Western brewer: Malting, mashing, lautering, boiling, and fermenting. Pito is inoculated with a handful of fresh malt and fermented in small vessels for single serving. As fermentation occurs, the protein-rich wort forms a thick kräusen that hardens across the top of the vessel. This kräusen cap serves two purposes; the first is to protect the beer inside from any insects, dust, or debris that might fall into the beer, the second to create an anaerobic or oxygen-free environment for the beer to ferment, much like the airlocks commonly used in homebrewing. When the pito is served, the hardened kräusen is cut away, exposing the fresh beer, and the beer is poured into a clean calabash (a drinking cup made from a gourd) for service.
In pito-making communities, one can always find people who are brand loyal to a particular brewer. What is left unsaid about favored brewers is the same attribute that could be found in the palm wine — consistency. A brewer does not have the best tasting pito sometimes. They have the best pito every time, and indeed, as I sampled the offerings from my local brewers, I was able to discern a specific taste that each brewer tried to cultivate.

Ghana is not unique in this respect. Around the world, people are making spontaneously fermented beverages that are every bit as consistent as those found in the breweries of the Western world. The key to understanding how this consistency is achieved is to first recognize that traditional beverages are controlled almost entirely through process. Consistent process equals consistent product.
Let’s start with a little history
In the typical Western brewery, the language around beer is often shaped by the German purity law of Reinheitsgebot, which stated that beer could only be made of water, barley, and hops — yeast being added later. These ideals seem to be good for brewers, and consumers, but this law turned brewing dogma set the stage for a brewing culture that has problematic perceptions of beer and ingredients. This is most apparent in what the industry calls clean beer and dirty beer (or wild, or sour beer, as it is marketed). Clean beer is beer made with a single, or pure, strain of Saccharomyces cerevisiae for ales or Saccharomyces pastorianus for lagers. Dirty beer is any beer made with the addition of, or exclusively by, any other strain of bacteria or yeast like Lactobacillus sp. and Brettanomyces sp. Clean beers often move freely through a brewery while dirty beers are segregated to their own systems. If dirty beer organisms creep into the clean beer, that beer is considered contaminated and is often discarded. In a brewing culture where any mixed ferment is considered dirty, it is no wonder that the practice of spontaneous fermentation has been given pariah status amongst pro brewers and homebrewers alike.
Despite the dominant thinking in brewing culture, there are some breweries that are rediscovering the benefits of spontaneously-fermented beverages, benefits that can be easily exploited in a homebrewing setting. To help understand the benefits of spontaneous fermentation, it is helpful to look at another industry that evolved symbiotically with brewing -— baking. Baking was once driven exclusively by spontaneous fermentation, just like brewing. As brewers began to isolate yeast, the excess slurry was then utilized in bread production. The rise of microbiology allowed for bakers and brewers alike to isolate microorganisms and shift from diverse-population ferments to isolated ferments. This shift in the bread-making world is personified by the Wonder Bread loaf.
While Wonder Bread is a milestone in the industrialization of food, it offers little in terms of flavor, texture, and aroma. To achieve consistency, those attributes were left behind. The industry then re-educated the public to prefer these white enriched breads to those that were traditionally fermented. As a result, traditionally-fermented whole wheat breads disappeared from the grocery store shelves. Fortunately for consumers, traditional baking techniques made a resurgence at the end of the twentieth century, and true, spontaneously fermented breads were readily available to the public again. The return of these breads allowed consumers to rediscover the complexity of flavor, aroma, and texture that a mixed spontaneous ferment can provide.
A World of New Flavors
So why are these spontaneously fermented products offering more flavor and aroma? It comes down to the ability of each individual organism to produce volatile and flavor compounds. The yeast utilized in soft white bread production has been selected to consume sugar and release carbon dioxide. It is in the industry’s interest to maintain a yeast that performs consistently with their current processes. This is also reflected in the commercial brewing industry where light American lagers depend on isolated yeast lines that perform predictably. This is not intended to disparage these beers. Producing these light and delicate beers in multiple locations across the country, with differing water chemistry, malts with varying profiles, and hops of various ages and acid contents is extremely difficult when the goal is to create a brand that tastes the same no matter where it is manufactured. To accomplish this, brewers need to know exactly what compounds will be produced during fermentation.
In a spontaneous ferment, a variety of organisms are producing a large number of metabolites that contribute to the flavor of the end product. Bacteria are widely associated with acid production. They are what cause the sour in sourdough bread, but acids are not just to produce sour beers and breads. Besides having unique flavors of their own, organic acids contribute complexity to a food source in combination with other compounds. Most of the fruit we eat contains acid, including fruits that are not commonly associated with sour flavors. Watermelon has a pH between 5 and 6. While this is close to neutral, that little bit of acidity contributes a lot of flavor to the fruit. For sweet tea drinkers, a little bit of lemon helps brighten up the sweetness and make the drink more refreshing. This is what organic acids bring to fermentations. They play a supporting role to other flavors, or step forward and serve as the backbone of flavor. We see the latter in the rise of sour beers in the last ten years.
Bacteria also perform a number of other functions that can be beneficial to the overall health and flavor of the beer. Acid-producing bacteria help create an environment that is hostile to parthenogenic, or disease-causing, bacteria. This is very important when brewing under traditional conditions where StarSan and iodophor are available. Some lactic acid bacteria (LABs) produce tiny peptide (protein) chains called bacteriocins that will perforate the membranes of other bacteria, preventing them from proliferating and causing spoilage or toxicity in the wort.
From a flavor perspective, bacteria can secrete a variety of volatile compounds that will lend complexity and richness to a beverage. This can most readily be seen when sampling a beer that has been soured in the kettle versus one that has barrel aged. A kettle sour usually involves pitching an isolated strain of LAB into the kettle after runoff. This bacteria is typically good at making lactic acid and not much else. The result is a beer that is quite sour, with a little citrus, and a large amount of flavor that I associate with my favorite childhood chewable vitamin. On the other hand, the ecology of a barrel or foeder is very complex, with a variety of organisms contributing dozens of compounds to make a more sophisticated product. The rich tropical and stone fruit flavors that emerge from a barrel are often the result of bacterial or Brettanomyces fermentation, and a lot of those flavors are developed by organisms making one compound that is then utilized by another organism to make a completely different compound. Over time, this compound swapping generates a beverage that offers more to the palate than simple isolation and segregation.
So, let’s talk about contamination. For the sake of this discussion, let’s define contamination as the presence of an organism, or organisms, that produce compounds that make a beverage unpalatable. It’s an intentionally broad definition, but when trying spontaneous ferments for the first time, brewers are often presented with flavors they are not used to encountering, but that doesn’t necessarily mean the beverage is bad or infected.
Craft beer drinkers encounter this every few years. There was a time when Samuel Adams Boston Lager was considered too malty and hoppy. A decade later brought the rise of the American IPA. After that, barleywines and Scotch ales reappeared on the market. The 21st century brought the farmhouse ale where previously avoided flavors like goat, barnyard, and horse blanket became the norm. Today, barrel houses and foeders are taking up almost as much space as fermenters in many commercial breweries.
A year of Spontaneous Fermentations
Given the craft beer drinker’s ability to remain open and accepting of new flavors, it makes sense that homebrewers look to spontaneous fermentations to seek out new sensory experiences. This is why I decided to take a year to exclusively ferment spontaneously. I had already
encountered many spontaneous beverages with consistently delicious flavors, and I couldn’t forget the fact that every modern beer style grew from a tradition of spontaneous fermentation.
Since these types of efforts are best done with a buddy, I reached out to my oldest friend and brewing partner Brian Wolf to see if he was willing to engage in this exercise with me. Brian is one of the most natural brewers I have ever met. When I think I’m on the edge of flavor, I find him foraging miles ahead of me. He said yes, and we divided up the brewing schedule so we could try as many different techniques as possible. I took mead and sour beers. Brian took standard beer and sour tonics. So, for the remainder of this article we’re going to share our findings.
Let’s begin with mead.
Strawberry Rhubarb Mead
We are going to start with mead because, in all likelihood, human’s love affair with alcohol started with mead. With some historians estimating mead’s origins at some 40,000 years ago, this beverage predates the rise of agriculture by almost 10,000 years. Needing only water and raw honey, it reflects a time when dense reserves of sugar were rare to early humans. What makes honey such a great substrate for spontaneous fermentation is it comes ready to work. Honey is food storage for bees. During the spring and summer, bees forage flowers for nectar, the pools of sugary water that sit at the bottom of flowers, but nectar isn’t the only thing that is collected. Wild yeasts, which can also be found among the sugar in flowers, are also taken up by the bees and flown back to the hive. Once there, the bees convert the nectar into honey and then evaporate the excess water, trapping the yeast inside the cell of the honeycomb. With much of the water gone, the trapped yeast cells go dormant.
The first versions of mead were likely accidental. Since such concentrated reserves of sugar were rare, one could imagine water being used to thin out or extend the honey so that it could be shared or made to last longer. With enough water added, the yeast are suddenly able to access the sugar. With protein, usually present in the form of pollen, the yeast can grow and flourish. The honey then comes alive and transforms from nutrient to intoxicant. Imagine the delight of that first intrepid soul to bring that freshly fermented honey to lips unfamiliar with the heady effects of alcohol. Although we are a lot more knowledgeable about what’s really happening in our ferments, the first time making mead using traditional methods is exciting nonetheless.
The first question when making mead is what honey to use. Commercial honey comes in many forms. A lot of the honey North Americans find in grocery stores is pasteurized and filtered for clarity and stability. If this is the only honey you have access to, then that’s fine. The process we will describe will still work. There are also expensive varietal honeys like orange blossom or buckwheat. I would not recommend spending money on these for this particular application. The subtle variations in flavors may get lost in the process.
For this project, I sourced my honey from a farmer at my local farmer’s market in Baltimore, Maryland. Lots of farmers keep hives to encourage pollination of their crops. After a brief conversation, I acquired a gallon (4 L) of dark raw honey. If you can source honey like this, it is ideal for this traditional application. It comes with everything you need to make a great traditional mead. This was made evident about a week after I made my first spontaneous mead, as I had left a little water in the bottle to rinse out the last bits of honey. Things happened and the jug got placed in the cabinet and forgotten about, only to be remembered a few days later when it exploded in the cupboard. The takeaway is that raw unfiltered honey is alive. If you cannot source this kind of honey, then any type of honey will do. Just make sure it’s free of sulfites, as these will retard microbial growth.
Wild Strawberry Rhubarb Mead
(6 gallons/23 L)
OG = 1.058 FG = 1.012
ABV = 6.1%
Ingredients
10 lbs. (4.5 kg) raw honey
2 lbs. (0.91 kg) fresh rhubarb
2 lbs. (0.91 kg) fresh strawberries
3 organic apples
1 small handful of raisins
Juice from 1 lemon
Water up to 6 gallons (23 L)
1⁄4 cup dextrose (if priming)

My Spontaneous Strawberry Rhubarb Mead was made in the spring. The steps are easy. Sanitize your vessel and utensils. Mix the honey with six gallons (23 L) of water. Wash all of your fruit, but do not soak in sanitizer. Slice the rhubarb thinly and float on top. Cut your apples into small cubes and add with the raisins and lemon juice. If you are not using raw unfiltered honey, the yeast from your spontaneous ferment will come from your apples and raisins. Yeast settle on fruit and gain access to the sugars inside if the skin is nicked. We most often see this on the chalky blush seen on fruit, particularly grapes, plums, and apples. This is the white stuff on the outside of raisins. By tossing a handful of raisins into your mead, you are essentially pitching yeast into your must. This is why a lot of old country wine recipes will include a handful of raisins.
Once all your ingredients are added, stir vigorously to aerate and seal your fermenter normally. Continue stirring vigorously twice a day until active fermentation is recognized, then seal and tuck in a cool dark place. In the warm spring of Baltimore, this took about three days, but times may vary depending on your climate. This aeration serves two functions. First, yeast need the oxygen to form cell membranes and facilitate replication. Second, by stirring the fruit, you can delay the formation of mold before you seal off the fermenter and the environment becomes anaerobic. Now, practice patience. This type of mead will be underpitched, so it can take weeks to ferment. Don’t panic. After the first week, rack the mead off the fruit and stick it somewhere it can sit undisturbed. Check on it weekly. If a pile of yeast forms on the bottom, rack it again to avoid any meaty dead yeast flavors.
I bottled it with 1⁄4 cup of dextrose for priming and cellared it for three months. The resulting mead was semi-dry with lots of jammy strawberry flavor. Any lingering sweetness was balanced by the rhubarb and lemon juice additions. Lightly effervescent, it was the perfect reminder of spring with the cold days of fall rolling in.
With the success of the mead, I was excited to try my next experiment, a sour-mashed Berliner weiss.
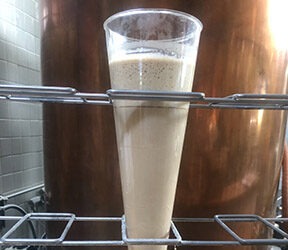
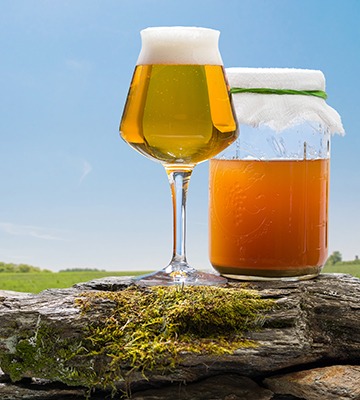
Sour-Mashed Berliner Weiss
The most challenging part of this exercise was sourcing the yeast. Mead is much more forgiving in a spontaneous ferment than beer. Since honey is partially antimicrobial, it is not as susceptible to rogue bacteria as wort. That being said, I wanted to make sure I created a beer that was 100 percent spontaneous while still making something that my palate would not just tolerate but enjoy. To do this, I set up a series of yeast traps in my neighborhood. These traps are simple. I boiled a malt extract solution with a few hop pellets (because alpha acids from the hops inhibit LAB growth) and put one pint of the solution into a 1-quart (1-L) mason jar. The gravity of the solution was about 1.044. I then covered the jars with cheesecloth and set them in different places in my neighborhood. When picking places to set your traps, it’s important to put them in clean locations where they are not likely to be disturbed. After a couple of days, the solution will start to show signs of fermentation.
Once fermentation begins, collect your jars and evaluate them. First smell them. Discard any that smell funky or have turned unusual colors. Keep the ones that pass the smell test and eye test to ferment further. Transfer into growlers with airlocks and additional hopped malt extract syrup to increase the yeast population. Once that spontaneous collect has been propped up, it’s time for a taste. For food safety, it is a good idea to test the pH of your prop before you taste. If your pH is 4.6 or below there is a minimal risk of encountering something that will make you sick. This is also the pH that Clostridium botulinum will not produce toxin, so if you have any questions about any ferment, do a simple pH test before you taste. Once you have picked the yeast, it’s time for the mash.
Spontaneous Tropical Berliner Weiss
(5 gallons/19 L, all-grain)
OG = 1.049 FG = 1.010
SRM = 4 ABV = 5%
Ingredients
5 lbs. (2.3 kg) pale malt
5 lbs. (2.3 kg) wheat malt
2 qts. (2 L) passion fruit juice
2 lbs. (0.91 kg) pale malt, uncrushed
Extract option: You can brew this recipe as an extract version by replacing the 5 lbs. (2.3 kg) each of the pale and wheat malts with 5.4 lbs. (2.5 kg) wheat dried malt extract. Keep the passion fruit juice and uncrushed pale malt the same. Bring 5 gallons (19 L) of water up to about 185 °F (85 °C) and stir in the dried malt extract. Hold for about 15 minutes then cool. Add the uncrushed malt when the temperature dips below 100 °F (38 °C).
This recipe involves a sour mash. As discussed earlier, a spontaneous sour mash provides a variety of complex flavors that are difficult to achieve in a kettle or without a barrel. Sour mashing also makes it easy to use huskless grains like wheat and rye as many of the bacteria will break down the beta glucans that cause mashes with these grains to be gummy.
To begin, mash in the first 5 lbs. (2.3 kg) of pale ale malt and the 5 lbs. (2.3 kg) of wheat malt at 154 °F (68 °C). This will favor alpha amylase conversion, which will leave more residual sweetness, a fuller body, and will prevent the final beer from being overly dry due to the long mash. Let the mash temperature drop to 100 °F (38 °C). Once the mash hits temperature, sprinkle the remaining 2 lbs. (0.91 kg) of uncrushed pale malt onto the surface of the mash and push it gently into the grain bed. Loosely close your mash tun and leave it for the night. This last grain addition is introducing the LABs that are going to ferment the sugars in the mash.
After about 12 hours, the mash should be fermenting vigorously. Be sure to maintain the temperature at 100 °F (38 °C). This is the best temperature to favor LAB growth while discouraging the growth of spoilage or pathogenic bacteria. You can do this by adding a gallon (4 L) of boiling water to the mash. With my system, I had to do this twice a day. The boiling water helps maintain temperature, and it also prevents the number of bacteria from growing out of control. Full disclosure, this process is funky. It produces a lot of sulfury volatiles that are reminiscent of feet or armpits. Don’t lose heart. These aromas will blow off in the boil. Once the pH of your mash drops below 4.6, you can start to taste it to determine if the sour level is where you want it. Once you like the level of sourness, run off your wort. You will not need much sparge water as your mash will be very soupy from the boiling water additions.
Boil your wort for at least an hour to kill the LABs and blow off any volatiles that are still present. Cool your wort and transfer into your fermenter as normal. Pitch your harvested yeast and ferment for a week. Rack into a secondary and add the passion fruit juice. Finish and package to your preference.
I love this beer. I have made it every year since my first experiment. Sour mashing gives the beer lots of pineapple and citrus complexity that go naturally with the passion fruit. It is light-bodied and refreshing, and does not last long in the kegerator.
While I was feeling proud of myself over my spontaneous beverages, Brian was taking things even further. He began with his Pumpernickel Sourdough Beer. So, with that, we’ll pass this article off to Brian to allow him to explain his procedures.
Pumpernickel Sourdough Beer
As a brewer, I was initially terrified of the idea of brewing wild. Brewing for me had long been an exercise of me exerting my will on water, barley, hops, and yeast. Giving up any control felt like it would be diminishing my role as the brewer. So I gave some thought to what is wild, and how can I have a final product in mind if I can’t control all the inputs. What I came to realize is wild doesn’t have to mean unknown. At any given time I have several fermentation projects in progress, but my longest running is my sourdough culture. It is a wild culture I started about 10 years ago when I started baking bread. I have used my sourdough culture literally hundreds of times. I know its flavor profile. I am very aware of the kind of sour and funk it provides. Once I zeroed in on my culture, I knew exactly how I wanted to harness the flavor profile to make beer. So I set out to make a sourdough pumpernickel beer.
First, the sourdough culture. A sourdough culture can be purchased from online retailers. When you buy a starter, it may come dry or as a liquid. You can also get a sourdough culture from a friend or neighbor. In Columbus, Ohio, where I live, there are frequent requests on our neighborhood Facebook group for sourdough starters. You probably have that kind of resource wherever you are too. But if you can make it yourself you’ll never be without.

Making a sourdough starter and growing it into a mature culture is easy. Start small, mix a tablespoon or two of good quality flour and an equal volume of water and set it out, covered, at room temperature. It should start showing signs of fermentation in a day or two. Once it is bubbling from fermentation, remove about half of the volume and feed the remainder with equal parts flour and water. You repeat this feeding every couple of days, increasing the amount that you feed each time. After a couple of weeks, you will have a mature culture that you can keep in your refrigerator. Just remember that fermentation is always going on in that culture so be sure to burp off any built up pressure to avoid fridge explosions. This culture will improve most any bread recipe and can be used as the sole leavening agent in long-fermented sourdough breads. But today we are going to use it to make beer.
Pumpernickel Sourdough Beer
(5 gallons/19 L, all-grain)
OG = 1.061 FG = 1.016
IBU = 13 SRM = 14 ABV = 5.9%
Ingredients
9 lbs. (4.1 kg) Maris Otter pale malt
2 lbs. (0.91 kg) rye malt
1 lb. (0.45 kg) flaked rye
2 oz. (57 g) crystal malt (60 °L)
2 oz. (57 g) chocolate malt
8 oz. (227 g) molasses
3.5 AAU Hallertau hops (60 min.) (1 oz./28 g at 3.5% alpha acids)
1 loaf pumpernickel bread
3 oz. (85 g) ground toasted caraway seeds
2 cups sourdough culture
Extract with grains option: Swap out the Maris Otter pale ale malt, rye malt, and flaked rye with 6.6 lbs. (3 kg) rye liquid malt extract. Replace the crystal malt (60 °L) with 2 oz. (57 g) Carapils® malt and finally add 8 oz. (227g) of table sugar to the ingredient list. Place all the crushed grains in a muslin bag and steep the grains in 5 gallons (19 L) of water as it heats up to 185 °F (85 °C). Remove the grains, allowing the sugary liquid to drip back into the kettle. Add the liquid malt extract, molasses, and table sugar then bring to a boil.
In making the Pumpernickel Sourdough Beer I built a grain bill similar to what I would put in pumpernickel bread with the Maris Otter base malt taking the place of wheat flour. I did a standard single infusion mash with 4 gallons (15 L) of water resting for one hour at about 152 °F (67 °C) to emphasize a fuller-bodied mouthfeel. I then fly-sparged with 3.5 gallons (13 L) of water, collecting a total of 6.5 gallons (24.5 L) of wort. Original gravity (OG) readings came in at 1.061.
I proceeded with a standard 60-minute boil, added the hops at the beginning to lay in a nice base of bitter. With 15 minutes left in the boil I added the one thing I was 100 percent certain would add a truly pumpernickel bread flavor . . . a loaf of pumpernickel bread. I got the idea from a local brewery that makes an apple fritter beer and they add a couple hundred fresh apple fritters from a local bakery at the end of the boil so I knew this was only marginally crazy. I sliced the loaf and added it in an old grain bag to help minimize the mess in the kettle.
After the boil I chilled the wort down to 68 °F (20 °C), added the ground toasted caraway seeds, and pitched the entirety of the starter I made with the sourdough culture.
About 3 days before brew day I took two cups of my sourdough culture and put it in a 1-gallon (4-L) jug and topped that off with water. A few times a day I would give that a swirl to keep things in suspension as best I could. On brew day we tasted some of what was in the jug and it was by far some of the most deliciously lactic and funky stuff I had ever tasted and I knew right then that this would be a successful beer.
The beer was fermented in my basement, which is always at the cool end of the ale range, around 66 °F (19 °C). I bottled the beer about one month later giving the wild yeast plenty of time to convert sugar. And after a few weeks in the bottles to prime, this beer was exactly what I wanted — sour, funky, yeasty with the depth of flavor you expect from a brown bread.
Sour tonics
Our experience with the traditional ferments eventually lead us to Eastern Europe and a traditional fermented beverage called kvass. Kvass is a sour tonic, meaning it has a refreshing sour taste and its alcohol content is typically below 2% by volume. In places like Ukraine, Russia, and Poland, kvass is as popular as Coca-Cola. While doing research, I mentioned what I was doing to my friend Olena, who is originally from Ukraine, and she got all misty-eyed and told me of her love for the stuff. How, as a child she would line up at the kvass wagon and wait her turn and buy a drink, from a communal tin cup, and get a bottle filled up to bring home to the family.

After seeing her nostalgia for the beverage, I knew I had to try some for myself. As luck would have it I was taking my kids to New York City, and not far from where we were staying was a Russian bakery that had a few commercial examples to taste. I immediately understood why Olena could love kvass so much. They were all light, sweet, and just sour enough to cleanse the palate. While I was at the bakery I struck up conversation with the owner, Arseny, who also had a lifelong love of kvass and recounted similar childhood stories as Olena, standing in line at the kvass wagon waiting his turn to buy a cupful from the local purveyor. But he didn’t stop there. He ran into a back storeroom and brought out a jar of a kvass concentrate and a hand written family recipe. The extract was in a jar with nothing but Russian writing, and Arseny assured me the concentrate was a “just-add-water” type of thing. When I got back to my home in Ohio, I put both the extract and the family recipe to the test.
The concentrate only needed water, sugar, and time, and when it was done, it was a satisfying, lightly sweet, tangy beverage. The family recipe, while a little more work, had a depth of flavor that significantly surpassed that from the concentrate. I’ve adapted that recipe so that is it easy to scale to any size increment you may like.
Kvass
Rye Bread: 1 lb. (0.45 kg) for every gallon (4 L) of finished product. This is the backbone of your kvass. You should seek out the best quality rye bread you can find. It should be a dark color and deeply flavored. I would also suggest no added oils as they impact head retention in your finished carbonated beverage. Also avoid rye bread with any preservative that could impede fermentation.
Sugar: 13 oz. (370 g) white table sugar per gallon (4 L) of finished product. I prefer cane sugar, but beet sugar, raw sugar, or brown sugar would all be fine too.
Culture: 2 Tbsp. of sourdough starter per gallon (4 L) of finished product.
Water: Enough water to hit your target volume.
Process:
• Cube bread and toast in oven at 350 °F (175 °C) for about 10 minutes or until browning is apparent.
• Soak bread overnight in about as much water as you are expecting for your finished product.
• Strain bread mush and squeeze as much excess liquid as you can.
• Stir in sugar.
• Top up with water to expected volume.
• Pitch culture.
• Let ferment 2–5 days, tasting along the way. When it tastes good it is ready to drink.
• Bottle and leave at room temperature one day to carbonate, then move to fridge to avoid bottle bombs.
While I was experimenting with the bread kvass my wife happened to be harvesting beets from the garden and, well, I love fermented beets. Beets ferment really well and super easily. Chop or slice the beets as you like, put them in a jar and cover them with a 3% salt water solution and set it aside for some time. The beets naturally have enough Lactobacillus to start fermentation. After enjoying a few batches of fermented beets I realized I liked the beet brine as much as beets themselves, so I set out to refine the brine as a beverage. This led to making a beet kvass, which turned out to be incredibly simple.
Start with one bunch of purple or golden beets for every half-gallon (2-L) of finished product. Roughly dice the beets to about half inch (1.3-cm) cubes. Don’t stress; the beet chunks will most likely go into the composter when you are done because they give up their entire flavor to the beverage. Put your chopped beets into a fermentation vessel and top off with water. Ferment open, but cover with cheesecloth to keep out critters. That’s it. You will know it’s done when it tastes good. The timeline will vary based on temperature, sugar content of the beets, and viability of the microbes on the beets, but it generally takes three to five days for beet kvass. It’s light and refreshing and my wife loves it. If you like the bubbles, then bottle it similar to the earlier instructions.
Any sweet root vegetable would be a good candidate for this treatment. I have also done this same treatment with a mix of greens, butter lettuce, arugula, and dandelion greens, which resulted in a light and crisp beverage but with more vegetal flavor.
Final Thoughts
For most homebrewers, brewing wild is a leap of faith, but we would like to remind our brewing community that brewing, for centuries, was left in the hands of the faithful. Spontaneous fermentation allows brewers to develop beverages that truly reflect the spirit of pursuit that led to the rise of civilization. It allows you to create unique flavors that reflect the ecology of your locality and demands mindful application of thoughtful technique. Most of all, spontaneous fermentation opens a window into the joys of those first intrepid steps towards beer and brewing. Once you start, it is easy to understand how our ancestors could watch a vessel, once still, come to life, and see the divine.