Beer the Partial-Mash Way

Let’s say you want to work with the Belgian aromatic malt that you tasted in the shop, but don’t want your brewing process to become too complicated. The answer is partial or “mini” mashing. As the name implies, with partial mashing you are relying upon grains to supply a small percentage of your wort, with the balance coming from the use of malt extracts. This allows you to be somewhat easygoing with your mashing procedure.
The key to easy “mini-mashing” is to relax and remember that all you need to do is ballpark everything. Because malt extracts will always give us a pre-determined amount of fermentables and a pre-determined base flavor profile simply by opening the can, we are working around the edges of the beer’s profile when we work with grains. And those edges don’t have to be exact to make or break our beer. As long as we keep the various parameters within the ballpark, our beers will come out just fine. One caveat: just as the idea of “ballparking it” implies, you cannot go into this expecting to nail a specific color or gravity.
I mentioned aromatic malt. What are some of the other malts that really should be mashed? Why can’t they simply be steeped, like so many recipes call for? (While both mashing and steeping involve soaking grain in hot water, mashing has very specific time and temperature requirements for converting starch to sugar.)

When barley is malted, chemical reactions occur that make it possible for the brewer to turn starch into sugar during the mashing process. Base malts have undergone this process, and now only need the knowledgeable brewer to turn the starch into sugar. These base malts are known by a variety of different names, with the most widely-used base malts being Pilsner, lager, pale ale, pale, Munich, Vienna, mild, aromatic, wheat and rye malt. Because these malts still have significant amounts of starch, their use without mashing may impart some flavor characteristics, but not the full range possible. And you will most certainly invite a haze in your beer from the dissolved, unconverted starches. The other class of malts is commonly referred to as specialty malts. These have had further processing at the malting facility and most of the starches have already been converted to sugar. To make use of specialty malts — such as crystal, chocolate, black and biscuit malts — one need only steep them in water to leach out the sugars and flavor profiles.
Most malt extracts are produced, depending upon their purpose, using different amounts of Pilsner, pale, crystal, wheat, chocolate and black malts. While this may cover most beer styles well, what about bocks? Or rye beers? Other styles that are difficult to reproduce using only malt extracts are Oktoberfest, Märzen and Belgian abbey beers. One of the more inventive uses of Munich malt is in really high IBU American-style IPA’s. A group of intrepid homebrewers out of the Pacific Northwest discovered in the late 80s that generous amounts of Munich malt allowed IPA’s to get really, really bitter, while still retaining some malt balance. So let’s make a really hoppy IPA. We’ll “just keep it in the ballpark” by using malt extract and a simple “mini-mash.”
Instant Karma IPA
- 6.6 lbs. Coopers light malt syrup
- 1 lb. Coopers light dry malt extract
- 2 lbs. Dingeman’s Munich malt
- 0.5 lb. Dingeman’s aromatic malt
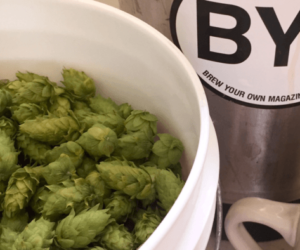
- 3 oz. Columbus hops
- 2 oz. Cascade hops
- White Labs WLP001 (California Ale) or Wyeast 1056 (American Ale) yeast
Using fresh malts is key with any type of brewing! If Columbus hops are not available, use Centennial.
The Tools:
In addition to your regular brewing pot and fermenting vessels, you will also need:
- Dutch oven, or other large pot with a
lid, capable of holding at least seven
quarts, that you can put in the oven. - A large spaghetti colander.
- A sauce pan, capable of holding five quarts of water.
- A thermometer.
The Mini-Mash Procedure:
Begin by bringing 1.25 quarts of water per pound of grain that you are mashing up to a light boil in the saucepan. If your pot or Dutch oven is not capable of holding this volume, you can reduce the quarts per pound to 1 quart per pound. Whenever convenient, I like to boil the water I’m using to boil off any chlorine. In the case of our IPA recipe, we will be boiling 3.5 quarts. After a five-minute boil, remove the pot from the stove and allow the water to cool to around 160–170° F. It is not necessary to put the lid on while it cools.
While waiting for the water to cool, turn your oven to its lowest setting. On my stove that is “warm” and it gets the inside up to about 160° F, which is just about perfect. As long as the temp inside your oven is between 140–160° F, you will be just fine. Once your water is in the 160–170° F range, transfer it to your Dutch oven and slowly mix in the crushed grains. Make certain you add the grains slowly enough to prevent dry clumps. After your “mash” is thoroughly mixed, put the lid on your pot and put it in the oven for 30–45 minutes. If the lowest setting on your oven leaves you a bit warm, turn the oven off just before you put the pot in it. The temperature of the oven and the mash will stay close enough to achieve the desired results.
Resist the urge to peek while the grain is working! If you let off too much heat and the temp drops below 145° F, you will have to get the temp back up and that risks getting the mash too hot. Best to just leave it to its own devices. After your mash has been in the oven for 30–45 minutes, pull it out. It’s time to get the goodies out of grain! While your grain was in the oven, the starch in the grains was being degraded into sugar, and all the flavors these grains will impart were being drawn out. Place the spaghetti colander over your brewing pot. You may need someone to hold it for you. Dump the grains into the colander, making certain any liquid runs off into your brew pot. I am not able to get a full 2.5 lbs. of mash into my colander. Don’t worry, just put as much in as you comfortably can. Pull a few cups of hot tap water and slowly pour it over the mash. Repeat this until you have slowly poured roughly 1.5 quarts of water per pound of grain that you mini-mashed over your entire mash, in this case roughly 3.75 quarts.
While you are waiting the 30–45 minutes, bring 1.5 quarts of water per pound of grain used to a light boil in a large pot. After boiling for five minutes, take it off the heat and put a lid on it, allowing it to cool somewhat. You want the temperature of this water to be between 140–170° F; basically hot, but not boiling. If your colander is capable of sitting on the top of your brew pot without the help of an assistant, then you can slowly pour the water over the grains, allowing the liquid to collect in your brew pot. Otherwise, I recommend ladling the water over the grains to prevent possibly burning your brewing partner and being forced to drink alone. If you have not been able to get all the grain into your colander, then rinse the grain in shifts. Save enough water to finish rinsing any grain still in the Dutch oven. After you have rinsed the grains with all the water, you are finished with them. And you are done mini-mashing. Congratulations! Add additional water to your brew pot to get up to the volume of water you traditionally use for your extract brewing.
The Boil:
You will have approximately 1 to 1.5 gallons of water in your pot from rinsing the grains. Add another gallon or so of water (remember, this is “ballpark” brewing) and two ounces of Columbus hops. Now bring your wort to a nice light boil for thirty minutes. Your boil does not need to be too aggressive to extract the hop bitterness. With fifteen minutes remaining in the boil, add the two ounces of Cascade hops. With two minutes boil time left add the remaining ounce of Columbus hops. After the thirty-minute boil, turn off the heat, wait for the wort to come down off its boil and then mix in the light malt extract and DME. Be sure all the extracts are thoroughly dissolved. You will note that I do not call for boiling the malt extracts. One of the more recent trends in extract brewing is to not boil malt extracts that were boiled prior to being concentrated. This essentially eliminates the need to boil at home. Sanitation is still very important, so you do need to mix in the malt extracts while the wort in your pot is still over 160° F. Once well mixed, put the lid on your pot and cool your wort in a sink or with a wort chiller. Once the wort is cool, pitch your yeast and ferment for 7–10 days. Transfer your beer to a secondary fermenter for three to seven days before packaging.
Written by Mark Henry