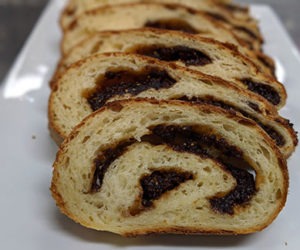
Cooking with Spent Grains
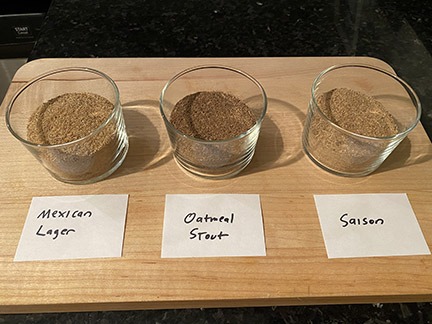
For as long as I’ve been homebrewing, I have exclusively brewed beer using all-grain recipes. Like others that use milled grain when brewing, at the end of my brew day I’m left with a decent amount of spent grain. Depending on how much beer you brew at a time and how frequently you brew, you may find yourself generating lots of this brewing byproduct. When it comes time to clean up after the brew day is done, we must decide what to do with all this spent grain. Discard it in the trash? Add it to the compost heap? How about turning it into flour and reusing it in the kitchen?
What is Spent Grain?
Before we get any further here, let’s first go over some basics. When you brew beer you need a base malt to serve as the main source of fermentable sugar in the wort. The primary ingredient in your base malt is usually barley. Sometimes, in addition to the barley base malt, the grain bill for a given beer can contain other non-barley ingredients like wheat, oats, or even corn. Spent grain is what you call your malt after you have used it to make wort and it typically can’t be reused for brewing purposes because all of its sugars have been extracted during mashing.
Options for handling spent grain typically fall into a few categories: Disposal, composting, feeding to livestock, and re-using. I’d wager that many of you simply throw your spent grain away. That’s what I did when I first started brewing. While I favor brewing ultra-compact, single-gallon (4-L) sized batches, I brew often enough that I am generating a few pounds (1–2 kg) of spent grain every week and it didn’t feel right to throw so much spent grain away. Brewing can be a resource-intensive activity. Think about all the water that is used on brew day — there’s the strike water, sparge water, water used for sanitizing solution if you use something like Star San, water for cleaning, water for rinsing, and water for chilling wort. On the rare occasions when I brew a larger batch on my 5-gallon (19-L) electric brew-in-a-bag (BIAB) system, I make every effort to collect the waste water from my immersion chiller to use for cleaning and rinsing as well as for watering my garden. When I brew small batches in my kitchen it’s harder to collect waste water for reuse so I started thinking about other ways to reduce the amount of waste I was generating.
In talking with professional brewers, I learned that they often find clever ways to reuse instead of discard one of their single biggest waste items. Many breweries work with local farmers who collect the spent grain for use as composting material and/or as feed for their livestock. I’ve also seen some breweries use spent grain to make dog treats. While I don’t compost at home nor am I allowed to have livestock in my neighborhood, this got me thinking that perhaps I could leverage my culinary school and formal restaurant training to incorporate spent grain into some of my favorite recipes.
Preparing Spent Grains for Cooking

I prefer to dry out my spent grains prior to using them. This will preserve them and will also make storage easier. You don’t need much in terms of equipment to do this — an oven, a spatula, and, ideally, a metal sheet tray that has edges or a lip. You could also use a baking dish or a cookie pan, just make sure it has sides so your spent grains don’t go sliding off it. My preferred pan is what’s known as a half-sheet tray in restaurant lingo, which typically measures 13 x 18 inches (33 x 46 cm) and has a 1-inch (2.5-cm) lip around the edges. I find that a typical single-gallon (4-L) brew will yield enough spent grain for two half-sheet trays, both of which fit comfortably in my oven. Obviously if you are brewing 5+ gallons (19+ L) at a time, you will yield a lot more spent grain than that. Though you certainly can, I’m not suggesting that you’ll want to dry and reuse all of that grain — the point here is to suggest that you don’t have to throw all of it away.
To begin the drying process, simply take your spent grains and lay them out directly onto your sheet tray in a relatively thin, even layer. It’s best not to pile the spent grains more than an inch (2.5 cm) or so high or else this will prolong the drying-out time. Place your sheet tray into a 200 °F (93 °C) oven and let the grain dry out over the course of the next 6–8 hours. Every hour or so I take the trays out of the oven and stir up the spent grain on the tray with a spatula to ensure it dries evenly. I also rotate my pans in the oven every time I stir the spent grains. Once the grain is bone-dry, remove the trays from the oven and let cool. Once cool to the touch, package the dried spent grain in an airtight container or Ziploc bag until you’re ready to use them.
For some recipes, like the granola recipe shared later in this article, you can leave your dried spent grain whole, but for most recipes you want to mill them into a fine, flour-like consistency. This will make it easy to swap some the flour in any given recipe for your homemade spent grain flour. To accomplish this, I use a coffee grinder. Because coffee flavor can be difficult to remove over time and so I don’t have to clean it out every time I use it, I have a dedicated grinder just for coffee beans and another for spent grains and spices.
The milling process is easy. Add the spent grains to the grinder, pop the lid on and grind until the grains achieve an almost powder-like texture. This shouldn’t be too difficult for most grinders to achieve and takes just 10–15 seconds of grinding to turn the grains into a fine texture. To preserve freshness, I mill just before I’m about to use it in a recipe.
How to Approach Culinary Usage of Spent Grain
When I cook at home it’s not unusual for me to use some of the same adjuncts from brewing in my favorite recipes. For example, my cornbread recipe contains a mix of flour and cornmeal — my Mexican lager and Kentucky common recipes both contain at least 10% flaked maize in their grain bills. I can’t make oatmeal raisin cookies without oats — and oats feature prominently in both my New England IPA recipe as well as an oatmeal stout I brew. Furthermore, some beers — hefeweizens and witbiers for example — contain high proportions of wheat in their grain bills. Seeing that there were common ingredients in some of my spent grain mixes and favorite recipes led me to conclude that it should be possible to replace some of the all-purpose flour in my recipes with spent grain flour.
I have previous experience with flour substitutions as I’ve already replaced some of the all-purpose flour in my favorite recipes with whole wheat flour. Swapping out all-purpose flour for spent grain flour is similar with one major caveat. In many recipes like traditional breads and pizza dough, flour serves a very important role by providing structure. It’s the combination of flour, water, and mechanical action (kneading or mixing) that creates gluten in your baked goods. This gluten forms the structure and texture. If you were to replace all of the flour in a recipe with spent grain, especially spent grain derived exclusively from barley, you remove a lot of the gluten in the recipe. Barley contains gluten, but not as much as is found in all-purpose flour. If you remove too much flour from some recipes, the final product could lack the gluten needed to provide the necessary structure. My general substitution rules of thumb are:
• For traditional yeast-leavened breads and pizza dough, I begin by swapping out 25% of the flour in a recipe with spent grain flour.
• For everything else, including cookies, brownies, cakes, quick breads (bread leavened with baking powder and/or baking soda), muffins, pancakes, and waffles, I generally swap out 50% of the flour called for with spent grain flour.
I arrived at these substitution rates through trial-and-error, which I encourage home cooks to do as well. There are no rules here — cooking is an objective process as much as it is also a subjective process. In other words, cooking is deeply rooted in fundamental techniques but everyone experiences and tastes food differently — what I like might not be what you like. Experiment and determine what you like.
It’s also worth noting that, in my experience, spent grain flour seems to be more absorbent than regular all-purpose flour. When developing or altering your own recipes to include spent grain, you may need to slightly increase the proportion of wet ingredients in your recipe.
Benefits of Using Spent Grain in Your Kitchen
Why go through all this effort of drying out and milling spent grain when it’s so much easier to throw it away? Beyond the benefit of keeping waste out of landfills, I see other reasons to reuse spent grain in the kitchen. The biggest may be an improvement in flavor and texture. All-purpose flour is highly refined and designed to not have any real discernable flavor. It’s in your baked goods to provide structure and that’s about it. Barley, along with whatever else is in your spent grain mix, will undoubtedly lend more depth of flavor to whatever items you prepare with it. An immediate flavor characteristic that I notice with most spent grain is a very subtle nuttiness. Depending on the beer brewed, its spent grain will impart other flavors as well. For example, when I brew a stout, some percentage of my grain bill will consist of darker roasted barley that can lend roasty, almost chocolate-like notes not only to beer but also to foods like brownies or a molasses-based quick bread.
Another benefit, if you want to call it that, is that it is a fun conversation when sharing these foods with friends and family, especially if paired with the beer that was also made using the same grains.
Spent Grain Recipes
I brew many different styles of beer at home and each style has its own unique grain bill. Every unique grain bill will consist of a different combination of spent grain that will impart its own flavor characteristics to the recipe product. The recipe examples I present here demonstrate applications of different spent grain mixes.
An important note for the recipes that follow: The amount of spent grain flour required is post-milling.
Spent Grain Granola

This was the very first recipe I made using spent grain. I make this one frequently and because this recipe is quite flexible, I sometimes vary the ingredients based on what I have on hand in my pantry. The variety of nuts and dried fruit can change from batch-to-batch. You can also add in a ½ cup of whatever seeds (pumpkin or sunflower work well) you have on hand but this is totally optional. I like my granola loose as opposed to packed-tightly into bars or clusters but you could certainly apply some pressure to the granola mix while it’s on the sheet tray before baking to promote the formation of clusters. The spent grain used for this recipe doesn’t even need to be milled, you can use it whole.
Ingredients
1 1⁄2 cups spent grain, dried and un-milled (I recommend using spent grain from a lighter beer that doesn’t contain roasted malt)
1 1⁄2 cups rolled oats
1 cup roughly chopped unroasted nuts (I use almonds, pecans, and walnuts)
1 cup coconut flakes, preferably unsweetened
1⁄2 cup roughly chopped dried fruit (I use dried cranberries)
1⁄2 cup olive oil
2⁄3 cup maple syrup
1⁄3 cup brown sugar
1⁄2 tsp. Kosher salt
1⁄2 tsp. cinnamon
1⁄4 tsp. ground cloves
1⁄4 tsp. garam masala (optional)
Pinch of ground nutmeg
Step by step
Preheat oven to 300 °F (150 °C). In a large bowl, using a large spoon, spatula, or your hands, thoroughly combine all of the above ingredients.
Spread the mixture evenly on a half-sheet tray or similar sized sheet. I recommend using something with a lip or edge.
Bake for roughly 50 minutes until the nuts and coconut turn golden-brown in color. Be sure to stir the mixture every 5–10 minutes. Let cool and package in an airtight container or plastic food-storage bag.
Spent Grain Pancakes
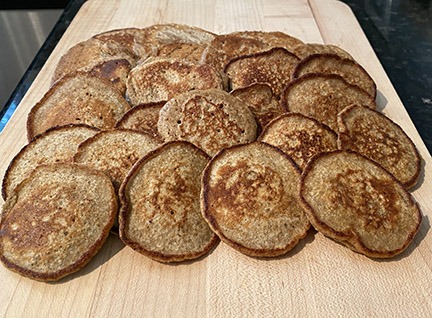
Homemade pancakes are so easy to make you’ll never buy another pre-packaged mix again. This is another recipe, like Spent Grain Granola, where I find that a lighter spent grain mix works best. With a third of its grain bill being flaked maize, I like using the spent grain from my Mexican lager for pancakes. You can even replace the flour entirely in this recipe, swapping it out with 1 cup of cornmeal to make Johnny cakes. The great thing with this recipe is that it offers lots of flexibility to suit your taste. You can use 1 cup of all-purpose flour and add in a ½ cup of mini chocolate chips. Use 1 cup of whole wheat flour and add in a ½ cup chopped walnuts and a ½ cup mashed bananas to make super-flavorful banana nut pancakes. Fruit additions also work nicely here as well.
Ingredients
1 cup spent grain, dried and milled finely (I recommend using spent grain from a lighter beer that doesn’t contain roasted malt)
1 cup all-purpose flour, or 1 cup of whole wheat flour, or a 50/50 mix of each
1 Tbsp. granulated sugar
2 tsp. baking powder
1 tsp. salt
2 eggs
2 cups milk (you may need up to an additional 1⁄2 cup depending on how thick your batter is)
2 Tbsp. melted butter plus additional butter for cooking
2 Tbsp. honey
Optional add-ins:
1⁄2 cup of chopped walnuts, or 1⁄2 cup mini chocolate chips, or 1⁄2 cup fruit (blueberries, strawberries or mashed bananas)
Step by step
Heat a large non-stick skillet over medium heat.
In a large bowl, mix together the dry ingredients (spent grain, all-purpose flour, sugar, baking powder, and salt).
In a separate bowl, mix together the wet ingredients (eggs, milk, melted butter, and honey).
Pour the wet ingredients over the dry ingredients and mix to combine. It’s fine if there are some lumps in the batter. If the batter seems to be too thick, add a little more milk and stir it in. You want the batter to have the consistency of marinara or tomato sauce — not too runny so that the pancakes spread too thin when the batter hits the pan but not too thick that the batter is hard to pour.
Add 2 tsp. of butter to the pre-heated skillet and let it melt, swirling the pan to cover it with the butter. I like to make small sized pancakes that require about 3 tablespoons of batter. I find I need about 2–3 minutes per side to get them nice and brown but not too dark. Keep an eye on your pan too and turn down the heat if the pancakes are cooking too quickly. Everyone’s stovetop heats differently so you might need to cook a few test pancakes before you determine your timing.
Serve immediately or hold in a 200 °F (95 °C) oven for up to 10–15 minutes. Cooked and cooled pancakes freeze well and can easily be thawed in a microwave.
Spent Grain Banana Bread

Banana bread is a classic example of a quick bread — a bread that uses baking soda and/or baking powder as leavening agents instead of yeast. Quick breads are generally easy to prepare in that they don’t require kneading or resting. Sometimes you can even prepare all of your ingredients in one bowl. I think they make good candidates for swapping out flour with spent grain because the finished product doesn’t have the same type of structure and elasticity that you’d find in a more traditional yeast-leavened bread, like a baguette or French bread. The quick bread just needs enough structure so that it can hold itself together and not collapse and it won’t matter if you replace some of the flour with something containing less gluten. For this recipe, I think you can get away with using spent grain from just about any type of beer you brew, with the darker the beer grains used, the more flavor that the spent grain will lend to your finished banana bread.
Ingredients
2 very ripe bananas, mashed
1⁄2 cup unsalted butter, melted
3⁄4 cup packed dark brown sugar
1 egg
1 tsp. vanilla
1 tsp. baking soda
1 tsp. ground cinnamon
Pinch of ground cloves
Pinch of ground allspice
Pinch of ground nutmeg
1⁄4 teaspoon Kosher salt
3⁄4 cup all-purpose or whole wheat flour
3⁄4 cup spent grain, dried and milled finely (almost any variety of spent grain will work here)
Step by step
Preheat your oven to 350 °F (175 °C). Using butter or non-stick cooking spray, grease a 9- by 5-inch (23- x 13-cm) loaf pan and set aside.
In a large bowl, mash the bananas until they start to form a smooth paste. Add in all the other ingredients except the flour and spent grain and mix to combine. Add the flour and milled spent grains and combine until you see no unmixed flour. Pour this batter into your greased loaf pan and put in the oven.
Bake for 40–50 minutes until a cake tester or toothpick inserted into the center of the banana bread comes out clean. Cool on a rack and remove from the pan prior to slicing.
Spent Grain Chocolate Chip Cookies
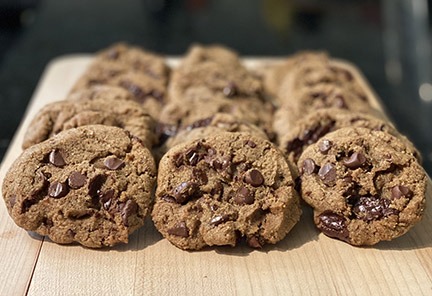
This is my go-to recipe for chocolate chip cookies. It produces cookies that are loaded with chocolate chips and are more chewy and chunky rather than flat and crispy, especially when you let the cookie dough chill in the refrigerator before baking. The spent grain addition here works well, adding some texture and nuttiness to the finished cookies. Using spent grain from a darker brew, for example a stout or porter, will really amp up the roastiness in the cookies and would even work well for a chocolate chocolate chip variation.
Ingredients
1 cup all-purpose flour
1 cup spent grain, dried and milled finely (almost any variety of spent grain will work here)
1⁄2 tsp. baking soda
1⁄2 tsp. Kosher salt
1 cup (8 oz.) unsalted butter, melted
1 cup dark brown sugar, packed
1⁄2 cup granulated sugar
2 tsp. vanilla
2 large eggs
12 oz. chocolate chips (I prefer semi-sweet but any variety will work)
Step by step
If you plan to bake the cookies immediately, preheat your oven to 325 °F (163 °C). I prefer to let the cookie dough chill for 2–3 hours before baking as this helps prevent the cookies from spreading out too much when they bake. (See my note later on dough-chilling.)
Line a cookie sheet or sheet tray with parchment paper or grease with butter or non-stick cooking spray.
In a large bowl, whisk to combine the all-purpose flour, spent grain flour, baking soda, and salt and set aside
In another large bowl, add the melted butter, brown sugar, and granulated sugar and beat/mix until smooth (about three minutes if using a stand mixer set to medium speed). Beat/mix in the eggs, one at a time, and the vanilla for another 2–3 minutes until the mixture is a light sand color and is very smooth and creamy. Add the dry mixture to the wet mixture and mix until everything is just combined. Stir in the chocolate chips.
If baking immediately, you can place the cookie dough right onto the prepared sheet trays for baking. Size is up to you — use about 2 Tbsp. of dough for smaller cookies, or up to 1⁄3 of a cup for larger cookies.
Baking time will also depend on cookie size. Smaller cookies will take roughly 10 minutes to cook while larger cookies will take 12–14 minutes to cook. Halfway through cooking, rotate your cookie tray in the oven.
You’ll see the edges of the cookies start to turn brown — that’s a good indication of cookie doneness. When the cookies are done, pull the sheet tray out of the oven and let the cookies rest on it before transferring to a wire rack or a cool sheet tray to cool.
Optional: Dough chilling is not mandatory but I find that when I skip this step, the cookies spread out too much for my taste during baking. To prevent that, this newly formed cookie dough should chill in the refrigerator for at least two hours prior to baking. After adding in the chocolate chips, I take the dough out of the bowl and form it into logs roughly a foot (32 cm) long and about the diameter of a beer bottle. Wrap the cookie dough logs in plastic wrap and refrigerate until you’re ready to use. When it comes time to bake the cookies, I cut off sections of cookie dough roughly 1–1 1⁄2 inches (2.5–4 cm) thick.
Spent Grain Soda Bread
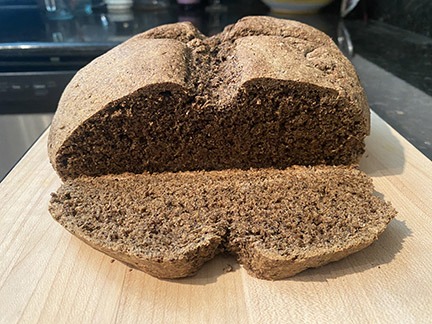
Like the Spent Grain Banana Bread, this is another type of quick bread however this one is a bit more reminiscent of a traditional bread. Like the banana bread recipe, it doesn’t rely on yeast for leavening, rather, the acid in the buttermilk reacts with the baking soda, which enables the bread to rise while it bakes. This recipe can mostly be prepared in a single bowl up to a certain point, then you’ll need to get your hands a bit dirty as you knead the dough to help it come together. Make sure that you’ve got a clean surface to work on before that step. You can bake the formed dough on a baking pan or sheet tray that’s been lined with parchment paper, or directly in a cast-iron skillet in the oven, which is my method of choice. The finished bread will develop a nice sturdy crust while baking and will be quite dense but the inside will be soft like other quick breads.
Ingredients
2 1⁄4 cups all-purpose flour, plus a little extra for your countertop
2 1⁄4 cups spent grain, dried and milled finely (almost any variety of spent grain will work here but I like to use something from a darker brew, like an oatmeal stout)
2 Tbsp. granulated sugar
1 tsp. Kosher salt
1 tsp. baking soda
6 Tbsp. cold butter, cut into 1⁄2-inch (1-cm) cubes
1 3⁄4 cups buttermilk*
1 egg
* If you don’t have buttermilk, you can quickly make your own using any kind of dairy milk and white vinegar. Simply add 1 tablespoon of white vinegar for every 1 cup of milk. Mix together and let stand at room temperature for 5 minutes. Stir again and it’s ready to be used in place of buttermilk.
Step by step
Preheat oven to 400 °F (205 °C). Place a sheet of parchment paper onto a baking pan or tray (if using that). If using a cast iron skillet, make sure it’s well-seasoned/lightly oiled.
In a large bowl, thoroughly combine the all-purpose and spent grain flours, sugar, salt, and baking soda.
Add the butter to the dry ingredients and using your hands, work the butter into the flour mix until it is the size of very tiny pebbles. Think of a green pea, but half that size.
In a separate small bowl, mix together the buttermilk and egg, then add to the dry ingredients.
Combine the wet and dry ingredients as best as you can — I find it best to use a wooden spoon here — until the mixture becomes too hard to stir. The dough will be very sticky and tacky and will appear to not be fully mixed. Pour it out onto a floured countertop and knead with your hands until you can form it into the rough shape of a ball. You might need to add a little more flour while kneading to get the dough to come together without it being too tacky to the touch.
Transfer the dough ball to the prepared baking pan or cast-iron skillet. Using a sharp knife, score the top with a “X” shape about a 1⁄2-inch (1-cm) deep. Bake for about 45 minutes until the surface becomes very crusty. The best way to determine doneness is to use an insta-read thermometer – insert it right into the center of the “X” and when it reads 185 °F (85 °C), the bread is done baking.
Remove the bread from the pan/skillet and let it cool on a wire rack for at least 15 minutes before slicing into it.


