Equipment Calibration: Tuning up your gear
I don’t think anyone will be surprised if we point out that homebrewers are a diverse group. We like different styles of beer, have different ways of brewing, and different goals for our hobby. But one thing I think we can agree on is that homebrewers love their gear. We may not all have the same gear or feel the same about what’s necessary, but whatever we use we’re totally into it!
Another thing that we can agree on is that gear that doesn’t work properly is worse than no gear at all. One thing you can do to ensure that your equipment does what it’s supposed to do is to be certain that it’s calibrated correctly. So, we’re going to look at what a homebrewer might have around and how to be sure it will be accurate to help you make your best beer.
Remember, the only numbers that are good are numbers you can trust.
What good is it thinking your wort is 1.050 SG if it turns out your hydrometer reading is off? The only person in a worse position is the brewer with two uncalibrated instruments — you’ll never know which is right. Fortunately, calibration — at our need level — is relatively painless.
Keep in mind that we’re more concerned with accuracy than precision. Precision would be “How many decimal places your hydrometer shows” and for homebrewing is of limited value. Accuracy is knowing the value you’re reading is correct. Brewers want accuracy from their equipment — that the hydrometer shows what the real story is.
Thermometer
If there’s one piece of equipment that’s common to all homebrewers, it’s a thermometer. You use it at multiple points in your brew and fermentation over a wide range of temperatures. A thermometer that’s out of calibration can leave you mashing or pitching yeast at the wrong temperature with potentially disastrous results to your beer.

Will your beer not beer? No, remember brewers used to brew and get away with it back before the thermometer. Amazing to think that both of our primary tools for brewing – the thermometer and the hydrometer/saccharometer both came into brewing usage in the 1700s. Just think how much beer was brewed before then!
As with any calibration, you need a standard to check it against. After all, how can you know you’re measuring something correctly, if you don’t know what it’s supposed to be measuring? The easy way to provide a known, thermically speaking, is to use ice water and boiling water to check the calibration at the extremes. Crush enough ice to almost fill a small glass, then cover the ice with water. Give it a good stir and wait a couple minutes, then take the temperature. It should be 32 °F (0 °C) or darn close to it.
Remember, the only numbers that are good are numbers you can trust.
At the other end, you can boil some water. But remember that the temperature for boiling water changes depending on your elevation above sea level (ultimately it’s the air pressure). You will need to account for that.
There are a couple problems with this method, though (aren’t there always?). First, you have to account for your altitude. More confounding, we’ve seen thermometers that were correct at the extremes but off at mash temperature. Unless you mash at freezing or boiling temperatures (we don’t!), you might have problems. A more accurate method is to check the calibration near the center of the scale, closer to the temperatures you’ll actually be using.
So, you’ll need to compare the thermometer under examination to a thermometer that you trust. An alcohol lab thermometer that is designed for calibration is one choice. A good digital thermometer (we both like the Thermapen and VWR also makes some very good ones) is another. Whichever you use, be sure it’s NIST (National Institute of Standards and Technology) certified.
If you’re using an alcohol scale thermometer for brewing, about all you can do is note the difference between it and your calibration standard and hope it’s constant over your thermometer’s range.
If you’re using a bimetal dial thermometer, you can turn the nut behind the dial face to calibrate it. Denny has been using one like this for 25 years, and finds that as long as he doesn’t drop it (good luck on that) it holds the calibration pretty well. And it’s quick and easy to recalibrate when it’s off.
Of course, if you buy a Thermapen for calibration, you could just use that instead. That’s what we’ve both decided is the best way for us. It’s accurate, fast, and reads at the tip of the probe so you don’t need to insert it far to measure something. And if you’re into cooking, it’s a must have so your money goes even farther. (Drew here — I swear by my Thermapen. They’re not inexpensive but they’re well worth the cost and there are some more inexpensive makes that are “pretty good” like the Lavatools Javelin.)
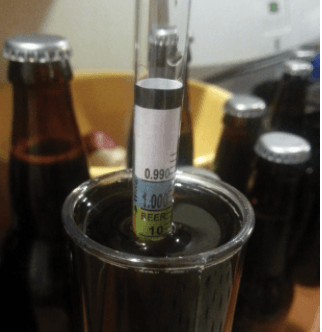
Hydrometer
Of course, unless you’re a free-spirited brewer (or sometimes forgetful like Drew), you want to know how strong your beer is and that’s where the hydrometer comes in. To check the calibration of your hydrometer, fill your sample flask with distilled water. Float your hydrometer in it, making sure that it isn’t touching the bottom or sides of your sample flask. You also need to ascertain the temperature at which your hydrometer was designed to be read. Use your newly calibrated thermometer to check the temperature. The hydrometer should read 1.000 in distilled water at the proper temperature.
Much like the thermometer, we do have to worry about measuring at scales. Reading 1.000 at temperature in distilled water is a good guide. One pound (0.45 kg) of corn sugar (dextrose) reliably gives you a gravity of 1.042 when dissolved into a gallon of water. So, dissolve 113 grams of sugar into 946 grams of water and then measure your resulting gravity. It should read around 1.042.
brewing equipment will ensure confidence in
the measurements.
You can also use an NIST-certified laboratory hydrometer to compare against. (Protect those at all cost.)
Now what if your hydrometer is wrong? This is not uncommon with cheap hydrometers. You have two choices – add a note to the hydrometer tube saying (“Add 4 points at 65 °F/18 °C” and hope it’s linear). Alternatively you chuck it and buy a new one, but this time shell out a few more dollars for a quality one.
We both prefer to use a hydrometer with a thermometer and temperature correction scale built into it. It makes for an easy one-step reading. You can also get hydrometers that are calibrated at 155 °F (68 °C), which is in the mash temperature range. Brewing America is one vendor that sells both of those.
Refractometer
Refractometers have automatic temperature correction (ATC), but many homebrewers don’t realize that’s to correct for the temperature of the instrument, not the sample. The small sample you use quickly gets to the same temperature as the refractometer. Still, it’s best to avoid extremely hot or cold instrument temperatures when calibrating.
Put a drop of distilled water on the slide of an analog refractometer and close the cover. Point it toward a light and read the scale. It should read 0. If it doesn’t, turn the adjustment screw until it does.
Denny and Drew both use digital refractometers to measure our wort. The process is similar. If you use a digital refractometer, follow the manufacturer’s directions for best results (usually it’s just pressing a button).
And never forget – a refractometer is wonderfully intuitive for measuring wort gravity, but the scale goes off kilter when you measure beer. You can either use a hydrometer like Denny to measure beer gravity or use math like Drew often does to correct for the influence alcohol has on a refractometer reading. https://www.brewersfriend.com/refractometer-calculator/
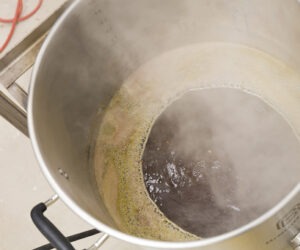
Kettle
Knowing the volume of liquid in your kettle is crucial to calculating your efficiency or knowing when our boil is done. You’ll need to start by having an accurate way to measure the water.
Water weighs approximately 8.34 lbs. (3.785 kg) per gallon (metrics are a heck of lot easier here since 1 L = 1 kg). You can put your kettle on a scale as you add water to it, but that can be difficult. Denny uses a plastic ½-gallon pitcher. He puts that smaller container on a scale and adds 2.085 lbs. of room-temperature water to it (or 2 lbs. and about 1 1⁄3 oz.). That’s a quart. Pour it in your kettle being careful not to spill.
You can mark your kettle directly by using a screwdriver or engraving tool to scratch marks on it. Denny prefers to mark a wooden paddle that he sticks into the kettle. Add a qt. of water to the kettle then insert the paddle (stick, rod, whatever) to the bottom of the kettle. Pull it out and mark the waterline with a permanent marker. Repeat, adding another quart at a time, until you’ve filled the kettle. Of course, if you need less precision, you can add more water at a time. Just be sure to measure carefully.
And if you’re bizarre, like Drew, you can use math! After doing some of the above to confirm the basic math, he set up a spreadsheet with a simple cylinder equation that means he can measure with a yardstick and input the number and find out his volume with decimal precision. Of course this is an extra step, but Drew’s like that.
Fermenter
Calibrating a fermenter is a lot like calibrating your kettle. But the marking is different. If you use buckets, or any kind of plastic fermenter where the liquid level is visible from the outside, you can use a permanent marker to mark the level of each water addition.
You can also use a marker on glass carboys, but you’ll have to remark them occasionally as the marks wear off. Still, they last quite a while and they’re fast and easy to remark if you get to it before they’re completely gone. A more permanent way is to etch the carboy with volume marks. A description of how to do that can be found in multiple places on the internet. (But be careful! Don’t etch too much and weaken your glass.)
Stainless steel conical fermenters usually come with marking already on them, but don’t assume. Check before purchase so you’ll know what you’ve got.
Scales
You’ll need to be able to weigh something of a known weight to calibrate your scales. For small amounts you can use coins. A penny weighs 2.5 grams and a nickel is 5 grams. If you have other coins, you can look on the internet to ascertain their weight.
For larger amounts, you can rely on the old saw “a pint is a pound the whole world round.” Put a container on your scale, tare out the weight, then add 16 oz. of water to it. It should weigh one pound. (Note: Some sources say that 15.34 fl. oz. equals one pound. Close enough for homebrew!)
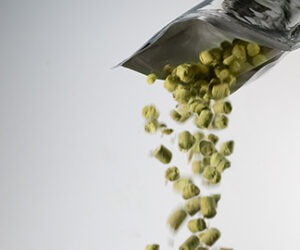
Grain Mill
We strongly feel that it’s pretty much impossible to designate a single, all around gap that will be perfect for everyone. The right mill gap for you will depend on the grain you use, as well as your brewing equipment and techniques. The important thing to do is to experiment until you find what’s right for you and then how to measure and document it so you can return to that gap if you should lose it.
Once you have your mill set to where you want it, use automotive feeler gauges to measure it regularly. Some people use a credit card, and if that’s the right gap for you then it’s an easy method.
pH Meter
In order to calibrate a pH meter, you’ll need to obtain calibration solution. It can be a powder you mix with distilled water, but we both prefer the ease and precision of premixed solutions. You’ll need a 4.01 and 7.01 (often referred to as 4 and 7). While you’re at it, pick up some pH 10 storage solution. While you won’t need it for calibration, it’s best to store your meter with the probe in storage solution. It will extend the life of your meter. Like refractometers, pH meters generally have some sort of ATC, but it’s still best to calibrate close to room temperature.
Start by rinsing your meter’s probe, preferably with distilled water. Then immerse the probe in the 4.01 solution. Either adjust manually or, if you have a meter with automatic adjustment, wait until the meter tells you it’s calibrated. Then rinse the probe again and repeat the process with the 7.01 solution. We like to rinse the probe again and go back to the 4.01 to be sure the calibration held. Then another rinse and back to the 7.01. Rinse and repeat until you get good readings of both with further adjustment.
The only thing more annoying than out-of-calibration equipment is screwing up a brew because your measuring tools weren’t calibrated. Make sure you know your gear is giving you accurate readings.