Fermentation Temperatures, Balancing a Draft System, and Honey Malt
Q I have always fermented my beers at around 70–72 °F (21–22 °C). I just brewed a Kölsch and fermented it at the low end of the yeast manufacturer’s recommended optimum fermentation temperature range (62 °F/17 °C). It fermented great and the final gravity was 1.010. Are there any advantages or disadvantages to doing this and what impact might it have on the taste profile? I haven’t been able to see for myself as it is now in a secondary carboy conditioning for a couple more weeks before kegging.
Kevin Schmidt
Livonia, Michigan
A Fermentation temperature definitely affects beer flavor and fermentation rate, however some yeast strains are more influenced by temperature than others. I will come back to this in a moment. Brewers who have a spot at home with a relatively constant temperature should consider making this their norm. My basement stays right at 64 °F (18 °C) throughout the year because my home’s air handler and basement dehumidifier are located in my basement. And because I am old school and like fermenting in carboys, it’s really handy to be able to design beers that taste great when fermented at 64 °F (18 °C). During my 23-year tenure at Springfield Brewing Company, we fermented beers at different temperatures. Ales were usually fermented at 64 °F (18 °C) using White Lab’s WLP001 (California Ale), except for our seasonal Kölsch that fermented at 61 °F (16 °C) using the same “Chico” strain, while we fermented lagers at 54 °F (12 °C) using the Augustiner strain.
Your question is about fermenting your Kölsch at 62 °F (17 °C) versus your normal 71 °F (22 °C) for other beers. In my experience using WLP001 (similar to SafAle US-05, Wyeast 1056, LalBrew BRY-97, among others), the cooler fermentation temperature typically results in a sulfur snap, most likely due to increased sulfur dioxide production and retention in the beer. And this is not a hit or miss observation. For about 20 years of using the same yeast strain at 64 °F (18 °C) for a wide variety of beers and 61 °F (16 °C) for Kölsch, I always noted the increased sulfur level. Because this added a lager-esque quality to a style that is often described as being similar to lagers, I liked the effect and stuck with the lower temperature. For me, this was a check in the advantage column.

But are these nuanced differences related to fermentation temperature detectable in the absence of a comparative beer, especially if the beer is a one-off brew? For example, if a Kölsch is fermented at 64 °F (18 °C) and has less sulfur in the nose, does the consumer have enough sensory memory and sense of scale to flag the aroma as being less than another beer that they aren’t tasting? In your case, you produced a very nice Kölsch when fermenting at 62 °F (17 °C), but you don’t know how the same batch would have been different if it were fermented at 71 °F (22 °C). Conventional wisdom suggests that the fermentation rate would have been a bit quicker and the resultant beer a bit more estery with less sulfur (cool fermentations are related to sulfur dioxide concentration). My bet is that your beer would have turned out well fermented warmer, while you know that it turned out well fermenting cool.
So why do yeast suppliers include guardrails around fermentation temperature? One obvious reason is that these companies want customers to be happy with their products and suggest temperatures that set the brewer up for success. It’s like the note on a beer label to consume beer before some date and to chill the beer before consuming. Another reason for the fermentation suggestions is that some yeast strains simply clock out below a certain temperature. While it is true that fermentation temperatures above about 80 °F (27 °C) are not ideal for most yeast strains, just about every brewing strain ferments quite well in very warm environments. The maximum temperatures are given to reinforce the importance of keeping things cool. Of course, saison and kveik strains are the outliers and break all sorts of conventional rules!
My most surprising experience related to this topic has been fermenting lagers at 64 °F (18 °C). I felt compelled to give this method a try using the famed Weihenstephaner W-34/70 because of the number of commercial brewers who are singing the praises of this method. I am a lager lover and was totally convinced that I was going to find all sorts of technical flaws in my beer; none-the-less I decided to brew a sacrificial beer. To my amazement, the resulting beer was great. Surely something went awry, so I fermented another lager strain at 64 °F (18 °C) and it was also great! Conclusion? Great lagers don’t have to be fermented in the 46–54 °F (8–12 °C) range and lagers don’t taste fruity when fermented warmer.
In past columns, I have touted the benefits of the KISS — keep it simple Shell (my middle name) — approach to brewing, which has almost always worked for me. If you have a spot in your home that has a consistent temperature, consider tailoring your brews around your environment. And if you conclude that your beers are best when fermented on the cool end of the spectrum, consider some type of cooling to establish an environment that allows you to brew a wide array of great beers with as few adjustments as possible. Like many of my answers, I took a detour down a street that hopefully added a bit of context and extra information related to your specific question.
Q I have read that numerous homebrewers use around 6 ft. (1.8 m) or less of tubing to pour their beer. Every time I have tried this length, I get a crazy amount of foam. I stumbled upon this website (http://www.mikesoltys.com/2012/09/17/determining-proper-hose-length-for-your-kegerator/) and it has most beers in the 11–12 ft. (3.4–3.7 m) of tubing range. Since I have started using these lengths, I have had a balanced system. Why can some brewers have a balanced system with half the length of tubing that I can? Thanks for the help, Mr. Wizard! For reference, I use 3⁄16-in. (5-mm) vinyl tubing and picnic taps.
Chris Wagner
Cincinnati, Ohio
A For starters, thanks for the great link. Mike Soltys, PhD. is the brains behind the hose length calculator you referenced and he has taken a fluid dynamics approach to beer line calculations using the Bernoulli, Darcy Weisbach, and Swamee-Jain equations to develop his very cool tool!
Pouring beer on draft and determining the ideal line length is a function of several variables, with the most significant being beer carbonation level, beer temperature throughout the system, especially in the warmest area, change in liquid elevation, pouring rate, and pressure drop across the system (keg coupler, beer line, any restrictors or reducers, and the faucet/tap itself). Soltys’ tool accounts for these variables, but does not take into account pressure drop/flow restriction across the beer faucet, changes in beer temperature from beer storage to beer faucet (for example with systems where part of the line is not properly insulated), glass temperature, glass surface roughness, and pouring technique used by the person pouring the beer. His tool is designed to determine the line length to balance the variables listed above and it’s really intuitive to use.
Let’s switch gears and discuss your situation for a moment. In my experience and the experience of many others who have written about balancing draft systems, you should be able to pour 38 °F (3 °C) beer normally carbonated to about 2.5–2.6 volumes using 6 ft. (1.8 m) of 3⁄16-in. (5 mm) tubing without excessive foaming. If you consistently are having problems with these conditions, consider checking or replacing your secondary CO2 pressure gauge (usually a 0–60 psig gauge) and reviewing your pouring technique . . . problem solving must begin with the obvious. If your pressure gauge is reading incorrectly, you could be consistently over-carbonating your beers and not knowing it.
Pouring draft beer into a cool, wet glass produces much less foam compared to pouring beer into a warm, dry glass. And pouring beer into a rough glass may result in foaming whether or not the glass is cold and wet or warm and dry. Another important technique is to fully open the beer faucet when pouring and to pour beer down the side of the glass at a ~45° incline.
When I start pouring a beer, I will immediately stop pouring if the first couple of ounces are foam and wait until the foam has collapsed into beer before continuing with the pour. Beer/bartenders often struggle with pours that begin foamy and can save so much consternation and loss associated with foaming if they simply let their problematic pours settle before continuing. Why does this work? Well, many beer systems are cooled up to the point where the beer line connects with the beer faucet, leaving about 6 inches (15 cm) of metal between the “tail piece” shank and faucet that is not cooled.
The beer in this section of the system warms over time and can result in straight foam for the first bit of a pour, especially when the time between pours is extended. Some bartenders will shoot the first bit of beer to the drain before pouring, and that method also reduces beer loss because foam creates foam and the small sacrifice is usually a good investment.
In your case, using a longer line solved your problem and I am leaning toward your carbonation and/or serving temperature for fomenting foam.
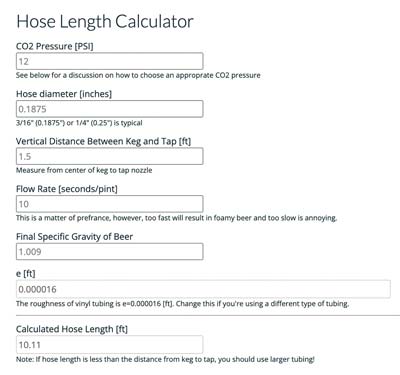
Let’s go back to Soltys’ hose length calculator. An interesting addition to his calculator is the time taken to fill a pint; a handy way of expressing flow rate. The two examples below show beer in a keg with 12 psig of CO2 pressure. The carbonation level in the beer is not given because the temperature corresponds to beer temperature. Let’s assume the temperature is 38 °F (3 °C); referring to a carbonation table this beer contains 2.57 volumes of CO2.
Note that the only differences in the two examples are flow rate (seconds per pint or spp) and calculated hose length. You can balance the system using 6 ft. (1.8 m) of hose when the flow rate is 7.5 spp (seconds per pint) and you can also balance the system when flowing at 10 spp through 10 ft. (3 m) of line. That’s cool, but how do you change the flow rate through the line?

In practice, most beer faucets have no flow control so you get what the system dictates when the faucet is opened. And the beer either foams or does not foam based on how it enters the glass. As long as the beer flows smoothly, foaming will be minimal. If the velocity entering your glass is too fast to prevent foaming, you can slow things down by using a longer section of draft line, holding the faucet above the keg to increase the vertical lift (easy to do with a picnic tap, but impossible when the faucets are fixed to a bar or the side of a keezer), using a flow control faucet (much more common these days than in the past), or working on pouring technique. Like just about everything else in brewing, there is no single solution to determining “the correct” draft line length! I hope this helps solve your problem as opposed to presenting you with more.
Q I am an extract brewer who recently started using honey malt to try to get some sweetness into some of my beers like English-style brown and amber ales. I notice the honey malt is in the specialty grain section of the online homebrew store where I buy my steeping grains. But some threads I’ve read said you should mash honey malt. I’m confused on whether this grain should be steeped or mashed? If I steep this grain, what will it yield versus if I mash it?
Stephen Elliott
Lawtell, Louisiana
A The rule of thumb when brewing with extracts is to steep crystal, caramel, and roasted specialty malts, and to mash specialty malts that contain starch. When crystal and caramel* malts are made, the malt starch is largely converted to fermentable sugars and dextrin in a step called stewing; this is basically mashing within the grain kernel. After the stewing step, crystal and caramel malts undergo kilning where the malt is dried and the color is increased according to the product specification.
Roasted malts, like melanoidin, amber, brown, chocolate, black barley, and roasted malt do not have a conversion step, but the higher level of kilning (compared to base malts) denatures enzymes and changes the nature of the starch by essentially charring it to different degrees.
Note that there is a progression in color associated with roasted malts where the lighter colored types do contain uncharred starch and the darkest types contain very little uncharred starch. This means that the rule of thumb about steeping is not absolute. Because most of these grains are used at relatively low levels, the steeping method works just fine.
But you asked about honey malt and I have not mentioned anything about honey malt. That’s because honey malt is pretty much its own thing. For over 25 years, the term honey malt was only used by Gambrinus Malting, based out of Armstrong, British Columbia. Gambrinus honey malt was developed as a brümalt in the early 1990s when very few brewers had heard of brümalt, let alone tasted a sample or brewed a beer with it, so they called their malt honey malt.
And for those all-grain brewers who are reading, one of the benefits to honey malt, aside from its interesting flavor and nice color, is its acidity; honey malt is a special type of acidulated malt . . .
Honey malt begins like other malts, but the fresh air supply is cut off midway through the germination process. This essentially suffocates the germinating barley kernels as carbon dioxide levels increase in the grain bed. Although this stops kernel growth and respiration, enzyme activity within the kernel continues and the growth of lactic acid bacteria is encouraged due to the carbon dioxide-rich environment within the grain bed. The result is malt kernels with relatively high levels of amino acids and reducing sugars from the continued action of barley enzymes and a rise in lactic acid because of the growth of lactic acid bacteria.
When this malt is kilned, the high concentrations of amino acids and reducing sugars lead to color and flavor development via the Maillard reaction cascade and the lactic acid from the growth of bacteria gives honey malt a nice snap. Unlike crystal, caramel, and roasted specialty malts, honey malt contains a relatively normal level of malt starch that is hydrolyzed when it is mashed with enzymatic base malts.
Like lightly roasted special malts, using up to about 10% honey as a steeped malt to supplement your extract recipe will work just fine, but if you want to go with a higher proportion of this malt type, mini-mashing is recommended. And for those all-grain brewers who are reading, one of the benefits to honey malt, aside from its interesting flavor and nice color, is its acidity; honey malt is a special type of acidulated malt that also reduces mash pH.
Your question about yield is interesting and is not one I recall covering in previous discussions about specialty malts. Yield is defined by how much extract, determined by measuring wort density, is transferred from carbohydrate source, such as malt, flaked adjuncts, malt extracts, and brewing sugars, to wort during the brewing process. The nature of the extract is irrelevant to yield because anything that is dissolved into wort from the carbohydrate source, including soluble proteins, increases wort density. This means that any grain that is steeped will contribute extract whether or not the extract is fermentable.
Yield does increase with mashing compared to steeping because malt enzymes convert some insoluble compounds into soluble compounds. This depends on the ingredient type, so providing a firm estimate about how much additional yield comes with mashing is hard to provide. Honey/brümalt is a different type of malt due to how it is germinated and contains a fairly high component of soluble solids, as can be seen by reviewing the soluble to total protein on a malt analysis (see below), despite its abbreviated germination. The coarse grind, as-is malt yield (typical brewery grist including moisture) is 76%, which is just a tad below typical base malts where this same metric is usually about 78%. This means that you should see similar steep yields compared to other lightly colored special malts.
I am definitely not knocking extract brewing, but if this whole discussion leaves you scratching your head about all-grain mashing you may want to give it a try. Infusion mashing is not much different than steeping. And if you use the brew-in-a-bag method you don’t require much gear, if anything, beyond what you already have (assuming you have a full-sized kettle).

* The terms crystal and caramel are often used synonymously and sometimes with an implication about roasting method. Crystal malts are almost always produced in a roasting drum, but the term caramel is used for malts dried on a conventional kiln as well as those dried in a roasting drum.