Choosing and Using Fittings

When my friends at BYO asked if I’d be interested in writing an article on homebrew fittings I was a little reluctant, thinking, “How the heck am I going to write a reasonable length article on such a simple topic?” Fortunately I was homebrewing the following day and took mental note of the fittings I used that day. I soon realized that you can’t swing a cat in my brewery without hitting a dozen fittings. The darn things are everywhere (fittings, not cats). Barbed fittings, flare fittings, heat resistant fittings, plastic fittings, stainless fittings, garden hose fitting, brass fittings, sanitary fittings, and pipe fittings. I’ve got bins of “just in case I need them” fittings! Let’s face it, anywhere your wort or beer moves, there’s a fitting involved. And all those fittings can add up to a lot of money.
So while I was absorbing all the fittings I had in my homebrewery, and the myriad of fittings used not only in the beer market, but in the industrial market too, it is almost ridiculous how many choices there are. So my aim with this article isn’t to steer you to a certain fitting, or which fittings to avoid. My aim is to get you thinking about the pros and cons of each type of fitting commonly used, where they’re best utilized, and how they fit your budget. I will say that trying to standardize is very helpful as hoses can be used in multiple applications. But don’t think you have to settle on just one type.
When I’m choosing a fitting for an application, my first decision is whether I’m using them on the hot side or the cold side of the process. Homebrew pressures are quite low (less than 50 PSI) so that is rarely a consideration. Fittings used on the hot side of the process needn’t be “sanitary” fittings, just something reasonably easy to keep clean. Fittings on the cold side definitely need to be designed with easy access to soil removers and sanitizers. There are also “clean in place” (CIP) type installations, but those are really commercial applications where disassembly is cumbersome or impossible. For homebrewers, CIP is usually more time consuming than disassembly and soaking.
Materials
The most common materials used in homebrew fittings are brass, stainless steel, and plastic. Plastic has the advantage of lower price, but the drawback is durability and ability to withstand heat. Some plastic fittings are very heat tolerant and quite durable but aren’t commonly used in homebrewing. The next is brass. Lately, lead content is dropping to very low levels from regulations, but the reality is that brass isn’t harmful in brewing applications. However people are increasingly worried about it so they are starting to be less common. The gold standard is definitely stainless steel. Fortunately stainless fittings are becoming more common in homebrewing, and prices have become more affordable over the past few years. The most common alloy is 304 and it’s perfectly suitable for brewing. While 316 is more corrosion resistant, it is definitely more expensive and is really overkill for brewing.

Most Common Fittings
NPT (National Pipe Taper) fittings are super common and readily available in brass and plastic at your local hardware store. They are also quite reasonably priced. You’ll not likely find stainless fittings at your hardware store, but you can usually find them at your local homebrew supply store as well as online sources. They seal by a wedging action of the tapered thread and require a PTFE (Teflon) thread tape to seal properly. That said, plastic NPT fittings usually don’t need tape as the plastic will deform to create a proper seal. With stainless NPT fittings always use PTFE tape or you’ll likely never get them back apart.
Stainless has a bad habit of galling — a phenomenon of microscopic localized welding from high pressure and friction. You’ll find the ½-inch size to be extremely common on homebrew pumps, kettles, fermenters and nearly all other equipment. The main drawback of NPT fittings are that they require wrenches to install and the thread tape is a bit annoying to remove in sanitary applications. But you CAN use them there if you’re diligent about cleaning. They also don’t swivel so they aren’t very quick to install as hoses need to be loosened so you can rotate the fitting, and then they are retightened.
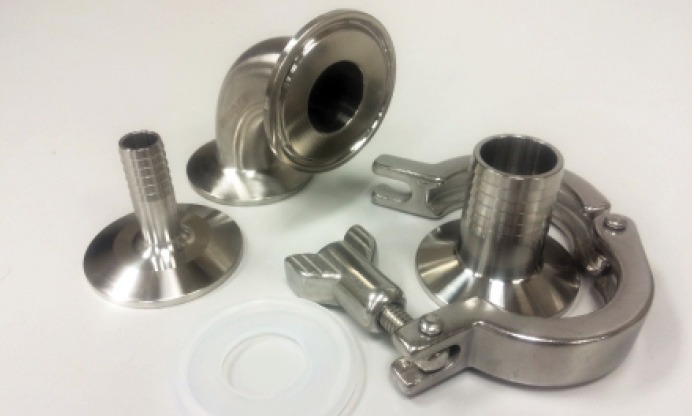
Tri-clamp fittings are what the pros use and are great for sanitary applications. They’re also one of the few fitting types that are CIP capable. They are comprised of two tapered flanges with a gasket between them. A clamp affixes the halves together for a secure joint. They carry a price tag commensurate with their coolness. But they are a little clumsy to install and require two hands to get them assembled. They will handle a pretty high heat load from burners if you use Teflon or silicone gaskets, but they are really designed for the cold side of brewing and are my fitting of choice for fermentation. But they are a bit cumbersome on hot side applications and really unnecessary.
Another common fitting style are “Cam-lock” connectors. They use two levers to affix the male and female ends of the fitting against the sealing gasket through a “cam” action — hence the name. Cam-lock fittings are almost always stainless steel and are quite durable (although plastic versions exist, and are available in farm stores). Cam-locks are also a two-handed fitting to install. And because they are all metal, they require gloves to disassemble when hot. If used near a burner, you’ll want silicone seals to accommodate the high heat. Since the seals can be removed to sanitize them, they can be used in cold side applications as well. You will need to purchase the male and female ends to use them so factor that into the cost.
OK — I’m admittedly biased here, but another popular fitting are Blichmann Engineering’s QuickConnector™ fittings. They are stainless steel swivel fittings and include a silicone seal and grip. They install on any male 1⁄2-inch NPT fitting and only take one hand to install. The silicone grips allow handling while hot without gloves, and they tolerate heat from burners quite well. They don’t require tools to install and are easy to clean and sanitize as the seal is easy to access. They can be used in hot and cold side applications so they are quite versatile. They are offered in straight barb and 90-degree elbow versions to prevent hose kinking. I also like knowing that they are securely affixed.

Taking a stroll down the gardening isle at your hardware store will lead you to another somewhat common fitting – brass and plastic garden hose quick connects. They are reasonably priced but must be purchased in pairs. They are very convenient for use on a chiller where you need to connect a garden hose. But garden hose sizes don’t match up with typical homebrew hose sizes so their application is a bit limited. You’ll need 1⁄2-inch NPT X barbed adapters to fit them to 1⁄2-inch and 3/8-inch hoses. Operation is quite similar to air hose fittings.
Flare fittings are also super common, particularly in beer dispensing and kegging applications. They seal by a tremendous metal on metal contact pressure between a tapered fitting and a flared tube or barbed stem relying on local deformation to seal. While this works great on soft steel and copper/brass — stainless fittings aren’t so likely to deform adequately under such conditions and are prone to leaking. Install a little plastic bushing and you’ll be good to go, and never wake up to an empty CO2 tank. The most common style is the 45-degree SAE flare and that’s what you’ll see on all kegging systems and at your hardware store. If you’re interested in hard piping your brewery flare fittings are super sleek looking. But if you want to use stainless steel tubing, plan to invest in an industrial tube bender, cutter and flaring tool. Rigid brand tools work well, but what you’ll find locally are designed for copper and soft steel like brake lines. Look on McMaster.com for industrial models specifically listed as being capable of forming stainless steel.
Air hose fittings have made an appearance in the homebrew world too. Now available in stainless steel they are quite durable and are also one-handed installs. But you do need to purchase the male and female ends. Again, if using in a high heat application you’ll want silicone seals for durability. Since these are metallic fittings you’ll want gloves to remove them in hot applications. For those that haven’t used air compressor fittings before, they operate much like a ball lock connector. They can be used in cold side applications but it is recommended to remove the seal to sanitize.
Installing a Hose
Installing a hose on a barbed fitting is a simple task — with a couple pointers. First, the little crevice at the junction between a hose and the fitting is a biological disaster waiting to happen. Always be sure to place the clamp on the FIRST barb of the stem, not the last. And leave enough gap between the hose and your swivel fitting to allow the fitting to rotate without interference. Now a bit about clamps. My favorite are Oetiker stepless clamps. They seal very evenly, look very clean, and are super secure. You can crimp them with a wire cutter, or you can use a special tool to pinch them. Worm gear clamps work well enough, but sometimes are prone to leaking. Not to mention the chronic problem of stabbing yourself with a flat blade screwdriver. That said, if you want to remove the clamp regularly you’re stuck with worm gear clamps to get the job done. And you can buy them locally, but look for stainless construction.
Bulkhead Fittings
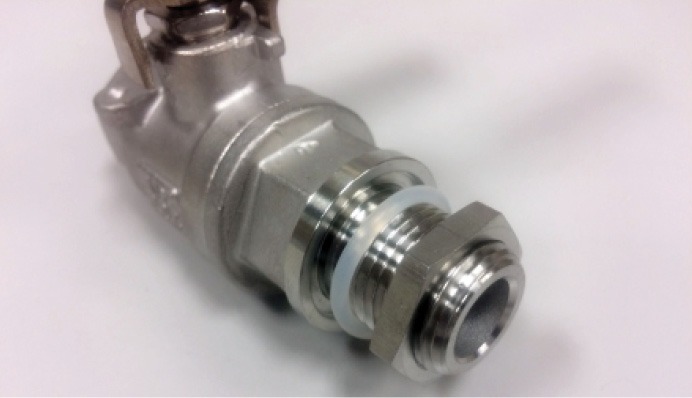
While fittings are obvious needs to connect hoses to pumps and kettles to move wort and brewing liquor, you need to gain access to the kettle through a fitting as well. There are a few ways to accomplish that. The first is siphoning. While this is economical, it is a bit of a pain compared to the simple process of turning a valve. There are a couple ways to add a valve to your kettle. One is to weld in a fitting to mount your valve. The other is to use a weldless connection. Both have been around for a long time and both are leak free. A welded fitting requires the help of a qualified welder proficient in welding stainless steel. However, if they don’t properly shield the weldment during welding you can end up with rust at the weld. So definitely look for an experienced welder. The weldless valve, on the other hand, can be installed with a step drill at home. There are low cost weldless assemblies made from off the shelf fittings and o-rings. They tend to seal OK, but are a little wiggly in the kettle. Another option is a valve with an integral o-ring and locking nut. These are very simple to install, are very rigidly affixed, and will not leak. They are also very easy to remove and disassemble for periodic cleaning.
Now a bit about galvanic corrosion. When it’s time to soak those hoses to clean and sanitize, remember that dissimilar metals don’t always play well together. Realize that keg fittings are usually nickel plated brass, hose clamps you bought at Lowe’s are likely zinc plated steel, and anything aluminum is happy to react with virtually any metal. And brass can turn a nice color too. So if you’re soaking them in sanitizer together, do so for just the necessary time and then hang them up to dry.
Find the Right Fit

To wrap things up, fittings are vital to every brewery, so put some long term thought into your choices. You’ll be using them every brew day and for many years. While there is no fitting that is the do all end all, I do recommend that you settle in on no more than two types for your brew house, and one type in your dispensing system. That way you can minimize the number of hoses in your brewery, and accordingly, minimize your expense and maximize your versatility. When making your selection, consider what features make your brew day more enjoyable. I personally hate searching for tools, gloves, or figuring out which hose I need for what piece of equipment. And remember that quality is always worth it in the long run.