Harvesting Homegrown Hops

Growing your own hops is a fun way to make your homebrew a little more homemade and can provide the freshest hops in your beer. We’ve run plenty of articles on how to grow hop plants (Humulus lupulus), so we’ll skip that here and instead focus on tips for harvesting and processing the hops as many regions in North America are in full swing of harvesting right now.
First, let’s look at how you know when the hops are ready to harvest — which will require many of your senses.
Sight: Look for a deep green color. When the tips start to brown that is an indication you have waited too long. Also look for the development of lupulin, the yellow powder that forms at the base of the leaves that make up the hop cone (called braceoles). As hops mature the amount of visible lupulin will increase and go from a paler color to school bus yellow. For a better look at the lupulin, pick a cone and dissect it.
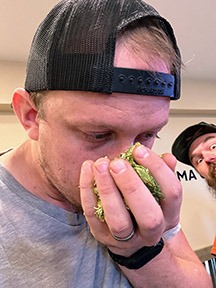
Smell: Get a good feel of the aroma the hops will impart in your beer by picking a couple of cones and rubbing them between your hands. Mature hops will have a pleasant and strong aroma, while younger hops will have a much more faint smell.
Touch: Gently pinch the hops between your fingers. Mature hops will feel springy and return to form as you release pressure. These hops filled with lupulin will also leave your fingers with a sticky, yellowish resin on them. Immature cones will remain imprinted when squeezed and leave less of the lupulin glaze on your fingers.
Once you have determined your hops are ready to harvest don’t put it off. There are a few methods to picking, depending on the time you wish to dedicate. Because the majority of the hops mature around the same time it is common to cut the bine (and twine or trellis wire they are climbing up) at the bottom so you can bring them to a comfy lawn chair and easily pick each hop by hand — don’t worry, the plant will start anew next spring. If you don’t mind doing a little more work to maximize the crop size, you can grab a ladder and pick only the hops that appear ready and go back to the plant each week to get the stragglers.
Once picked you can use your bounty immediately to brew a wet hop beer or dry them for later use. When drying hops you do not want to overheat them as this can cause a loss of the essential oils — temperatures from 90 °F to 115 °F (32 °C to 46 °C) are good. The best ways to dry hops are in a hop oast (a box in which air is constantly circulated through multiple layers of hops) or spreading them out in a single layer in a food dehydrator set around 100 °F (38 °C) for a few hours. Alternatively, hops can also be dried by spreading them out on window screens or cloth in a dry, warm space (attic, shed, etc.) with airflow for a couple of days. When the hops are dry they are about 20–25% of their original wet weight, have opened up a bit, and feel similar to tissue paper.
Once dry, load up zip-seal freezer bags with as little air in them as possible (or vacuum seal bags work well if you have them) and tuck them away in your freezer. Under these conditions the hops should remain in good shape for at least a year or longer.