Help Wanted: Yeast Wrangler. Repitching is a skill all brewers should know
Back in the days when there were only a couple hundred breweries in the United States it was common for brewery owners to claim they were the brewer. I ended up in many late-night conversations with other brewers about who is actually the brewer in a brewery? Is keeping the lights on sufficient? Who is the assistant? What part of the process is critical to operations? Over the years it became clear that the Head Brewer or Brewmaster was the person responsible for the wort and the yeast. As advanced brewers we have lots of experience with producing wort and many brewers focus a lot of their attention to its production. But many of us have less experience with yeast management. The easy availability of fresh yeast and the difficulty of serial propagation keeps many brewers (professional and amateur) from learning this critical part of brewing.
Much of fermented food production uses the process of keeping a “mother” — a carefully saved culture where enough is split off from the mother to ferment each batch. Beer, on the other hand, is traditionally produced by harvesting the yeast from the end of a batch and reusing it in the beginning of the next batch. This brings some of its own problems but is also one cause of the amazing genetic diversity found in brewing yeasts. Ale brewing strains are poorly suited for living outside of fermentations and seem to have diverged from wild yeasts roughly 7,000 years ago. (This is just an estimate — we are not going to quibble about a few thousand years here). The important part is how dependent yeast is on the brewer. Brewers make wort, yeast makes beer.
Many of the historic breweries have used the same strains for hundreds of years. This selective pressure from the brewers favoring different qualities has made some very unique yeasts. Tasting the difference between a Kölsch yeast and an English ale yeast easily shows the variations. Regardless of the strain of yeast you choose to propagate, wrangling yeast takes patience and attention to detail.
Repitching yeast has many advantages. In almost all instances, you will find that later generations have better performance than fresh pitches, lower final gravities and shorter fermentation times are expected. It saves money and usually time because a starter is not needed. Brewers describe ale and lager yeasts like dogs, once you learn how to make them do a trick, they will do it every time. This kind of experience comes from many batches on a single strain of yeast.

Many of the historic breweries have used the same strains for hundreds of years.
When we collect yeast from the end of fermentation it contains living yeast (viable), dead yeast (non-viable), non-yeast solids, beer, and CO2. Our goal is to try to keep the best yeast and discard the rest. In an ale fermentation it is traditional to add enough oxygen so the original pitch becomes 4x as large. As an example, if we start with 1 liter of yeast we should end up with about 4 liters at the end of fermentation. Adding more or less oxygen will change this growth rate. Since we have so much yeast it allows us to be conservative in selecting the proper pitch unless we are cross propagating to more than one fermentation.
If we have a well-equipped lab we can homogenize our pitch and examine it under a microscope in a hemocytometer and see the non-yeast solids, count the cells and even stain the cells and check the viability. This is the gold standard but you don’t have to have these tools to select good yeast for repitching.
Yeast will stratify at the end of fermentation. So let’s say our fermenter at the end of active fermentation contains 4 qts. (4 L) of yeast. The bottom layer of sediment will have things that settled early: Much of the non-yeast solids like trub will settle first. Yeast that is lazy and flocculates early will also settle first, let’s say roughly a qt. (1 L). The next layer of yeast should be very clean. This 2 qts. (2 L) of yeast is our dream yeast for repitching. The final qt. (1 L) is yeast that may have been poor flocculators. It is possible to select only the last yeast to settle and change the flocculation characteristics of our strain. This is usually undesired.
Floating on top of a stored yeast pitch will be a layer of beer called barm beer. This beer has been in the closest contact with the yeast and contains some very low flavor threshold off-flavors. It is best discarded. The CO2 in the yeast changes the density of the yeast significantly and can make pitching by volume difficult. If you don’t have the ability to do a cell count, then pitching by weight is a good strategy. If you spin your yeast on a stir plate you can drive off CO2 and increase the accuracy of pitching by volume.
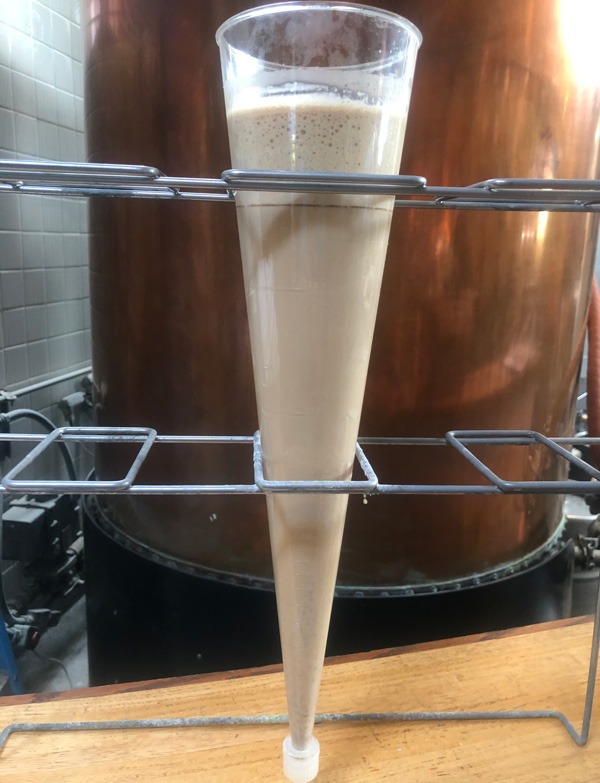
In the picture below I collected the bottom 1 L (~1 qt.) of Chico yeast from a 7-bbl fermenter that had just completed fermentation and been crashed for 24 hrs. As you can see there is very little non-yeast solids in this sample and shows the care the brewer took to separate the trub during whirlpool. Still, in the course of two hours I was able to settle most of it to the bottom of the Imhoff cone. If I was pitching that yeast, I would pour off the foam and the barm beer on top and use the middle 800 mL (27 oz.) and discard the bottom 150 mL (5 oz.) or so. After I took that sample the brewer discarded another 10 L (10.5 qts.), collected 10 L (10.5 qts.), and discarded about 20 L (21 qts.). He used that yeast within minutes of harvest to pitch into 217 gal. (821 L) of red ale. Much of this discarded yeast was very usable but was not needed to meet production needs. Taking two 10-L (10.5 qts.) pitches from this batch would have been easy if yeast was needed in two fermenters.
It is standard practice for brewers to keep generational counts. In my notes the first pitch is “1,” the second pitch is pitched into two fermenters and becomes “2a” and “2b.” The first number is always the generational age. The following digits show where the yeast had been. 2a might only become 3a if it was not cross propagated. Then, if 3a was crossed to two fermenters it would become “4aa” and “4ab.” This was just the easiest way for me to track what batches came from where. Often, I would let a line die out. This decision was made by tasting the batch of beer and evaluation of the fermentation parameters. Most brewers recommend only running 6 to 12 generations of a yeast. You can see that with cross propagating it is very easy to get 25 batches or more by generation 10.
A local brewer/friend of mine ran the same yeast-strain pitch for 18 years. He was very meticulous and did more than 6,000 batches with that yeast. After he left, the next brewer had contaminated the strain within two months. As an advanced brewer you get to set your comfort level and pitching goals. I made sure to always have a new pitch delivered every quarter (three months). From four pitches I made 105 batches of beer each year.
The enemies of yeast storage are temperature, time, pH, pressure, and contamination.
This is an ideal situation. The yeast is safest on the bottom of a crashed tank of beer if used in a timely manner. If the beer is needed before the yeast, it is customary to collect the yeast into a brink. A yeast brink is designed to be sanitary, to allow pressure to exit the brink and to not allow any air to ingress. It is kept as cold as possible without freezing. A very sophisticated brink will have a cooling jacket and a stirring mechanism to keep the yeast at the same temperature and homogenized. For a 5-gallon (19-L) batch, a beer bottle or lab flask with a piece of Saran Wrap rubber banded on works well.
Chris White and Jamil Zainasheff in their book Yeast – The Practical Guide to Beer Fermentation, have published charts showing the rate that yeast loses viability during storage. I reduced their work to a 50% viability after 7 days at 40 °F (4 °C) and 0 PSI rule of thumb and it has served me well. I take that to mean I only store in the brink for four days. To some extent you can just add more yeast to account for this loss in viability but too much dead yeast can autolyze and create off-flavors, so keeping your yeast fresh is very important.
A labor-intensive way of storing yeast is to keep feeding it with sterile wort and pouring off the excess beer and yeast until needed. Yeast kept this way needs to be fed about every four days and the risk of contamination increases with every handling step. This is akin to how a mother is stored.
The enemies of yeast storage are temperature, time, pH, pressure, and contamination. The safest place to store yeast is cold under sterile beer. I did not notice a change in viability when storing yeast under a crashed beer for a week but I could not store yeast in my converted keg for a week and not have to make adjustments to my pitching calculations.
The good news is you only need a single viable cell to propagate up a fresh pitch and if all goes wrong you can plate a streak of your yeast and select a few colonies and grow them up separately, finally choosing the one that has the desired taste, attenuation, and flocculation qualities. This is then stepped up to your pitching volume.
I read the other day in a forum where homebrewers talk about “washing” yeast for repitching but I have not been able to find out exactly what process they are using. I have used two methods to “wash” yeast. If I am only looking to get non-yeast solids out, I double the volume with sterile wort (some brewers use sterile water instead) and let it settle for a few hours. The non-yeast solids will settle quickly and you can use the rest as a pitch. It is important for you to use the yeast before fermentation starts or the non-yeast solids can get stirred back in. This is very safe and easy. However, I don’t call this washing yeast.
How I was trained to wash yeast (acid washing) is a process that I would only use in the most extreme circumstances. Such as if a pitch of yeast I expected to use was contaminated and wort production was complete. As I was trained, you double the volume of your yeast with sterile water and then using phosphoric acid you lower the pH while stirring gently. This pH target is very strain-dependent but is very low, even as low as pH 2.2. The pH is held at 35 °F (2 °C) for two hours. The yeast is then pitched right away.
The idea is any contaminating bacteria are killed before the yeast. If you suspect a contamination, I find it is better to get fresh yeast or to plate from a single cell. In my experience washing yeast lowers the viability dramatically and the first fermentation has lower attenuation and runs more slowly. Some brewers have found this process to be very effective and employ it every pitch. It should be noted this process is also not very effective against wild yeasts or lactic acid-producing bacteria (LAB). LAB are hop-sensitive and iso-alpha acid wort to at least 10 IBUs can be added to try to protect against these type of contaminations.
Colin’s yeast pitching checklist:
- Did the last fermentation proceed orderly?
- Were you able to harvest enough clean yeast to reuse?
- Can you store it cold? (At least 40 °F/4 °C and not freezing.)
- Can you ensure it is under low pressure?
- Did you separate off the non-yeast solids?
- Can you reuse it in a timely manner?
Colin’s yeast repitching rules of thumb:
- 1 lb. fresh yeast per bbl/0.5 oz. per gallon/3.7 g per L
- Viability declines 50% in 7 days
- Wash yeast below pH 2.4 if needed
- Add 10 IBUs of iso-alpha acid to the wash
- Discard the first and last yeast to settle
- Smell your yeast before pitching . . . use yeast that smells clean and bread-like and reject yeast that smells like soy sauce (autolyzed), phenolic, or funky
- Expect quicker fermentations and lower attenuation: Generally repitches finish two days sooner and 0.002 gravity points lower compared to 1st generation
Repitching yeast is one of the best things a brewer can do to maintain quality in their product but it requires consistent wort production. I often tell people that you are not a brewer till you decide to discard a pitch you really needed instead of pitching it. It will happen, so always have a backup plan.