Home Bar Builds
We asked readers to share pictures and stories behind their bar designs. Here are our favorites:
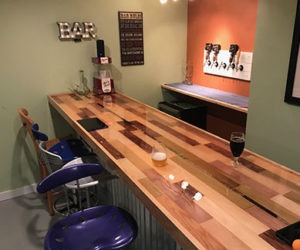
Dan Stocker • Red Deer, Alberta
When we purchased our house two years ago, one of the requirements was that there would be an area that I could use for a bar/homebrewing spot. We found a place with an undeveloped basement, got the basement finished, the plumbing roughed in, and got started on the bar. I really enjoy homebrewing and wanted to create a space that I could brew in, but also a space that I could hang out with friends and family while they drink my beer. I set to work on the most important part — the taps — drawing inspiration from a friend’s tap setup that he has in his kitchen and random images that came up when I Googled “basement bar taps.” I wanted to create an island big enough to enclose all of my draft equipment (CO2 and nitro included) and serve as an aesthetically pleasing “sit-up” bar area.
The design was relatively simple; I built a box around a freezer, bought and stained the birch countertop, installed it with heavy duty hinges, drilled a hole for the tap tower, and finished the outside with faux rock. The cabinets I had done custom since that’s a bit beyond my carpentry prowess, but I installed the wet bar sink and a utility sink with filtered water behind the scenes in the laundry room. After the main part of the build I filled the drawers and cabinets with all my homebrew gadgets (Erlenmeyer flasks, stir plates, etc.). I built some shelves to match the countertop along with the backsplash and added a few items that looked cool with some sentimental value as well.
I didn’t originally have much of a vision for the bar; I was worried about having unrealistic expectations and then not finding a place that could live up to the hype. I wanted it to have a pub feel, function, and look, but also showcase a few items that mean a lot to me including:

- The shadow box with my Granddad’s WWII memorabilia.
- The “Sword of Charlemagne” replica (also from my Granddad).
- Two long neck bottles from The Establishment Brewing Company, which is owned by the award-winning brewers (Mike and Brandon, among others) who taught me how to brew. These are from their very first barrel-aged batches of beer and their passion for brewing has been a huge inspiration to me.
- The German stein was a gift to my Dad for some engineering work he did in Germany.
- My first homebrew medal; a silver for an English extra strong bitter called “Bloody Well Right.”

Now that the space is fully set up I can have coworkers over for team meetings and chat about beer with friends and family while pouring pints for them. Being able to have all my brewing equipment in one place has streamlined my brew days and made it more enjoyable to brew. I do have some plans for the future of the bar; I’d like to install a 240V plug and an exhaust fan so I can boil indoors (I use propane on my front deck right now). My fiancée, Christine, has done some wine kits that we have carbonated and put on tap, which were delicious, so I’d like to expand from beer and try some ciders and perhaps meads in the future also. I like to think of the bar as a constant project that’s never really finished, always making tiny improvements either functionally or aesthetically.
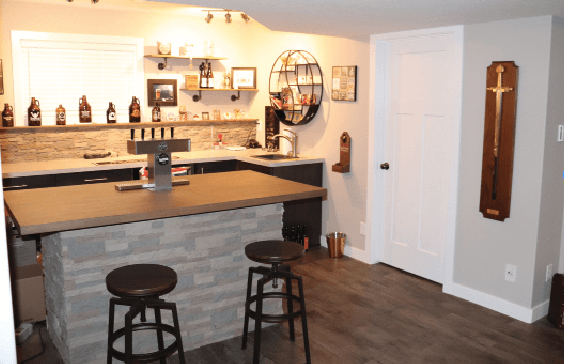
William Blase • Colorado Springs, Colorado

This is the bar that friendship built. Everything from the idea to the construction of it was all because of friendship. When the time came for us to search for a home, we desired to find a house that had enough space for entertaining. Our bar was going to be a focal point in our household, not just a table in a corner. I do not think there is a better idea than to have a room dedicated as a brewpub to showcase my homebrew. When we bought the house, I quickly set out researching designs that would maximize the space available.
It was going to be in a sunroom with a lot of natural light, and within a month I had a design. My brother-in-law, Keith, made plans to help me build it. We built it from scratch, with a custom-designed backside to fit a kegerator and mini fridge as well as giving me space to store my glass collection. I went with the dark stain and corrugated tin roof for the design; which complemented the existing farmhouse style décor of our home. For the tap tower I used steel to add an industrial look. Shortly after the bar was built, I saw the need for more. When friends would come over we would run out of fridge space and draft beer — it was time to expand! I then found a fridge and chest freezer online. My desire was to repurpose something old and give it new life. I cleaned and painted both with chalkboard paint to allow the current brew on tap to be displayed. My good friend came up with the brewery name “Role Model Brewing Co.” and drew the hop on the fridge.
This home brewpub is used for good times. We play games, listen to music, and most importantly get away from the daily grind. To this day I have refused to put a TV in the brewpub as this is a place for laughter and good times with friends. I am a member of a fun beer group on Facebook that uses our pub to host beer shares. We sure can pack the place! I also use the bar to have tapping parties. What’s homebrew without some friends to share it? That’s where all the décor comes from. The stickers that cover my kegerator and mini fridge beneath the bar come from beers enjoyed with friends; every one of them holds a memory. The tin tackers are from breweries that we have been to that hold great times as well; each with its own story.

If I had to pick one aspect that I would call my favorite part of this brewpub, it would be the memories. Sure, there are many neat little things in here, but the memories that it has given me are next to none. I do love my tap tower, though. It was fun to build and does a great job keeping the beer cold with some good insulation inside.
The story of my brew pub continues to grow. I have some expansions planned in the near future. I am currently building a bigger keezer to start my sour tap and conceal some CO2. I am also looking into dartboards to add another game to the pub. Lastly, I am going to be putting my new home-built electric brew system in the brewpub, but that will be moved when guests are here.
Will Swingle • Waconia, Minnesota

For years my wife and I have had a recurring conversation. It normally begins with something like, “wouldn’t (fill in random name) be a cool name for a bar?” It then goes on to build upon a theme and design that we would love to hang out in and even own one day. Owning our own bar has always been a dream, but not one that would ever be feasible without making some huge life changes. So, instead we decided that we would put one in our home.
I picked up woodworking as a hobby a few years ago and mainly work on projects during the summer because I’m a teacher and that’s when I have the time. Each year I have one big project that I spend a lot of time on and last summer it was the bar. We had just finished our basement and at that point knew exactly what it was missing so we decided to go for it. My wife and I spent about two weeks building and installing it.
The shape was chosen to fit and function in our space. We knew we wanted to be able to have at least six people sit at the bar at once and since it is in the middle of a large room, it needed it to be separate and not dominate the space. We also wanted to make sure we had enough room to allow use of the living space without it feeling cramped. With all this taken into account we came up with the design and it was perfect except our rough in for plumbing was about a foot too close to our back wall to accommodate what we had in mind. The solution to this problem would eventually be a small seat/shelf at the far end of the bar to allow space for the plumbing (shown in the image below).

The frame is made from 2x4s and was probably the easiest part of the build. The tops are made of 2x6s and gave us a bit of a headache when it came time to bring them downstairs. The stairs into the basement have a sharp turn in them and so the boards wouldn’t fit around it. To solve this problem we had to bring them in through the window.
The front of the bar is shiplap and was designed to match the back wall of the basement, which we installed at the same time. This is one of my favorite parts and took the most time. Each piece of shiplap was unfinished to begin with. We stained each one then either white washed or distressed them to give us four different colors using three colors of stain, a white wash, and a brown glaze. My wife was the mastermind behind the color and pattern of the wall and front of the bar. She measured and cut nearly every piece and I hung them up. Like I said, this took a long time.
Next it was time to install the sink. I had never done this before but thanks to the internet and the directions that came with it, figured it couldn’t be too difficult. I had already cut a hole in the top so the biggest challenge was deciding how tall we wanted the faucet to be. We went taller because the sink was small and we wanted to be able to fit tall glasses under it.
At this point we primarily use the space for hanging out as a family. We have a living space on each side — one for television (it gets a lot of use during football season) and the other for games, and the bar anchors down our basement.
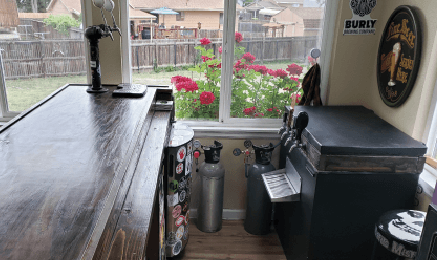
Danny Allwood • Sheffield, UK

The main consideration behind my bar was that I wanted to get into kegging my beer (rather than just bottling), so with future-proofing in mind, I wanted to be able to eventually run three keg lines in as small a space as possible. It’s difficult to get a refrigerator large enough to hold three Cornelius kegs and a CO2 tank, so I did a lot of research and found a chest freezer with the perfect dimensions and then bought one used on the internet. The kegs and tank fit nicely with a little space on the back shelf left over, which can be used for lagering beer in 1-gallon (4-L) fermenters. To run the freezer as a fridge, I used an external temperature-controlled power supply, which cuts power to the freezer when the internal temperature reaches 43 °F (6 °C) and turns it back on when it reaches 50 °F (10 °C). You can see the temperature probe cable in the bottom photo as the probe is taped to the side of a cider can sitting on the back shelf.

Internally, the kegs are carbonated and beer delivered by CO2 pressure from a 6.6-lb (3-kg) tank, with a single regulator and a 3-way gas splitter manifold providing gas to all three kegs. All the carbonation and delivery is done under the same 10 psi of pressure so that I don’t have to mess around with changing the gas pressure and the carbonation only takes around a week.
The beer lines are run through a hole in the lid of the chest freezer into the “coffin box” on the top, where the three flow-control taps are mounted. There are three more holes between the lid and the coffin box, which have computer fans mounted in them to ensure the air circulates properly through the whole interior. This ensures the top section of beer lines stay reasonably cold (to stop out-gassing and foamy pours) and also to prevent any mold growth. All the lines/probe cables etc. run through the lid as the walls of the chest freezer are where the coolant pipes are housed, so drilling through them is a bit problematic.

Cosmetically, the freezer is just painted with blackboard paint, which allows us to use chalk pens on the front/sides. All the wood is reclaimed from our local wood recycling depot, so cost less than $25 in total and is just finished with stain and wax. The wooden frame around the front/sides of the freezer isn’t fixed – it slides out in case the bar needs to be moved (as the chest freezer itself is on wheels). The top frame is bolted on to the freezer lid, so you can just lift the entire thing up on the pre-existing hinges to access the kegs.
There are RGB LED strips built into the underside of the coffin box and the under sides of all the front/side panels, providing downlighting that can essentially be set as an infinite number of colors or changing patterns as desired. A switch for the LEDs is mounted on the back of the freezer but they’re also remote controlled, which is how you set the color, pattern etc.
All the electronics (LEDs, fans, temperature control unit, etc.) are plugged into a multi-way adaptor that is mounted onto the back of the freezer, so the entire bar only uses one plug in an electrical socket and it keeps the cables tidy!
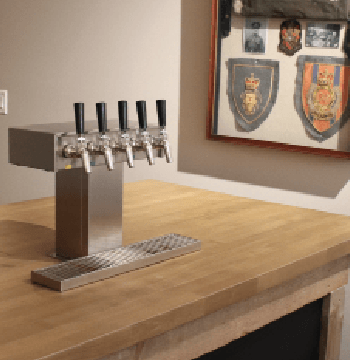
Jeff Witte • Independence, Missouri

hen I started brewing 10 years ago, I had no idea just how hard the bug would bite. I got this hobby kicked off with your typical starter system and a couple extract kits, and it has morphed into a half-barrel electric system that attempts to keep my 10-faucet-long draft system in my basement bar fed. The bar has been a work in progress over the last five years, slowly collecting pieces and building it out a little at a time. Picking up the tap tower here, the glycol chiller there, and eventually the cabinets and actual bar top, and it has finally evolved into something for my friends and I to enjoy my homebrew at.
I started the long decision-making process of trying to decide exactly how I wanted it to look and how it was going to be laid out by finding as many pictures of basement bars that I could, and using masking tape on the floor to lay out possible options that could fit. I went back and forth for quite a while as to whether I wanted a long traditional bar or a small wet bar style. In the end, I went for a blend of the two, and chose a small space that could still seat 5–6 people comfortably while also having a traditional feel, but not taking up as much space overall as a full-size bar.

Once I had the design and layout figured out, I had to decide what I was looking to use for materials. Again, I had several thoughts in my head for what to do based on the many examples I had been looking at. Eventually, I came to my decisions based on ease of install, ease of future maintenance, and overall feel of how they worked together. I started with ceramic tile flooring that has the look of wood floors. I wanted something with good appearance and wear qualities, but more importantly, easy to clean and keep clean. Once that had been laid, I placed the back bar cabinets and painted them black to blend in with the wall paint scheme, and topped it off with a butcher block-style countertop finished in a neutral color with several coats of gloss polyurethane.
For the bar itself, I used another butcher block piece finished the same, and then wrapped the bar front with recycled pallet wood I had picked up from a local brewery and my homebrew supply shop. The pallet wood is then carried through to behind the back bar for a nice rustic feel that I think highlights the stars of the bar well, the 10-tap tower, and my lit up homebrewery logo sign. Being near plumbing was a big consideration of the location so that I could put a sink in the back bar and feed my glass rinser drip tray. Being in IT, I of course had to add computerization to the bar as well, using a monitor for a menu board and flowmeters to keep track of keg levels.
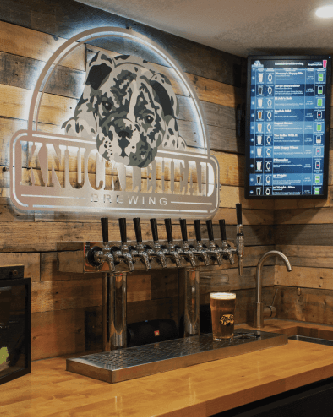
I wanted my basement bar to have plenty of keg space, but I also did not want any sort of refrigeration compressors in the bar itself. To accomplish this, I found a commercial-style three-door cooler and a glycol chiller to keep everything cold. I set all of this up in my garage with a 30-foot trunk line heading into the basement. With a 10-gallon (38-L) reservoir, the glycol chiller is also able to pull double duty and keeps my three conicals at fermentation temperature, and even cold crash, while still keeping the trunk line and tower chilled.
It’s taken time to get it to where it’s at now, but by working slowly I’ve been able to create it exactly how I envisioned, and been able to wait for the great deals along the way. Knowing that I built it all with my hands, and those of some great friends who have helped out, makes it all the more satisfying to sit down and have a beer at.
Richard Barnes • Nottinghamshire, UK
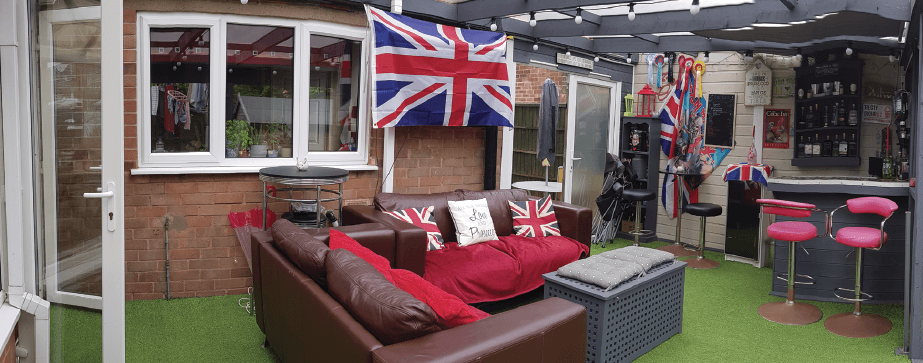
o begin with, Bar-NES was a sad, empty square of decking on our back garden. It was rarely used and needed staining yearly, which took a great deal of effort and usually faded pretty quickly; leaving the whole area looking rather untidy. This was not helped by the recalcitrant herd of garden furniture scattered across the deck.
It was June 2017 that we decided to take action and bring the area to heel. The initial plan was to build a semi-permanent sheltered outdoor seating area that joined onto the back of the house, between the conservatory and the boundary fence, which means that we only would have to build one side, whilst also giving us easy access into the house. Yet as the seating area took shape we felt it was missing something. As August approached we decided to add a bar to the space . . . and so Bar-NES was born.
The result was a wonderful sanctuary protected from the unpredictable British weather by two retractable awning blinds and a set of sturdy French doors. As the summer reached its end we found we were able to sit outside later into the evenings, especially with the addition of the TV, which brings the homey feel of a living room outside. In the time since, we have had many enjoyable nights in almost all weather.

With the addition of the bar, alcohol came naturally and we stocked up on various beers, wines, and spirits. We have had a few parties, and Bar-NES has allowed for a great atmosphere with different lights and later additions of sofas, bar stools, and tables, which means that there is plenty of seating. Additionally we rescued an old bookcase, polished and painted it to match the color of the bar, and turned it into a shrine to Iron Maiden’s “Trooper” complete with the flag and it’s one of my favorite features of Bar-NES.
Another of my favorite parts is the bar itself. Not just because of the alcohol, but because of how we decorated it. After around four months of collecting bottle tops from a local bar, we set them into the top of the bar and covered them with resin, which is a great background for pitchers of cocktails.
As good as this was, the most recent change we made was to cover the visually offensive decking once and for all with artificial grass. This makes it much easier to walk on barefoot and easier to keep clean with the vacuum cleaner, and in my opinion really sets off the space, contrasting with the darker grey of the walls which is pleasing to the eye.
One of our favorite hobbies is to create cocktails and host family tasting sessions. We have made a wide variety of cocktails, which are all published on our Instagram page ‘bar_nes_cocktails,’ which add a burst of color to the bar and bring a flavor to our relaxing evenings.
As Bar-NES’s second summer year up, we have plans to extend outwards for an area to barbecue and eat.