Long-Draw Draft System
Pushing your home draft system to new levels
Homebrewers tend to have a habit of making things more complicated than needed. Why buy a wort chiller when you can spend a weekend wandering Home Depot looking for the right combination of copper compression fittings? If you have a kegerator, I am guessing that many of you have contemplated installing a more ambitious beer delivery device. The kind of system that gets your cold draft to a corner of the house or home bar, far away from where your kegs reside. Don’t walk all the way to the kegerator. Have the beer come to you.
It can be done and it’s not particularly hard, but these systems can be cost-prohibitive. Long-draw systems are most commonly found in bars where refrigeration storage for the kegs may be a long way from the faucets. And there are a few rules that must be adhered to and more than a few opportunities to mess it up along the way. This article will guide you through the design and installation process.
We will discuss a hypothetical system installed within a single-family house with a basement. Your particular system may not require every aspect of this design, but with a little knowledge and an idea of what to look out for, you should be well prepared to take a deep dive. Previous draft system articles in BYO offer useful information about tubing, faucets, hardware, and home bar designs. Some of this stuff is going to be buried behind drywall or under a slab and a realistic evaluation of your builder expertise is warranted. I can assure you that nobody at the hardware store will have any useful expertise. Don’t make the mistake of designing and installing your system similar to household plumbing. We are going to assume you have a solid understanding of draft system balance. If not, spend some time learning about how the relationship of pressure, resistance, and temperature work in a draft system. A long-draw system is complex. I’m not here to tell you not to go for it, only to be the sober friend. You really don’t want to use substandard equipment anywhere, but with a long-draw the stakes are much higher.
Loosely, there are three types of draft systems. A direct-draw system is one in which the kegs are stored in a cooler and the shank and faucet assembly penetrates the cooler wall. This is the simplest of the three. It eliminates several hardware and cooling problems, making life cheaper and easier. A converted refrigerator or chest freezer (a.k.a., keezer) are examples of a direct-draw system. A slightly more complex design is a short-draw system, in which the kegs reside in a refrigeration unit and the faucets are a few inches or feet away. A fan is typically used to move cold air from the cooler into the unrefrigerated space and then back to the cold space. If you are familiar with a typical kegerator with a tower, that’s a short-draw system. Both are fairly simple to design and install. The third design is a long-draw system, requiring an order of magnitude more planning, hardware, expense, and time. You’re looking at around $2,500 (USD)minimum and the costs can go up from there. That’s not including minor or major home renovations that may be involved. But the reward is impressive.

The complexity of a long-draw system is mostly wrapped up in the refrigeration requirements, along with a decent amount of resistance headaches. Unlike typical plumbing, our beer always needs to be at the correct temperature from keg to faucet, which is never more than 38 °F (3 °C). This is one of those hard rules. You like your beer at 44 °F (7 °C)? Tough. Let it warm up or pour yourself a glass of foam. Keeping it cold is the prime design initiative and it is unfortunately not something we can neglect. Even a few degrees variation will cause foaming. You will be reminded, and annoyed, each time you pull a pint. Homebrewed beer comes with not insignificant amounts of pride. Commercial kegs come with a healthy price tag. We want this system to pour great beer, whether homebrewed or commercial, day in and day out.
First, we are going to need a cold space to store our kegs. You don’t need a walk-in cooler (though if you convince your significant other . . . well, great). A fridge or chest freezer will work just fine. An external thermostat is required because, again, maintaining temperature is our dilemma. As for resistance, the farther the keg from the faucet the more line resistance we have to account for. Add lift or drop (a.k.a., gravity) to the equation and things get more difficult, but should not be a deal breaker. We will calculate resistance later. So number one, keep it cold; number two, correctly calculate restriction; and number three, apply gas pressure to get beer from keg to faucet. This last part is where long-draw systems can get nutty. We are going to discuss blended gas in a future article, so if your particular long-draw system cannot be balanced with 100% CO2, stay tuned. Soon you’ll be able to get your beer virtually anywhere in your home.
In our hypothetical long-draw, Joe Homebrewer wants to install a faucet in his shower. Because why not? Joe has a basement and the shower is on the second floor, with a total distance of 25 feet (7.6 meters) from the Corny keg to the faucets. Joe brews a lot and wants four faucets available. He has a chest freezer for keeping his kegs cold and knows how to patch drywall as well as cut tile. Joe’s system does not need a drip tray (he is in a shower after all) but if you are going to your kitchen counter, plan for a drip tray and drain.
The complexity of a long-draw system is mostly wrapped up in the refrigeration requirements, along with a decent amount of resistance headaches
Joe plans to re-use his keezer for this long-draw system. Once the beer exits the refrigerated space it will warm and CO2 gas will escape resulting in a foamy mess each time a beer is poured. The foam will continue until the cold keezer beer reaches the faucet and then the warming process will start all over. Let’s not do that. We will use a dedicated trunk line with a glycol loop to keep our beer at the correct temperature from keg to glass.
All of the BYO draft articles I have written discuss the importance of using quality hardware and this goes double for a long-draw system. Some of this stuff is going to be buried behind drywall or under a slab so you really don’t want to use sub-standard equipment anywhere. With a long-draw the stakes are much higher. Use brewery-approved materials throughout, sourced from name-brand manufacturers. All metal components are going to be stainless steel and your vendor should have a reputation for integrity along with a generous return policy.
Keeping It Frosty
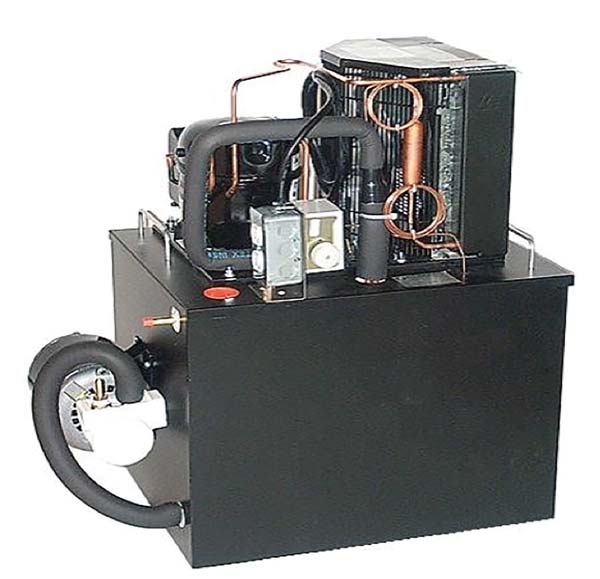
A glycol chiller used in combination with the trunk line should be employed to maintain temperature. The chiller circulates glycol within an insulated assembly of beer line, tape, and moisture barrier. The glycol continually removes heat that would otherwise allow the beer to warm up. A pump runs the glycol 24/7 in an endless loop and the compressor assembly switches on and off to maintain glycol temperature (usually cut out at 28 °F/-2.2 °C, then cut in at 34 °F/1.1 °C or thereabouts). With four lines to chill for a distance of less than 25 feet (7.6 m), Joe can use a chiller with a capacity of around 1,000 BTUs. A useful formula for calculating BTU requirements is to multiply the number of faucets by 100, then multiply the foot length of the trunk line by 7 (up to 6 lines). Add both to determine BTU requirements. The chiller should be a bit oversized though. Multiply the BTU requirements by 1.4 to determine the appropriately sized chiller. Round up to the nearest size. If your line goes through a hot attic you’ll want even more BTU. The chiller will also be used to keep the draft tower cold. Quality towers have an insulated shank assembly with chilling blocks built in, and that helps quite a bit.
Here are some things to consider with the chilling part of the system:
- Account for a receptacle near the chiller. Get some “glycol jumper line,” a premade insulated length of line to get from your chiller to the trunk line, or make your own. Use 3⁄8-in. ID poly line. All of this refrigeration equipment makes some noise and generates heat too; choose your installation location carefully. But wait, there is more!
- The chiller will not bring down the beer temperature, but it will maintain the temperature from the cooler. The glycol chiller’s thermostat should be set to maintain a bath temperature roughly between 27 and 33 °F (-3 and 0.5 °C). The chiller will hopefully be factory set. If not, you get to experience the joys of programming a commercial digital thermostat.
- Mix your 100% USP-grade propylene glycol to around 24 °Brix. That is roughly 2 parts water to 1 part glycol. Most chillers do not require distilled water, but check to be certain. 24 °Brix glycol will bring the freezing point well below the bath temperature. A refractometer is required for this measurement as hydrometers do not work so well with glycol (if you don’t have a refractometer, now you have a reason to purchase one). The copper chilling coils operate at around 0 °F (-17.7 °C). If your mix is too lean you’ll get a block of ice, but don’t overdo it or you can jam up the pump. Glycol absorbs moisture and it needs to be checked every few months and replaced when the Brix starts to creep. Only use 100% USP-grade propylene glycol.
- Pure glycol has a shelf life of about one year. UV light (sunlight, for example) will quickly degrade the fluid. Buy only enough of this increasingly expensive fluid to get going.
Right about now you may be thinking “I can design and build a homemade glycol chiller and keep it in the refrigerator.” That’s an idea, but a fridge will not get cold enough. Freezer? Unfortunately, residential freezers do not have the heat removal capacity. The air will get below freezing of course, but the constant heat loading in the freezer is too much for the unit to keep up with. In addition, air is a relatively poor conductor. A dedicated, purpose-built glycol chiller uses cold copper coils in direct contact with the glycol solution. If you’re still not convinced, we can provide a few examples of clients who asked us to get their glycol systems sorted.
Resistance
System resistance refers to the friction and gravity inherent to the system. It is a one-time design consideration we need to get right. First, determine how much trunk line you need. This is the length from the coupler to the shank. Trunk line is available in ¼-in., 5⁄16-in., and 3⁄8-in. ID sizes. 1⁄4-in. barrier tubing provides 0.4 psi of resistance per foot (30 cm), 5⁄16-in. is 0.15 psi per foot (30 cm), while the larger 3⁄8-in. ID is only 0.06 psi per foot (30 cm).
These are generalities because every manufacturer is ever so slightly different, but the differences are not so important within our limited trunk line distance. Ignore 3⁄8-in. discrepancies since they are really only useful in bigger systems like those found in stadiums. The other two sizes are similar. If your resistance calculation allows for it, ¼-in. is preferred as it contains less beer and is therefore easier to chill. It’s also a bit less expensive. The glycol line in the trunk is universally 3⁄8-in., however, and you are going to need 3⁄8-in. splicers no matter what the ID of your beer line. Almost all beverage line in the trunk is made with barrier tubing. Remember that the trunk is permanent and there is a lot of beer in that line. Barrier tubing is a requirement. The glycol line will be less expensive poly tubing.
Next determine the rise (lift) or fall of the beer. This is the vertical distance from the middle of the keg to the shank. We need to be accurate to within a foot or so. If the trunk line goes from the keg and into an attic before going back down to the shank, only measure the actual lift from keg to shank. Every foot of rise that has a corresponding foot of fall is cancelled (and vice versa). Our beer needs 0.45 psi pressure to overcome each foot (30 cm) of lift (or simply ½ psi per foot/30 cm). With the magic of blended gas we can overcome quite a bit of resistance and lift. What is much harder is dealing with gravity. Beer falling from a keg on the third floor to the basement bar is a complex design constraint because it is hard to compensate for the lack of gravity induced resistance.
Our applied pressure is carbonating the beer but it is also pushing the beer. If we have a target 2.5 volumes of CO2 we will need to apply about 11 psi to the keg. If our system incorporates a 25-ft. (7.6-m) drop, that’s 11.25 psi of gravity removed restriction. 25 ft. (7.6 m) of ¼-in. tubing provides 10 psi of restriction. So we are already unbalanced. We will need to compensate with a lot of choker. It is usually much better to push kegs on the same level as the faucets or up a modest amount than it is to deal with beer drop. That and hauling kegs up and down stairs is not fun. If we flip the design and decide to push the beer up 25 ft. (7.6 m) we would be looking at 10 psi or 3.75 psi of resistance with ¼-in. and 5⁄16-in. respectively. With an applied 11 psi of pressure we can balance our system with a few feet of choker. Line diameter should progress from larger ID to smaller ID from keg to faucet. This is a hard rule. Introducing a smaller diameter tube along the circuit will cause foaming.
Your Sanke couplers should use 3⁄8-in. tubing. Cornelius keg quick disconnects (QDs) need a line ID that is at least as large as the trunk line. This line should be flexible too, not rigid barrier tubing. “PVC Jumper” is available in premade lengths for Sanke couplers.
Poly barrier tubing is difficult to work with in a cooler, from the coupler or QD to the trunk line. Use flexible tubing (https://BYO.com/article/choosing-tubes-and-hoses/). Tubing from the trunk line to the shank will be 3⁄16-in. choker. Flexible TPE is best used for choker because it is 3 psi per foot (30 cm) and it is barrier, but quality PVC is not a beer crime. You can inspect the PVC and replace it whenever you feel it is required.
After you peel off the insulation and install splicers, you need to rebuild the trunk. You need foam tubing, silver tape, foam tape, and refrigeration tape for all that. You’ll need it to insulate the choker as well.
The Install
After you have determined the design restriction, bought your glycol chiller and glycol, trunk line with an extra few feet just in case, glycol jumper line, 3⁄16-in. choker along with all of the associated splicers and clamps, you are ready to get a tower installed. There are literally dozens of design options. You do get what you pay for with draft towers. Economy towers tend to be flimsy affairs with mediocre insulation and questionable hardware. My advice is to find a reputable provider that will allow you to buy the tower without faucets so you can use your preferred faucet. Just be careful about compatibility issues; this equipment is supposed to be universal domestic thread, but it doesn’t always happen. Specify the proper width drip tray as well.
We typically install the draft tower first, then work from the kegs up to the tower. The tower will likely come with 15 psi of restriction out of the box and you will trim that back as needed. If your design needs more than 15 psi of restriction you should take a second look. More than around 15 psi is difficult to get right when using 100% CO2. Try going from ¼-in. to 5⁄16-in. line and recalculate. Ask your supplier how much restriction they have built into the tower and how much restriction each foot of choker provides. This is usually anywhere from 2.0 or 2.2 psi per foot (30 cm) of PVC to 3 psi per foot (30 cm) with TPE line. It is very important to know this accurately so you can complete your install precisely.
You have options when choosing your draft tower (sometimes called a font). Namely, look at purchasing a glycol insert. This is the guts of the tower and you can use it behind a wall, for example. You’ll save a bit of money as well.
What to consider with a draft tower? Faucets are a lever and that tower will get pulled on . . . hard. Secure it on a suitable substrate such as ¾-in. (19 mm) plywood or something equally robust. Drywall or tile backer board are definitely not going to work. Plan to sufficiently reinforce the wall or countertop. Promise draft beer after the installation is complete and employ a buddy for assistance.
Tall faucet handles can lean back into the wall before being fully closed. There is a thing called a faucet straightener for this and they are cumbersome, but they do work. Or just use stubby handles.
European towers may be metric and therefore do not accept domestic faucets. Check first.
Ready to install this dream system? If the previous sections have not scared you off, and it shouldn’t have, dive in. A long-draw system is quite a bit more complex than any draft system you may have experienced and the results are accordingly very satisfying. Take your time, read up (including links below), and check all the boxes. Draft beer in the shower is really a possibility. And if your significant other has different ideas . . . we have never met.


