In Search of Perfect Foam
There is something inviting about beer foam. A tall hefeweizen with a creamy white cap standing proudly above the rim readies me for a great experience to follow. We know that great foam is a combination of malt proteins, charged ions, hop resins, gentle brewing, the right dissolved gases, clean beer glassware, and proper dispense. It’s like foam is a litmus test for excellent beer; or maybe that’s just how my selective memory has framed the significance of foam. It is true that beer is one of few beverages with a persistent foam and it’s also true that foam is a sign that beer has been roused during pouring, allowing for the release of aromatics. Foam adds mouthfeel to beer, deposits a wonderful windowpane-like lattice on the surface of a clean glass, serving as an indicator of sip size, traps aromatics released during pouring for enjoyment during drinking, and provides a layer of insulation to the top of the beer.
Over the past century of brewing research, scientists have identified the major contributors to beer foam. Protein Z, a group of albumin storage proteins each weighing about 43 kilodaltons (kDa) found in the barley endosperm, and Lipid Transfer Protein 1 (usually denoted as LTP1), a smaller functional protein weighing about 10 kDa, are believed to be the most significant foam proteins. We also know that metal ions, like iron, copper, nickel, and cobalt, improve foam stability, although none of these ions should be added to beer to boost foam! Hop resins improve lacing, carbon dioxide increases foam volume, ethanol improves foam up to about 1% and then becomes foam-negative, and carbohydrate gums, like beta-glucan, slow liquid drainage from foam. Guinness scientists figured out that nitrogen was the key to creamy foam when Guinness moved away from cask ale to ward off oxidation and then ushered in nitrogenation to the beer world.
Beers brewed with adjuncts suffered from protein dilution and brewers looked for foam stabilizers. In the 1950s, gum acacia was a common foam stabilizer produced from the bark of the acacia tree. Brewing scientists discovered in the late 1950s that propylene glycol alginate, produced from seaweed extracts, both improved foam stability and protected it from the negative effects of lipids transferred to beer through glassware. There was even a patent issued in 1949 to prevent gushing in beer by adding cobalt salts, which were believed at the time to pose no health risks to beer consumers. Brewers figured out that cobalt also improved foam stability, and some breweries began adding cobalt to stabilize beer foam before medical research put the kibosh to the practice. When hop chemists began producing reduced hop acids (hydrogen added across certain carbon double bonds), brewers quickly noticed that these advanced, light-stable hop products, especially tetrahydro iso-alpha-acid, aka tetra hop, improved beer foam stability. These hop products are now used specifically to improve foam.
Although the modern craft beer enthusiast often believes that “big beer” has never cared much about beer, large-scale brewers have constantly pushed beer quality forward, even when the methods involved practices with strange names. An article in American Brewer magazine was quoted by the Ann Arbor Sun in a 1974 article titled “Beer Belly Blues: Tastes Great, but Oh That Propylene Glycol Alginate” written by a Dr. Michael Jackson and originally published in the Lancaster Independent Press. The quoted excerpt read: “When beer was made with more malts and hops than is the practice today, stability of foam was rarely a problem. Today’s lighter type lagers and ales, however, made with higher percentages of adjuncts and only mildly hopped, require assistance in maintaining an expected head of foam.” Fifty years later that summation is still spot on, even in the craft world as brewers are increasingly being drawn to light beers to — how do I say this — sell more beer.

As an industry we know a lot about beer foam thanks to the research into this noble pursuit. As individual brewers we also know that producing beer with that perfect foam crown can be elusive. This article will focus on things we can do at home to improve beer foam in our homebrews.
All-malt brewing, especially when hops are generously dosed, gives homebrewers more than a fighting chance of brewing great beers with a heady topper of foam. There are a few things to look for when troubleshooting subpar foam. Over-modified malts can be a problem, especially when malt protein is diluted with low-protein adjunct grains like rice and corn or when sugar is added to boost gravity. The good news is that over-modification is uncommon these days and most base malts from around the world should provide sufficient foam-positive protein to give homebrewers enough of the good stuff. Very low-protein malts may also be problematic, but just like over-modified malts, these sorts of malts are relatively uncommon.
Brewers looking to boost what is typically present in wort have several options in the ingredient world to consider. Functional malts produced in such a way to improve beer foam and mouthfeel can provide a dose of boosters without having much effect on beer aroma, taste, or color. Examples include so-called short-grown malts like dextrin, chit, and spitz, and well-known pale crystal malts like Briess Carapils® and Weyermann Carafoam® (known as Weyermann Carapils® in all parts of the world other than North America). Although short-grown malts have long been used by European, especially German, brewers, they have little history of being used in North America until the last decade or so. Some joke that these malts are barely malt because of their very low modification levels, however, enzyme development and limited cell wall breakdown does occur during germination. The takeaway is that they are much easier to use than raw barley and they boost foam, mouthfeel, and haze.
Maybe you have tried using functional malts to boost foam and still want more? Consider making tetra hop the next stop on your foam journey. Tetrahydro iso-alpha acid is the name given to a chemically reduced form of iso-alpha acid. Although originally developed to prevent the light-struck reaction in conventionally hopped beer bottled in green and clear bottles in the 1970s, tetra hop is used by many brewers to improve foam. Tetra hop does have some properties that brewers need to keep in mind when using it. For starters, it is on average about 1.4 times more bitter than regular iso-alpha acids. It can also create a donut-like raft when used as the sole source of bitterness; this unusual appearance only occurs if a beer is poured and left to sit for several minutes. Because few beer drinkers pour a beer and leave it untouched for several minutes, breweries using tetra hop generally don’t have a big issue with it — but don’t say you weren’t warned! Craft brewers who use tetra hop usually use it in the 5–10 ppm range (about 7–14 IBU equivalents) and add other hops for flavor and aroma. Tetra hop increases foam stability and produces very impressive lacing. If you are not sure what tetra hop does to beer, pour a Miller High Life into a glass, observe, then enjoy.
For the chemically inquisitive, Figure 1 (below) shows how a generic alpha acid is heat-isomerized into a generic iso-alpha acid, then reduced by the addition of four hydrogen atoms to a generic tetrahydro (literally four hydrogens) iso-alpha acid molecule. The “R” designation is used to denote that these molecules have different forms (humulone, co-humulone, post-humulone, and ad-humulone) that vary by the “R” or functional group.

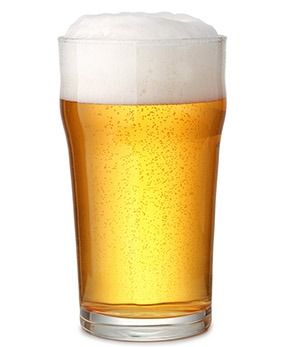
The last ingredient I want to mention is propylene glycol alginate (PGA). Although not something easy to purchase at your local homebrew shop, there are online retailers that sell PGA for use in molecular gastronomy. One supplier even has a glass of beer on their package, although nothing on the package mentions beer. Like tetra hop, PGA beer foams can look unusual if too much is used. PGA works very well to improve foam instability associated with high adjunct use and to combat the effects of oils that often are transferred to beer from greasy foods like French fries and potato chips. You guessed it, some brewers want to make their draft beer foams bar food-proof!
Beer foam is like pH; foam is affected by just about everything we do during beer production and pH affects just about everything in beer. Gentle handling, minimizing foaming during transfers and carbonation, and keeping protease enzymes away from beer are all things that brewers can do to protect what is produced on brew day. When Suntory planned a new Kyoto brewhouse in the late 1990s, it was designed to reduce oxygen pick-up, shear damage during mash mixing and pumping, thermal damage during wort boiling, hot break in chilled wort, and energy consumption. After the brewhouse was commissioned in 2000, they reported an improvement in beer foam stability and lacing. Most homebrewers don’t subject mashes to much shear, but excessive splashing and rough stirring certainly can increase mash oxygen.
More obvious handling problems at home, however, relate to beer racking, exposure to proteases, and carbonation technique. There is much online discussion these days related to beer oxidation, especially when it comes to brewing hazies. Based on unpublished work from commercial brewing studies, my guess is that much of what is being reported, particularly golden beers turning brown after dry hopping, is likely related to metal ions from hops. Typical homebrewing racking practices are another possibility. While purging is a common and often effective method to prepare for a transfer, filling the receiving vessel with a no-rinse sanitizer, like Star San, and pushing the sanitizer out of the vessel is the best method to simply eliminate all oxygen from the receiving vessel while consuming less carbon dioxide than purging methods. This method works best with kegs and is not recommended for glass vessels.
Exposure to proteases, or enzymes that reduce protein size, occurs when yeast cells begin to autolyze. Autolysis leads to the release of enzymes from within the yeast cell and can damage foam when beer is aged in the presence of too much yeast, especially when aging temperatures are elevated. The general view among many homebrewers these days seems to be that racking is unnecessary and outdated. But as a commercial brewer who also homebrews, I am here to attest to the fact that racking from fermentation vessel to lagering vessel is still alive and well in the world of commercial brewing. Whatever your specific practices are after fermentation is complete, removing yeast sediment is a good idea.
Conical unitanks that are used for both fermentation and aging make yeast removal easy and are a terrific tool for both home and commercial brewers. Old-school homebrewers like me who still ferment in carboys can benefit from racking to a Corny keg or other vessel after fermentation is complete to move beer off the yeast sediment. I often move my beer a second time after aging and yeast sedimentation are complete to minimize the potential for stirring up yeast during keg dispense. I don’t worry about oxidation during racking because I always fill my receiving keg and purge with carbon dioxide before racking.
In the world of commercial brewing, transfers can cause beer foaming and subsequent loss of foam-positive compounds. The consensus is that the substances in beer that foam do so only once. After foam reserves are spent on a bubble, they are lost for future use in more beer foam. Some of this material sticks to vessel walls and some remains in beer as so-called bubble skins, like sad, deflated balloons. Aggressive carbonation is one of the most common practices leading to loss of foaming compounds. However, rapid carbonation is not a bad practice if the keg headspace is increased to just under the injection pressure before carbonation begins.
Although carbon dioxide is critical for beer foam, there is not much to say about the right amount required for great foam because beers ranging from low-CO2 cask ales to highly carbonated Belgian ales and everything in between can have great foam. Nitrogen is a special tool used to produce creamy, very stable foams and is addressed in this issue’s installment of “Mr. Wizard,” so I won’t be mentioning any more about nitrogen here.
The last two topics are arguably the most important and are often what makes or breaks beer with inherently great foam; beer-clean glassware and proper dispense. Pouring beer into clean glassware sounds easy but all too frequently is the place where folks fail. And when failure occurs coupled by pictures of your beer babies on social media people do take notice.
My own rules about beer glassware are simple. Rule #1 is to pour beer into a glassware intended for beer. My favorite glasses have fill lines, not because I am selling homebrew, but because serious beer glasses usually have these handy marks. Rule #2 is to only use beer glasses for beer. And Rule #3 is to always wash beer glasses by hand because dishwashers have a way of damaging glassware over time.
If you really want to be strict about things it is important to use a dedicated glass brush to clean your glasses. Depending on how many people are in your home and where the glass brush is kept, keeping other things off the brush can be a challenge. This is where full-service bars often run into problems. Beer glasses, shot glasses, and cocktail glasses used for all sorts of drinks, some made with fat-containing ingredients, are all cleaned using the same equipment. The worst scenario is when a 3-sink setup is used where the second sink contains cleaning brushes and is filled with detergent. This is cross-contamination central and almost always leaves a coating of oil on beer glasses. Homebrewers do have a clear advantage in the glass cleaning department over bars, but that does not make us immune to dirty glasses.
An old-school test used to monitor glasses for “beer-clean” status is the salt test. This test is performed by taking a clean glass, wetting the interior surface, pouring out residual water, then sprinkling salt over the entire interior surface. If the salt sticks uniformly, the glass is deemed beer-clean and indicative of proper cleaning. Spots without salt indicate the presence of oils and flag cleaning problems. Glasses can also be evaluated by looking for uniform sheeting of rinse water and for the presence of gas bubbles adhering to the surface when filled with beer. Whatever you do, be sure to use a clean glass.
And finally, there is pouring. Whether pouring from a bottle or from a faucet, wetting the glass before filling allows for a quieter pour and allows for more controlled foaming at the right time. One textbook method is to quietly fill the glass about 75% full by tilting the glass and pouring down the side, then tilting the glass upright while shifting the flow straight into the center of the glass. If the glass is clearly on its way to over-foaming, it’s OK to stop pouring while the beer calms down and the foam height drops before completing the pour. Indeed, some expert beer pourers fill glasses in multiple steps to consistently deliver the perfect pour while minimizing beer loss. Other expert pourers intentionally over foam the glass, scrape the foam square with the rim, then dip the glass in a cold, clean water bath to rinse beer from the glass exterior.
Beer foam is a thing of beauty when the stars are aligned and all steps of the journey come together. As a lover of foam, I like taking pictures of epic pours. One of my favorite foam shots was taken during a trip to Prague in 2018. It was my last day, and I decided to take a brisk walk to the top of the hill overlooking the Charles River for one more look. On my way back to my hotel, I ducked into a pub that had Ferdinand Pilsner for a ridiculously great price. After my first sip, I knew that it was time to carefully lay down some serious lacing before taking an after pic. Hopefully this article and pictures below inspire you to up your foam game. Cheers!