Master Partial Mashing
You’ve been brewing with extract and have made great beers. Maybe you’ve experimented with steeping grains and have been able to manipulate color and flavor. Now you’re starting to get curious about what the grain hype is all about.
There are dozens of different grains at the homebrew shop, each with its own color, aroma, and flavor. You start chewing on some of them with each visit and wonder what they can do for your beer. Maybe you want to brew beer the way they do at your local brewpub. Or maybe you haven’t been able to achieve that special fresh malt aroma in certain beer styles.
What’s that? You say you haven’t got much space, don’t want to take a lot of extra time, or spend a lot of extra money getting into an all-grain system? In short you have passed into the partial-mash zone. Don’t worry about a thing. You’re going to like it here.
Partial mashing consists of making beer the same way you’ve been doing it with extract, but instead of using all store-bought extract, you will be making a portion of the “extract” yourself. Doing a partial mash will allow you to begin experimenting with some of the wonderful possibilities of grain. Try adding a few pounds of English ale malt to the next ESB or IPA you make, or some Belgian specialty malts to that bock. This will introduce you to the principles of all-grain brewing, adding only a few simple steps to your brewing process and about an hour and a half to your brew day.

Best of all, doing a partial mash may dramatically improve your beers, and you can do it without buying a single piece of new equipment.
Principles
You may have already brewed some extract recipes that called for steeping some crushed grains in a mesh bag as you brought the brewing water to a boil. This is an excellent way to add color and extract sugars from certain types of malt such as crystal or caramel. Because of the unique process of making crystal malts, these malts have essentially been mashed in their husks. They contain hard balls of caramelized sugar that become soluble and dissolve into hot water when steeped. Other specialty malts, such as chocolate and black patent, can be steeped for color and flavor contributions in a similar fashion.
Regular pale malt, however, consists mainly of starch that needs to be converted to fermentable sugars in the mashing process. Although steeping pale malt in hot water (140° to 160° F) will yield fermentable sugars, the lautering process is left out. Lautering is the process that uses malt husks as a filter to separate undesirable proteins and tannins from the sweet wort. These proteins and tannins can cause beer to be very hazy and to have harsh flavors. Therefore, pale malt is best used in an all-grain process that includes mashing and lautering.
The partial-mash method allows you to use extracts instead of pale malt as your fermentable base and to fine-tune the color and flavor of the final beer with a range of specialty malts. These can include amber, Vienna, brown, chocolate, Munich, black patent, smoked malt, and many others. Because you’re also using extract, partial mashing allows you more latitude than either all-grain or extract brewing. You will be able to brew, make mistakes, and learn without risking a batch of beer.
What You Need
To get started you need some sort of strainer to separate the grain husk from the sweet wort. A kitchen pasta colander works well. If you want to get more sophisticated, use a plastic food-grade bucket (available at your local restaurant supply or warehouse store) with lots of tiny holes drilled in the bottom. Or visit your local homebrew shop and buy one of the many mash/lauter systems available. Many retailers sell a simple brass, rotating sparge arm that fits over a plastic bucket and does an excellent job of evenly and thoroughly rinsing the grain. If you’re the gadget type, you can build any number of mash/lauter tun designs using camping coolers and copper pipe or plastic false bottoms. For the sake of simplicity (and saving money), let’s go back to the pasta strainer.
If you only have one pot that you plan to use for the mash and the boil, you will need another container to collect the wort runoff. This can be a food-grade plastic bucket or another cooking pot if you have it. You’ll need a pot to heat the sparge (rinse) water — this could be the same pot you used for the mash. Also, you’ll need a good thermometer (a dial face works best) to monitor the temperature of the mash.
The Process Step By Step
There are many ways to design the partial mash process to suit your space, equipment, and budget needs.
Go to your local homebrew shop and poke around in the grains. Smell them, taste them, and find some that intrigue you. Have the shop grind the grain for you. They will be able to set the mill properly for a good crush that will expose the starchy interior of the grain while leaving most of the husk intact to act as a filter bed.
Suppose you’re brewing a batch of Toasted Red Ale. The grain bill that we have chosen for five gallons is as follows:
- 4 lbs. pale malt extract syrup
- 3 lbs. pale American two-row malt
- 8 oz. 40° Lovibond crystal malt
- 2 oz. unmalted roast barley (black barley)
This recipe will get about half of its fermentable sugar from malt extract and half from grains. It will have a deep red/amber hue from the crystal malt and black barley, and the black barley will lend a hint of toasty nuttiness. The beer should have an original gravity of about 1.050 to 1.055.
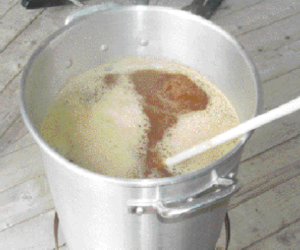
- The Mash. Use a quart of water per pound of grain for a thick mash that will hold its heat. For this grain bill, one gallon of water is perfect. In your brew kettle or another smaller enamel or stainless pot (such as a pasta boiling pot), heat the gallon of water to 168° F and shut off the heat. This is called the strike temperature. Mix all the crushed grains into the hot water and stir well. When the cool grains are added to the hot water, the temperature will drop 15 to 18 degrees and should stabilize near 150° F. If the temperature is below 146° F or above 156° F, use heat from the stove or boiling water to raise it or cold water to lower it, and stir well. Once the temperature has stabilized in the right range, let the mash sit covered for about 40 minutes.To maintain the temperature you may need to turn on the heat periodically. Alternatively, you can preheat your oven to about 140° F, turn it off, and set the pot inside. You can also wrap the pot in towels or use a camping cooler to maintain the mash heat. Do what works best for you, and keep it simple.
- Conversion. After 30 to 40 minutes the conversion should be complete. Different malts have different amounts of enzymes, so conversion may be quicker or take longer depending on the type of malt you use. This recipe uses American two-row barley, which is very high in enzyme power, so conversion happens quickly.To test for conversion, take a spoonful of the liquid from the mash and place it on a white plate or bowl. Add a few drops of tincture of iodine, which you can buy at your local pharmacy. If there is still unconverted starch, the iodine will turn purple or black. If all the starch has been converted to sugar, the iodine will not change color. Make sure you discard the iodine-tainted mash; it is toxic. If the conversion is incomplete, let the mash sit for another half hour. After an hour in the right temperature range, your mash should be completely converted and you can proceed with sparging.
- Sparging. Place your strainer over the rim of your collection pot or bucket. Carefully pour the hot mash into the strainer.Use about a half gallon of sparge water for each pound of grain, or two gallons in this case. Heat your sparge water to 170° F (if you have an extra pot, you can do this while the grain is mashing). This will kill the remaining enzymes and make the mash easier to rinse. There are a number of ways to sparge, or rinse, the grains. The principle is to gently sprinkle or pour hot water uniformly over the grain bed while the sweet wort flows out through the strainer. The husk of the grain forms a natural filter bed, so once sparging has begun, don’t stir or agitate the grains!Some brewers use a bottling bucket with spigot for sparging. With the strainer and collection bucket below you, hold the bottling bucket of sparge water over the strainer and slowly open the spigot, allowing a sprinkle-like flow of water onto the grains. Just move the spigot around the grains in a circular pattern for an even sparge.You should sparge slowly, allowing all of the grains to become thoroughly rinsed. It should take at least half an hour for the whole two gallons. After the first few minutes you can check the runoff for husk material that made it through before the grain filter bed was well established. Just recirculate this cloudy wort back through the grain bed and it should clear nicely.
That’s it! You now have a couple of gallons of all-grain wort to add to your regular recipe. Just boil it, adding extract and hops as you normally would. If you begin heating your regular brewing water when you begin sparging, your extract base will be coming to a boil by the time you are done sparging. You can throw in the grain wort, and you’ve only spent about an extra hour to make better beer.
Other Equipment
As you experiment with the partial mash process, you may want to add some equipment, such as the mash and lauter system. The best piece of equipment you might think about making or buying is a lauter vessel. The plastic bucket with holes drilled in it works very well. Put the strainer bucket inside a larger bucket to collect the runoff. A larger bucket with a spigot would be easy to drain.
Make or buy a simple brass rotating sparge arm. These have a bracket that fits over the lip of the sparge bucket. Also, a section of thin brass tube with tiny holes drilled in it spins when water flows into it, creating a fine shower over the grain bed. If you have a sparge device, try to keep an inch or two of hot water on top of the grain bed, adjusting the outflow through a spigot to get an efficient lauter.
Some Suggestions
To really get a feel for what different grains can do for a brew, start some controlled experimentation. If you like amber ale, for instance, try the Toasted Red Ale recipe. Take good notes on the flavors and aromas, then make it again using the same recipe and yeast but changing one element of the grain bill. Instead of using American ale malt, for example, try using British ale malt. Or instead of black barley, try using chocolate or aromatic malt. You’ll become a master at using and understanding grains in no time.
If you are not already doing a full wort boil, think about investing in a bigger kettle and trying it. For one thing, a bigger kettle will free up your old kettle for mash or sparge water use, making the process go faster. But most important, you will ensure sterilization of the whole wort, you will get better hop utilization, and your beer’s overall flavor will improve.