Meads of the Season
Seasonal drinking traditions are a really interesting subject to delve into, as holiday parties and family gatherings often open people up to new beverages that aren’t available or of interest during other parts of the year. There’s also the added excitement around family traditions, which may seem unique to your family, but they often have common traits shared much more broadly. No matter who you are, where you are from or what you celebrate, there are common themes with the liberal usages of herbs, spices, and fruits, as well as unique, scarce, or prized ingredients in the holiday beverages from wherever you hail. Now that is something we can all celebrate!!
Making Your Best Holiday Meads
Because of the extra attention paid to the details of our holiday gatherings and celebrations we should expect holiday meads to be their best selves as well. Well appointed, while an interior decorating term, came to mind as I was trying to explain the additional allure and hopes for a truly great holiday mead. Great holiday meads will have structure, body, rich flavors, and a balance between the ingredients and attributes that conceptually make sense, but they should also be accessible. We plan to use fruits and spices liberally, and the best holiday meads should be expressive with characteristics that are distinguishable to make that moment of tasting memorable.
The path to a great holiday-inspired mead is one of trial and error. Working with ingredients that may be particularly expressive like peppercorns, anise, or clove, even with short contact times, requires some finesse. Time is the hard detail that can be monitored, but taste is king because the variance of many ingredients, even in the same quantities, means it has to taste right before it can just be made on a schedule. Understanding this means recipes can be great guides, but focusing in on that “perfect” outcome requires your skills in the process. Loving the mead is part of the desired outcome.
To that tune, I’m going to share with you four of my favorite meads that I consider perfect for the holidays. Note that all of these recipes have flexibility to adjust the amounts of spices, fruits, and other ingredients, as well as the techniques used when making them. I will outline my basic procedure, but feel free to follow your own traditional process and adapt the recipe as you feel comfortable.

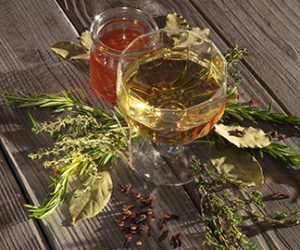
Spices are the most immediate example of a theme for holiday meads. I love apple pie. I mean, who doesn’t? How about a mead that tastes like liquid apple pie?
I’ll Have The Pie
(5 gallons/19 L)
OG = 1.138 FG = 1.025
ABV = 14.5%, est
Ingredients
16 lbs. (2.3 kg) honey
3–4 gallons (11.5–15 L) fresh-pressed cider
25 g 71B-1122 wine yeast
Yeast rehydration agent
Yeast nutrients
Stabilization additives
Peels of two large oranges
5 cinnamon sticks
10 dried berries of allspice (roughly crushed)
3 whole cloves
3 vanilla beans (split and scraped)
I like wildflower honey for apple meads, but keep in mind that all honeys will impart their unique character to mead, so you can search for different honeys that really sing with apples and spices! Mesquite and buckwheat honeys are interesting alternatives, the character of each being fully expressed in the final product. You can also put a caramel apple twist on a mead like this just by caramelizing some of the honey prior to the ferment. This can be done by heating a small amount of honey in a large saucepan (leave space for expansion as the honey rolls, creating foam) over medium-high heat until it begins to brown and takes on a candy-like flavor. A long-handled spoon and gloves are advised when stirring your caramelized honey this way as hot honey splatter can be very painful.
In this recipe, the honey and cider are mixed together from the onset and fermented.
My typical meadmaking process would be to use the yeast rehydration agent to prep the yeast before pitching, and then a staggered nutrient addition regimen (with degassing) to feed the ferment for the first few days. Depending on the time of year and temperature in my house, I may or may not choose to place the fermenter in a 64 °F (18 °C) temperature-controlled space. Once the fermentation is complete I always use both potassium sulfite and potassium sorbate as stabilization additives, whether I filter the mead or not. All of these additions are based on volume and there are a number of choices for the types and sources of nutrients that can be used. Additional tips and resources on the meadmaking process are included in the “Notes of the Meadmaking Process” sidebar at the end of this article.
The fermentation should arrest near the target final gravity (FG), after which the spices and orange peels can be added. The spices and peels should be removed once the flavor is as desired. I will often check in 24-hour increments. To my taste, I often find the flavors I am seeking just after three days. For stronger meads, additional contact time with spices allows for the development of robust flavors to balance with the alcoholic strength and potential sweetness of the mead. Use your own taste to decide if more contact time is needed, or even if you want to add more of any of the spices used. If adding more, I most often remove the existing spices and add a fresh dose of anything I want more of. I also typically use a nylon straining bag to contain citrus peels, whole spices, hops, and other small items to make their removal easier.
Mead has a treasure trove of contextually specific words that typically describe a specific style of mead. In this case, I’ll Have The Pie is a melomel, which means a fruit mead, but it is also technically a cyser, a fruit mead made from apple and honey, as well as a metheglin, a spiced/herbed mead, because of the addition of spices. This makes this particular mead a hybrid of both fruited and spiced meads, a very common intersection in mead!
I love the season in which the holidays of Thanksgiving, Christmas, and New Years are celebrated. The added focus on spending time socially means groups of people are looking for experiences to try new and interesting twists on flavors inspired by the season wherever they are. We think of foods with different “classic” flavors right away, but don’t forget the drinks!
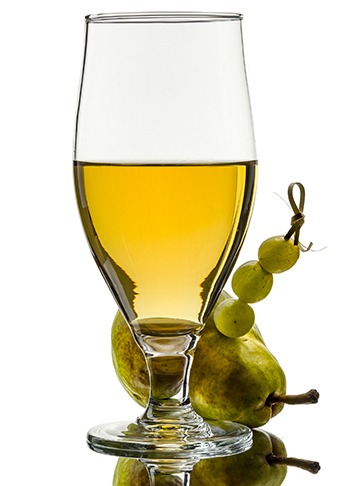
Pear & Grape Cocktail Mead
(6 gallons/23 L)
OG = 1.067 FG = 0.997
ABV = 7%, est (final, 9% after ferment)
Ingredients
6.4 lbs. (2.9 kg) honey
Water to 4.5 gallons (17 L)
12 g QA23 wine yeast
Yeast rehydration agent
Yeast nutrients
Stabilization additives
12 lbs. (5.4 kg) pears (cored and chopped)
0.3 oz. (8 g) dried elderflower
18 fluid oz. (532 mL) Chardonnay juice (25 °Brix)
1.5 lbs. (0.68 kg) honey
Water to 6 gallons (23 L)
The honey and first fraction of water are combined and fermented. The initial volume will be 4.5 gallons (17 L). Once the fermentation stops the mead will be dry and should be racked off the lees to a clean container and stabilized. The pears and dried elderflower can then be added. Remove these when the flavor is at the level desired, which could be as short as 3–5 days for the elderflower. To finish this mead, mix the remaining honey with water and add that and the Chardonnay juice to a final volume of 6 gallons (23 L).
This pear and white grape mead was inspired by a cocktail that contains pear vodka, white wine, and St. Germain liqueur. The aromas of the drink alone can elevate your mood. I’ve always associated pears with Christmas gatherings in my family, so I think this mead is a great fit for holiday entertaining.
With this recipe we’ve got another hybrid melomel/metheglin, using both the fruit and spice to blend into the final result.
Mid-winter celebrations come in many forms, and I’ve seen quite a few mead recipes designed for Yule festivities. While not true for all of these recipes, quite a few contain a lengthy list of components, almost like a tincture for cocktails. Here’s my take on a herbed/spiced mead made to usher in the new winter season.
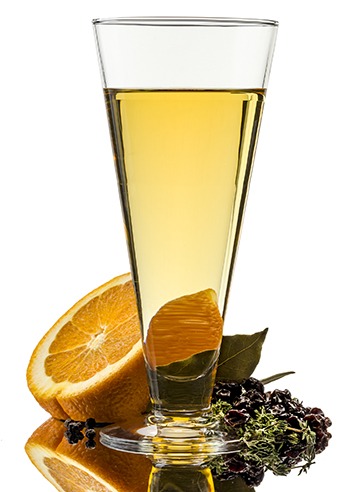
Spiced Orange Mead
(3 gallons/11.5 L)
OG = 1.127 FG = 1.020
ABV = 14%, est
Ingredients
10.5 lbs. (4.8 kg) mix of clover and basswood honeys
12 g Côte des Blancs wine yeast
3 orange peels
1 fresh sprig of thyme
3 tsp. peppercorns (roughly cracked)
6 bay leaves
3 lbs. (1.4 kg) golden raisins
Yeast rehydration agent
Yeast nutrients
Stabilization additives
For this mead everything goes in up front — more on this topic shortly — and a straining bag to hold the herbs/spices is again recommended to make removal easy. Mix the honey and water together, add the spice bag, and get the fermentation going. Check the flavors after a week or so and remove the spices when you have the desired flavors. Once the ferment is complete the mead can be stabilized and ideally given a short time to age in bulk.
This mead is definitely a bit more savory than the other recipes so far. The thyme and bay leaves do impart an herbal character, but the orange and raisins balance that with some fruitiness, and the black pepper provides a streak of earthy spiciness to make the outcome that much more interesting. I’d call it a metheglin, even with the orange peel and raisins. Their attributes are used much more as a spice in this mead than you might see elsewhere.
When to Add The Fruits/Spices
We’ve exercised several different techniques with the fruits and spices in the recipes up to this point. In I’ll Have The Pie the fruit (cider) was fermented and the spices were added in secondary. In the Pear & Grape Cocktail Mead all the fruit and spices were reserved for secondary, and finally for the Spiced Orange Mead we added everything right up front. How do you decide when to use the ingredients?
Ultimately this may come down to preference, but when you are first starting out it makes sense to try the different techniques so you can understand how they might be different. Keep in mind that you can, and should, still consider contact time no matter when you use most ingredients. This means that the impact will still be “x” days of time regardless of whether it is during or after fermentation. It is also worth remembering that any sugar added during primary will likely be fermented.
Over the nearly 15 years I had been homebrewing I ended up developing a couple basic concepts for how I made different types of meads. For most of the draft-style meads (carbonated, lower-alcohol) I tend to flavor them in the secondary. Meads containing either apple and grape juices were often co-fermented with the honey, but most others tended to have the best presentation when raw fruit was steeped with or without spices in secondary. The bold flavors and freshness is what makes this technique stand out for me.
For more traditional meads (higher in alcohol, non-carbonated) I found I would vary the technique depending on the type of ingredient, and most often how likely the delicate aromas might get blown off during a vigorous fermentation. Dried elderflower is pretty delicate and I won’t risk losing the aromas from it during a ferment. Cacao nibs, on the other hand, are much more “durable” and might be something I would use in both primary and secondary. Here’s an interesting tip: The necessary contact time for cacao nibs in particular is long enough that putting them in from day one starts the clock for them earlier in the process.
Can spices interact with the fermentation? While there is a possibility of some ingredients experiencing unusual bio-transformation when applied to an active fermentation, I’ve never seen any warnings about this that gives me reason to be concerned about doing it. Definitely watch out for anything with preservatives in it, and some dried fruits are heavily sulfited, which will impact the yeast if there is enough sulfite on them.
Spices can be also added in doses, another aspect of control, with the goal of working towards an end result with a much reduced risk of overshooting it. With this you can manage the contact time and the amount used, as well as wield multiple doses of fresh spices, something that longer contact times with the same initial spices can’t always produce. There is a lot of opportunity to experiment here.
A Little Goes a Long Way
The next recipe is a good example of a little bit of something going a long way. The first time I made candy cane vodka for use as a tincture I broke up two boxes of candy canes into a 1-quart (1-L) mason jar and covered them with vodka. By the time the candy canes finally broke down the vodka was pink and had a very strong candy cane flavor. It didn’t take more than a small splash to flavor a cup of hot chocolate or a cocktail with the peppermint blast from candy canes!
This candy cane vodka-infused chocolate mead was made as a small countertop batch as a homebrewer some years ago. We made it a few months before Christmas and we poured it right from the 1-gallon (4-L) carboy we had aged it in during our family Christmas gathering!
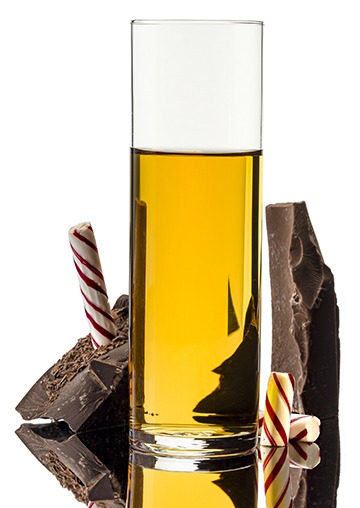
Candy Cane & Chocolate Mead
(3 gallons/11.5 L)
OG = 1.134 FG = 1.027
ABV = 14%, est
Ingredients
11 lbs. (5 kg) wildflower honey
Water to 3 gallons (11.5 kg)
15 g Côte des Blancs wine yeast
Yeast rehydration agent
Yeast nutrients
Stabilization additives
3 oz. (85 g) cacao nibs (lightly toasted right before use)
Peppermint vodka
The honey and water can be mixed and fermented. Once the fermentation is completed the mead can be racked and stabilized. Slightly toasting the cacao nibs before using them helps to activate the chocolate and get it ready to impart its flavor to the mead. These are added after stabilization in this recipe, and allowed to steep in the mead for several weeks, but the ultimate goal is for the mead to taste nicely of chocolate, so the timing and even the choice to use more nibs is open for personal interpretation. Once the chocolate flavor has been achieved the mead can be racked off the nibs and then flavored with the candy cane vodka. Less is more here, but use as much as you need to put it right where you like. I couldn’t find a documented amount from this project (this is a good time to remind everybody that good note taking is important when you are playing with new recipes!), but I vaguely recall I started with 1⁄2-oz. (15-mL) increments in a 1-gallon (4-L) batch, mixing it well in between to make sure I didn’t overshoot my goal with the peppermint.
While this example might be at an extreme end of the spectrum of intense flavors, it is also a good example of something to keep in mind when using spices; a little bit often goes a long way. Furthermore, once you get the flavors from the spices in, you can’t remove them. You can blend an overly spiced mead down to mellow the spice component, but with that comes other changes depending on the composition (alcohol, sweetness, flavors) of the meads used to blend.
Entertaining with Your Holiday Meads
Of course we can always pour ourselves a glass of a delicious holiday spiced mead, but since the season calls for family gatherings and house parties why not use your holiday meads to take your drinks game to the next level?
Mulling or serving mead warm with spices is not as popular as it may have once been, but is an interesting option to serve mead for the holidays. The outcome can often be positive — maybe try a warm version of the apple pie mead recipe shared in this article to make it taste like a fresh apple pie right out of the oven, or even a mulled cider. The simple starter is to slowly warm a sweet, strong mead up in a saucepan with a couple cinnamon sticks. Serve the mead in a ceramic mug with a cinnamon stick for a warm, fragrant drink to push the cold winter weather back for a time. This is an ideal drink when gathering around the fire pit on a cool night!
During the holiday season people are looking for new and interesting twists on adult beverages. Cocktails are very popular and there are two obvious reasons. Firstly, cocktails are a more potent potable, which can definitely elevate an occasion, and secondly, the breadth of distinctive flavors available in spirits, mixers, and bitters can create some incredibly complex drinks. But, have you ever considered using meads in cocktails?
There are all kinds of “rules” out there for making cocktails, and they all make sense. I’d like to hone in on just a couple that can help support some mead cocktail experimentation at home:
1. Cocktails should be balanced, so the strong (spirits), weak (juice, mixers), sour, and sweet components should work together in harmony.
2. Only stir cocktails that contain just spirits (mead included), but you can shake cocktails when fruit juice or other non-carbonated mixers are involved. This is really to promote the clean, clear visuals of this type of drink, but shaking does introduce oxygen, which can dull delicate aromatics rather quickly.
3. Ice used in cocktails should be clean and fresh. As the ice melts the water becomes part of the drink. It needs to taste good.
4. Meads we might use in cocktails have alcohol in them so I recommend backing off a half shot of alcohol when initially making any cocktails with mead. You can always add it back if you feel like it needs the additional alcohol for balance.
Since I’ve hopefully gotten your mind turning with how meads can be used as cocktails, I guess I’d better share a recipe. Here is one I’ve come to know well.
At Ancient Fire Mead & Cider in Manchester, New Hampshire we make a 7% ABV, draft-style mead flavored with both apple and ginger that is named With Malus. When we make this we use 30 lbs. (13.6 kg) of fresh ginger in each batch. The result is a ginger-beer level ginger profile, so it makes for a great swap in a Moscow Mule (which is traditionally made with ginger beer). Our partners at The Flight Center Beer Cafe in Nashua, New Hampshire actually make the Ancient Flight Mule cocktail, their riff on a Moscow Mule using our mead — they even use a copper mug to serve it! You can make your own version of this cocktail with this recipe:
Moscow Mule Mead Cocktail
Ingredients
2 shots vodka (I like Tito’s because it is a bit sweet)
1⁄2 shot lime juice
6 fluid oz. (175 mL) semi-sweet ginger mead
Ice
Pour the liquids over ice in a rocks glass or a copper mug if you want to be completely traditional. Stir to mix. Garnish with a lime wedge and even a sprig of mint.
Thinking About Your Next Holiday Meads
At this point you’ve probably got all kinds of ideas swirling around in your head for holiday-themed meads. While they also drink well out of season, something about timing them when the flavors are at the front of people’s minds really makes them sing!
With the stronger mead recipes shared here, some time in the bottle can absolutely help them further develop drinkability so why not plan ahead and start making meads for next year’s holiday gatherings? As you sit around the table with your family and friends this holiday season let the flavor combinations inspire you to make something that celebrates your holiday traditions!
Notes on the Meadmaking Process
The process of making mead is discussed generally in this story as the focus is specifically on making holiday meads. However, for brewers new to the meadmaking process, there are a number of common techniques and important tips that can be applied to consistently make good mead. Many are mentioned briefly in the recipes, but I have called out key points and documented the amounts and related steps for each up front here.
Keep Everything Clean — Sanitation is your best defense for successful homebrewing projects.
Manage Your Volume — Containers should be a bit oversized until you get to the stage you want to age longer-term. You need headspace for mixing/degassing and extra space for any large volumes being added in secondary. Once you get to aging you want as little headspace as possible.
Temperature Control — Controlling your temperature will produce more pleasing meads when using most wine yeasts, and in many cases it will also reduce the aging time that has historically been needed to mellow out fermentation aromas and flavors. I typically ferment meads at 64 °F (18 °C). You should use a temperature in the low end of the range that your chosen yeast will support.
Prepare Your Yeast — Re-hydrate dry yeasts and make starters with liquid yeasts. For yeast rehydration I use Startup from BSG at a rate of 1 gram per oz. of rehydration water. I typically use 1 oz. of rehydration water per 1.5 grams of yeast. I pitch yeast at 2 grams and up to 5 grams per gallon (4 L) along a specific gravity (SG) range of 1.050 to 1.150+. The rehydration process involves adding the Startup to 110 °F (43 °C) water and mixing it thoroughly. Once the rehydration water cools to 104 °F (40 °C) or below the yeast can be added and gently mixed. From here the yeast will begin to bloom up. After 10 minutes or so you can mix it again and add some of the must to both temper the rehydration water and give the yeast a little food.
Take Care Of Your Yeast — Make sure you have good quality nutrients on hand and a staggered process of dosing your ferment with them. I recommend a micro-nutrient blend like Superfood from BSG with a dosage of 1.25 to 2 grams (on an SG range of 1.050 to 1.150+) per gallon (4 L) of volume (for more on Superfood, visit https://bsgcraft.com/resources/FAQ/4.26.18%20Nutrient%20Addition%20Charts.pdf). I also recommend adding 0.5 grams per gallon of diammonium phosphate (DAP). With meads above 1.080 I will break up the nutrients into four equal dosages with additions on days +1, +2, and +3; and the final dose at 1⁄3 sugar break. For meads below an SG of 1.080 I break up the nutrients into two doses and add them on days +1 and +2. The basis for this difference is how quickly the fermentation progresses to 50% or more of the sugar having been consumed and that you need to get the nutrients in when the yeast can most use them.
I typically warn against the usage of DAP on its own or in nutrient blends past 50% of a ferment. This is because DAP is like candy for yeast and after 50% of the ferment we don’t want the spikes in metabolism it can provide. We want a smoother fermentation moving toward completion. Yeast hulls can be used for additional organic nitrogen for sluggish or intentionally lengthy fermentations. Dosages of 1 to 2 grams per gallon (4 L) of yeast hulls provide small amounts of nutrients. Yeast hulls, if not metabolized before the fermentation is complete, can leave behind an earthy or “cheesy” aroma, reminding us that more is not better and intervening past a logical point may be worse.
Stabilization – I advocate for the use of potassium metabisulfite and potassium sorbate for the stabilization of meads that contain residual sugar, whether added initially but unfermented or added during a backsweetening step. The fact that there is sugar present leaves the opportunity for re-fermentation, and the use of both sulfite and sorbate can greatly reduce this risk. The application of these additives should be followed by a rest to allow them time to work. Immediate backsweetening, and worse yet packaging, is a recipe for disaster. These additives do not kill yeast, and this is a common misconception, so some time for action is necessary. The application of sulfite is pH-dependent, but if no sulfite has yet been added an assumption of zero existing can be used to calculate a 50 ppm dose, which is a good baseline. With no free SO2, a 50-ppm dose can be achieved with 0.32 grams per gallon (4 L) of potassium metabisulfite. For home meadmaking purposes I recommend 0.75 grams per gallon (4 L) of potassium sorbate along with the sulfite. The application of these additives can also be optimized by adding them to a mead that has been racked off the gross lees and is not showing signs of any yeast/fermentation activity. The reduced biomass means there is more sorbate available to ensure all the yeast are bound and stop reproducing.
My basic meadmaking steps are outlined and links to additional resources can be found in the “Education” section of my meadery’s website at https://www.ancientfireciders.com/mead/meadmaking/. You can also search the archives of both Brew Your Own and WineMaker magazines for mead-related content from myself as well as a range of other authors.