Packaging Beer: Practical tips to minimize problems
You’ve devised a recipe that makes your mouth water when you just look at it. You’ve gathered the best ingredients you can source and prepped them to perfection. You’ve mashed, boiled, steeped, and hopped exactly as you had intended. You’ve fermented at exactly the right temperature for exactly the right amount of time. You’re ready to finally try the beer you’ve worked so hard on and given so much thought and love to.
While you could just dipper out a cup of your mostly flat warmish brew and give it a swig — isn’t that what you do with the hydrometer samples? — the best drinking experience comes after you’ve packaged your beer. Whether it’s bottles, cans, or kegs, packaging is the final step in the brewing process and deserves as much love and attention as any other part of it. (We’ll leave casks for another column.)
A Word on Packages
Today’s homebrewers have an embarrassment of riches when it comes to package choice. From the crown-capped and flip-topped bottles of yore to modern home-sized canning rigs, you might get baffled as to which way to go.
Our Package Thoughts:
- Keg — yes, they require startup capital to pay for a cold space, tanks, and kegs, but honestly if Drew had to bottle all of his beers he would have stopped brewing around batch #6 in 1999 . . . incidentally his first kegged batch.
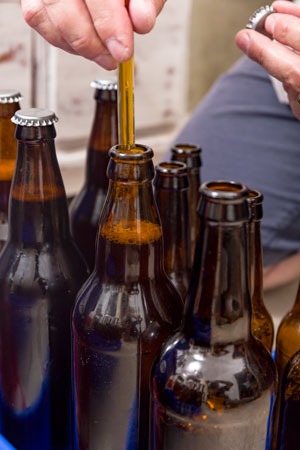
- PET plastic bottles — when we send beer back and forth the easiest thing to use is brown PET beer bottles. We fill straight from our kegs and screw the caps on and go. Easy to use and hard to break.
- Glass bottles — your standard 12-oz. (355-mL) long neck beer bottle is ubiquitous because it only requires a tiny effort to use and they’re cheap and replaceable . . . if breakable. If you don’t have kegs, it would be hard to argue for a better thing to use. (If you don’t want to bother with crown caps and don’t mind the expense, invest in flip-top bottles. Just mind that your gaskets stay in good shape!)
- Cans — Drew loves cans and the ability to make his own gleaming metal beer cylinders. There are a number of options, but cans are by far and away the most finicky means of packaging. So many things can go wrong, but when you get them right, they sing. (For instance, cans are the most sensitive to bad packaging practices due to their broad, open surface.)
But regardless of what you choose to hold your beer there are a few rock solid practices we encourage:

- Everything must be clean and sanitary. It should go without saying, but if you don’t keep things spic and span, you’ll be having a bad day.
- Fight oxygen at every step. Oxygen is the enemy of every finished beer, especially beers with a ton of dry hops. Flush bottles, flush kegs, flush cans with CO2 to remove as much oxygen as you can.
- Fill slowly with minimum of splashing and fill from the bottom. (Don’t just stick a hose in at the top and let ‘er rip.)
- If you’re filling cans or bottles from a keg, keep everything cold during filling. Gases release less in cold liquid – and you’ll get less mixing for O2. (We’re a little less worried when bottle conditioning as the yeast will help some with absorbed oxygen.)
- Once the beer is carbed keep it cold at all times. One of the greatest homebrewer advantages is that we have the ability to keep our beer continuously cold. With meticulous low oxygen practices and cold storage, Drew has kept low-alcohol beers on tap nearly two years with minimal damage.
Figure Out Your Fizz
Whether you put your beer in bottles, kegs, or cans, your first task is to be sure it’s properly carbonated. The basics of carbonation are the same — determine how much fizz you want captured in your brew, how much sugar (or CO2 for forced carbonation) you need, and how to lock it into your beer.
How much fizz you want is going to be style- and taste- dependent. For brewers this is most commonly gauged as “how many volumes of CO2 for this beer?” For example, traditional British pub ales would have relatively low carbonation levels: 1.5–2.0 volumes of CO2. In contrast, a number of Belgian styles are renowned for their lively and spritzy natures, tending to have 3–3.5 volumes.
Whether it’s bottles, cans, or kegs, packaging is the final step in the brewing process and deserves as much love and attention as any other part of it.
Taste-wise, lower carbonation levels tend to leave a beer with a richer mouthfeel and allow the malts to shine and push the hops to the background without feeling overwhelming. Higher carbonations cut the malt character and reduce the residual body while sharpening flavors like hops and spicy phenols. From our examples, that’s why low-gravity session ales work well with low carbonation to seem fuller while big and spicy Belgians sing with high carbonation, helping to punch up the yeast character and reduce any apparent sweetness (even if it’s just from esters). Many American craft ales shoot the gap and end up around 2.5–2.7 volumes of CO2.
Once you’ve picked the level of carbonation you desire, we recommend using a priming calculator to figure out the needed amount of sugar or CO2 required. (If you spund your beers for carbonation, the same numbers apply as those that are used for forced carbonation. But more on this later.) A good calculator will ask you about the temperature of your beer. Not written in the fine print of the calculator, this means the highest temperature your beer has reached during the late fermentation process.
Why? Beer produces CO2 during fermentation. Not all of it goes flying out the airlock. Some of that CO2 remains in the beer and you need to compensate for that amount when you carbonate your beer. Cold liquid retains more CO2 than warmer liquid. When your beer warms up, CO2 escapes from solution. So, the calculator is adjusting for what’s left behind after your beer warms up and your yeast stops adding carbonation. This residual dissolved carbonation does effect fizz levels after packaging.
If you want to get advanced you can try taking advantage of your fermentation’s generation of CO2. It requires two things, a vessel capable of handling pressure (a keg or pressure-rated conical, for instance) and a special pressure relief, or “spunding,” valve. Attaching a spunding valve to a fermenter allows you to maintain a level of CO2 pressure in the vessel. If the beer generates CO2 above that pressure, the valve releases it. Otherwise, the CO2 is retained in your beer.
Brewers usually wait to attach the spunding valve until the ferment is almost done to avoid pressure-related fermentation issues. (Many yeasts will stall/stop fermentation if the pressure of the environment gets too high – hence the use of specific strains that are recommended for pressurized fermentation.) If you time it right, (generally 0.004 points above terminal gravity) by the time fermentation is finished your beer is carbed and ready to go. For the love of safety, don’t try this in a glass carboy!
Adding Sugar
This is pretty straightforward: If you’re bottle conditioning, you’ll need sugar and yeast. We recommend keeping your sugar source simple — plain old dextrose/sucrose/glucose (corn sugar) is readily available, easily consumed by yeast, and easily administered. Legends abound about dried malt extract priming creating “finer carbonation” and “better head,” but we’ve never detected a difference in our experience with any alternate sugar sources. And we’ve never had any luck with carbonation drops. It’s difficult to get exactly the carbonation level you expect.
In other words, keep it simple – use dextrose, boil with a little bit of water and gently add it to your beer in bulk. We don’t recommend trying to prime individual bottles since it leads to uneven carbonation.
For homebrew, you rarely need to provide additional yeast since we usually have enough left in suspension. Drew never re-pitched his massive Belgian Champagne beers even after the finished beer sat for months and the yeast were about to be stressed by producing 3.5–4.5 volumes of carbonation! That said, if you do decide to add a packaging yeast, it will not hurt the beer and may only speed the process.
Avoiding Oxygen Damage
Remember: Oxygen Is The Enemy! Brewers have developed multiple means of dealing with it.
The first rule to a fight is to avoid entangling with the enemy unless necessary. With the exception of bottle-conditioned beer, that means removing as much oxygen out of the package and filling mechanism as possible before packaging. With bottles and cans, you want a slow, low-pressure flow of CO2 to discourage mixing. Gases will always mix, so even in an ideal world, a CO2 blanket is closer to a myth than a truth. By going slow, say about at 3 psi, you’ll help discourage the mix. It won’t be perfect but it beats nothing.
With kegs, you can do even better by using a sanitizing solution. Simply fill the keg with a liquid sanitizer like Star-San or Iodophor and fill it to brimming. Close the keg and push the liquid out with gas. The keg will fill with almost nothing but carbon dioxide. This works miles better than the old method: “Purge the keg and pull the pressure relief valve, repeating 3–7 times.”
Some people use additives at packaging to help prevent oxidation. The two most commonly used are metabisulfite and ascorbic acid (vitamin C). If you go the sulfite route, we recommend potassium metabisulfite (K-meta or KMBS) over sodium metabisulfite so you don’t increase the sodium load in the beer.
Both are pretty easy to use. Per 5 gallons (19 L) of beer, add 1 tsp. of ascorbic acid. Metabisulfite is pretty strong stuff so you need to measure more carefully: 0.3 g in 5 gallons (19 L) will give you about 10 ppm of sulfite, which is a good amount for beer (KMBS is highly dependent upon the pH). Campden tablets are KMBS and weigh 0.44 g each tablet for reference. Put either in your bottling bucket and rack the beer onto it, or gently stir it into the beer.
Disclaimer: Neither of us has actually tried either of these, but the science is sound and many homebrewers have used them. KMBS is almost universally used in the winemaking world to prevent oxidation of wines too. There are varying reports of efficacy and flavor impacts in beer. Try them if you’re so inclined and decide for yourself.
We have used Brewtan B, a gallotannin compound used in the mash tun and kettle. It slows oxidation by binding with or removing compounds that are susceptible to oxidative damage. It’s also easy to use and provides fairly inexpensive insurance!
One Last Point From Your Local Occupational Safety Representative
As in all other things, keep yourself safe and in good shape while packaging. You’re potentially dealing with wet glass, gasses under pressure, and lots of physical activity. If you’re filling with a counter-pressure system, wear safety glasses just in case. Again our usual caveat applies about drinking while doing anything related to brewing — don’t or wait.
And take a lesson from Denny and save your back and knees! Make sure what you’re doing keeps your body comfortable. Denny used to bottle on his floor, killing his knees, until he realized that it was just as valid to bottle while comfortably sitting.
Package and carbonate your beer properly and you’ll get the maximum enjoyment out of the next pint.


