Post Fermentation and Packaging
After fermentation, the beer needs to be packaged into bottles or kegs. The beer must also be carbonated to the correct level. For the best results, the beer should be exposed to as little oxygen as possible during the transfer and subsequent storage. Minimizing oxygen uptake by the finished beer will prolong its shelf life.
After biological fermentation — the conversion of sugars to alcohol and carbon dioxide — has finished, most beers are conditioned for a period of time during which the yeast and other solids drop out of solution and some molecules are taken up by the yeast. After this conditioning time, which may be only a few days for some ales but up to a few months for some lagers, most beers then go to the packaging stage. In some cases, however, the brewer wants to add additional flavors or aromas post-fermentation. Two examples of this would be dry hopping or adding fruit to make fruit beer.
In dry hopping, hops are added to the beer in the fermenter. This can be done in the primary fermenter, when the beer is racked to secondary or in the keg. Dry hopping adds hop oils to the beer, providing a boost to the hop aroma. They are generally added after active fermentation has ceased to minimize the loss of hop oils. The contact time varies, from a few days to a couple weeks.
Whole hops are often used for dry hopping, but there is one potential drawback to using them — the air trapped between the bracteoles in the hops will add oxygen to your beer. If you dry hop immediately after fermentation, much of this oxygen will be scavenged by the yeast. But generally it is advisable to keep beer away from oxygen as much as is possible.

One way to get this entrained air out of your hops is straightforward. Take a pellet or two of dried ice (frozen CO2) and place it at the bottom of a Corny keg, place the (bagged) whole hops on top of the dry ice and set the lid on the keg. (Don’t affix the lid, just let it rest on top of the oval.) The dry ice will sublimate and fill the keg with CO2, replacing most of the oxygen in the hop cones.
When making a fruit beer, there are many opportunities to add the fruit. Some recipes call for the fruit to be added to the boil, while others call for the addition to come in the primary or secondary fermenter. Adding whole fruit in the secondary fermenter has the benefit of preserving the aroma of the fruit, but the drawback that the fruit is not sanitized.
Many homebrewers therefore wonder if whole fruit needs to be sanitized before adding it. Generally, this is not needed. Although whole fruit harbors wild yeast on its exterior, these generally do not cause a problem in the beer. Fruit added after primary fermentation is going into a solution (beer) with a fairly low pH and an alcohol content that kills most microorganisms. Likewise, the brewers yeast will be reinvigorated by the sugars from the fruit addition and a brief period of fermentation will occur during which most other organisms will be competitively excluded. It is a good idea to wash your fruit before adding it, something that doesn’t require too much effort at a homebrew scale. Additionally, sort through your fruit and discard any with damaged skin. And of course, canned fruit (purees, etc.) should be biologically stable and can be added without worry of contamination.
Bottling
Bottling is a fairly time-consuming part of homebrewing. You need to clean and sanitize all the bottles, then fill and cap each one. Bottling is also rewarding. When you put those two cases of homebrew in your closet to condition, there’s a sense of accomplishment — and anticipation.
When bottling homebrew, there are two major goals. First, you want to carbonate the beer to the correct level. Second, you don’t want to prime the beer to stale quickly by introducing oxygen as you bottle.
After fermentation is complete, most of the carbon dioxide generated by fermentation will have bubbled out of solution, but a small amount will remain dissolved in the beer. How much depends on temperature. A beer that fermented at a steady 72 °F (22 °C) is going to contain slightly less CO2 than one fermented at a steady 68 °F (20 °C), about 0.80 volumes of CO2 and 0.85 volumes of CO2 respectively, because gases are more soluble in colder liquids. However, even at lager temperatures the amount of carbon dioxide retained is below the level of carbonation of English ales.
Homebrewers commonly transform fermented, lightly-carbonated beer into fully-carbonated beers one of two ways, by bottle conditioning or by forced carbonation.
In bottle-conditioned homebrew, the beer is primed with a small amount of fermentable sugar and then sealed. The carbon dioxide created during the fermentation of this sugar is trapped in the sealed bottle.
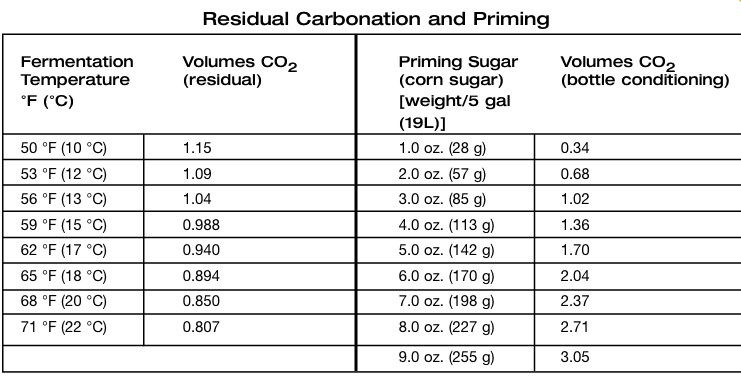
Many older homebrew sources cite a single amount of corn sugar for priming a 5-gallon (19 L) batch, usually 3⁄4 cup. This produces a level of carbonation suitable for English ales. For more control over your level of carbonation, you need to consider the residual level of carbonation and then add sugar to reach your target level, which will vary for different beers.
From the chart on page 47, read the residual level of carbonation in your beer, based on your fermentation temperature. Then subtract this amount from your target level of carbonation. That is the amount of carbonation you need to generate during bottle conditioning. You can get that amount from the chart (or see the charts at www.byo.com/resources/carbonation).
To prime your beer, dissolve the sugar in the least amount of hot water possible, then simmer for 5 minutes (you don’t want to darken the sugar extensively). You should put the priming sugar into your bottling bucket first (and it doesn’t matter if it’s still hot), then siphon your beer into it with as little splashing as possible. Siphoning the beer into the priming sugar so the mixture swirls should ensure that it is mixed in thoroughly. To make sure, give the beer a slow stir or two with a sanitized spoon. (Don’t stir too vigorously as that just allows more oxygen to enter the beer.) Then, bottle as quickly as possible. The longer the beer sits in the bottling bucket, exposed to air, the more oxygen will get into your brew. You don’t need to rush, but have everything ready to go — sugar heated, bottles, caps and capper handy — when you open the fermenter and begin siphoning the beer into the bottling bucket. Cap the bottles, with oxygen-absorbing caps, as each bottle is filled.
If you have a kegging system, you can add a squirt of CO2 to your bottling bucket before you siphon the beer in, and then again once it’s full. If you cover the bucket with aluminum foil, you will trap much of the CO2 and this will provide a partial barrier against oxygen. You could also try putting a pellet of dry ice in a nylon bag and letting it hang in the bottling bucket above the level of the beer. The cold CO2 would drift down over the surface of the beer and offer some protection. Don’t drop the dry ice into the beer, though, or you’ll make a beer geyser and potentially lose some beer.
With the right amount of priming sugar in the beer and the beer bottled and capped promptly, the yeast is ready to carbonate your beer. For best results, store the beer relatively warm for about 2 weeks. Around 75–80 °F (24–27 °C) would be great for most beers. When two weeks is up, take one beer as a test and place it in the fridge overnight. Open it the next day and check the carbonation levels. If it’s OK, move the rest of the beer to cooler storage — preferably at refrigerator temperatures, but anything below ale fermentation temperatures will be adequate.
Kegging
The most popular alternative to bottle conditioning homebrew is kegging it in Cornelius (or Corny) kegs. These kegs, with the 5-gallon (19-L) size being the most common, are the right size for most homebrewers and are more convenient for most home homebrewers. Although moderately expensive, it takes much less effort to rack a 5-gallon (19-L) batch of beer into a single Corny keg than it does to put it into 53 12-oz. (355-mL) bottles. Plus, you force carbonate beer in a keg and even adjust the carbonation level as needed.
As with bottling, you want to minimize the amount of oxygen the beer is exposed to. When kegging, there is one way that works well. Fill your clean, sanitized keg completely with water, then use CO2 pressure to completely empty the keg. You now have a keg that contains only CO2. Rack the beer quietly to this keg, keeping the lid of keg loosely set over the opening (or cover the opening with aluminum foil) and you will rack the beer in under a cover of CO2.
Seal the keg as soon as the beer has transferred and apply CO2 pressure (only a few PSI is needed), and pull the pressure relief valve a few times. Each time, some headspace gas (which will have a small amount of oxygen in it) will exit the keg and be replaced with pure CO2. A few spurts of CO2 will adequately purge the headspace and your beer will be less prone to stale quickly.
There are many ways to carbonate a keg of homebrew. These include bubbling CO2 through the beer with an aeration stone, agitating a keg under high CO2 pressure on the beer, letting the beer set under the correct serving pressure and priming the keg with sugar as you would during bottle conditioning. Unfortunately, there are no simple ways to measure the amount of CO2 in homebrew. As such, the most common methods of quickly carbonating kegs — by injecting CO2 or shaking the keg — involve some guess work or prior experience to work properly.
Waiting for the keg to carbonate by storing it at the appropriate temperature and CO2 for a given carbonation level is much more accurate and repeatable, but takes more time. The same thing goes for priming with sugar. For many homebrewers, a hybrid method produces results that split the difference between being extremely quick and more controllable. For example, the brewer will inject CO2 (or shake the keg) to a degree that experience has taught him will give him slightly less carbonation than needed, then let the keg set at the appropriate temperature and pressure for a few additional days to settle into the right carbonation level.
Another benefit of kegging is that you can counterpressure bottle your beer. Counterpressure bottling involves transferring carbonated beer from a keg to a bottle. The beer is under CO2 pressure during the transfer, so carbonation of the beer is maintained. (The bottling apparatus is removed before the bottle is capped, so a little CO2 is lost, but this can be compensated for by slightly overcarbonating the beer destined to be bottled.) Counterpressure bottling is a way to produce sediment-free bottles of homebrew, and many homebrewers use this method to package a few beers from their kegs to take to homebrew meetings (or other parties) or to send to homebrew contests.
As with packaging bottle conditioned beers, limiting the amount of oxygen the beer is exposed to is advised. With counterpressure bottling, there is a simple way (in theory) to do this — cap the beer over foam. The idea is to fill the beer, then — when the bottling apparatus is removed from the bottle — induce the bottle to produce just enough foam to flow out the opening. The crown cap is then placed over the foam and very little oxygen has entered the beer, compared to a bottle capped over an empty headspace. Getting the beer to foam on command isn’t always easy, however. If a bottle has not produced enough foam to cap over, lightly tapping the bottom of the bottle against a hard surface will induce it to foam. This can lead to uncontrollable gushing, however, if you rap the bottle too hard.
Once beer is bottled or kegged, store it so it lasts as long as possible. Your best option is to store the beer refrigerated. Your next best bet is to store the beer as cool as possible at a steady temperature. The amount of time homebrew will keep is dependent on many factors. These include the level of contamination in your beer, how well you managed to keep oxygen away from the beer, whether it’s bottle conditioned, the strength of the beer and other variables.

