Sanke Fermenter DIY

I jumped into this hobby brewing 10-gallon (38-L) batches. This was mostly out of necessity as a friend and I went in on it together and we didn’t see the point of splitting a 5-gallon (19-L) batch. We started our fermentations off using glass carboys. With both of us enjoying higher-ABV beers, we dealt with blow-offs and the inconveniences of dry hopping in the carboys as a right of passage not thinking much of it. That all came to a screeching halt the day a 5-gallon (19-L) carboy of a Dogfish Head 90-Minute IPA clone slipped from my grasp and came crashing down on the basement floor. The need to simplify the post-boil process through kegging and get away from glass became the priority. Given my process, budget, and love for building stuff, I pursued the Sanke keg fermenter conversion that I’m going to share in this article.
Before we start, let’s talk about the benefits of using a Sanke keg. Outside of the ability to add custom features for my specific brewing needs, they: (1) Can be found relatively inexpensively on local classifieds or, you may be able to buy an old one from your neighborhood brewery. (The key word here is buy. Putting a deposit down on a full keg and then not returning it is theft. Buy them legally!) (2) Are about the correct size for fermenting 10-gallon (38-L) batches, and (3) Probably the most important from my personal perspective, they’re built like tanks! Un-modified, these kegs were made to move pressurized liquids up to a max operating pressure of 60 psi from point A to point B with some level of damage tolerance.
Planning Out Your Sanke Fermenter
While I would guess it’s everyone’s desire to simplify the brewing process, each homebrewer’s individual needs are different given their setup, the styles of beer they brew, etc. In my day job, we call this the Concept of Operations or CONOPS. For my specific CONOPS, I needed to move 10 gallons (38 L) of wort from my garage to my basement, ferment, and transfer to kegs. That sounds straightforward until you start looking at each step individually and what features would make each step easier. Here are some of the things I made priorities:
Collecting and moving
I chill my wort using a homebuilt counterflow chiller. Any hot break, hop particles that escaped the hop spider, etc. would find its way into the fermenter. I wanted a means to remove all of these particles before they could enter the fermenter. An inline wort strainer looked pretty effective for my purposes.

Once collected in the fermenter, I needed a means to completely seal the fermenter so I could manhandle 10 gallons (38 L) of wort from the garage to the basement. This step alone was what ruled out a store-bought conical for me in this size. Imagine you’ve spent the day with friends and/or family brewing a 10-gallon (38-L) batch of beer, likely sampling some of your own product throughout the day, only to finish the day by moving 100+ lbs. (45+ kg) of beer and stainless steel down a set of stairs. I would guess, regardless of the batch size, most homebrewers experience a similar situation of having to haul wort from one location to another. I wanted to make it as easy as possible. The thought of spending ~$1,000 on a conical/unitank, then awkwardly carrying it downstairs with the possibility of dropping and damaging it, not to mention losing all the freshly brewed wort, didn’t sit well with me. I could transfer to buckets, carry downstairs, then transfer again to a fermenter but that was an added step that could result in contamination, not to mention it’s a pain.
Sanke kegs were designed for this awkward task of moving larger quantities of liquid from point A to point B. They’re generally much thicker than what you’ll find in a conical or unitank. Using a Sanke keg in combination with tri-clamp fittings for accessories and sealing during transport to the basement, my biggest concerns now became my back and the drywall at the bottom of the stairs if I did happen to lose grip. That said, it is still safest to have two people to move a full keg of beer. Much less chance of dropping it, and your back will thank you later. Fortunately, kegs are relatively easy for two people to move.
Fermentation
There is a plethora of things going on in this step between oxygenating the wort, ability to add yeast, hops, or anything else depending on the recipe, measuring and controlling temperature, ability to bleed off CO2, and pressure relief.
Transfer to kegs
For this step, I wanted a means to add CO2 for pressure transfer as well as a way to filter anything I added during fermentation to prevent clogging up my keg fittings.
Future growth
Who knows what the future of brewing looks like. With this consideration, I threw in an extra tri-clamp ferrule for good measure.
The Build
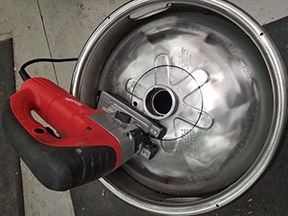
With my list of CONOPS jotted down, I started the build by depressurizing the keg and a good cleaning/polishing before exposing the inside. While the exterior look isn’t too critical, it is a fermenter. Keeping it shiny and clean on the outside will promote keeping it clean and sanitized on the inside. Plus, it just looks cool! I used 4-inch (10-cm) fine nylon buffing wheels in an angle grinder.
Once I pulled the dip tube, I placed my 6-inch (15.25-cm) ferrule on top and used a marker to mark the inside for cutting. A metal blade in a jigsaw and some cutting oil works well here. Another option is to keep a spray bottle with cool water and keep wetting the cutting area. Stainless is easily work hardened so if it gets too hot, it gets much harder to cut. Take
your time!
Note here: I wanted my fermenter right-side up for the handles, but if your CONOPS allow yours to remain stationary, you could do this to the bottom of the keg and keep the ferrule already on the keg. It fits a 2-inch tri-clamp with a custom O-ring.
Notes on TIG Welding
There are two important notes I’ll make on TIG (tungsten inert gas) welding here: (1) TIG welding stainless is very much like brewing beer . . . the best recipe won’t matter if your weld area isn’t clean. Think sanitized-level clean. Once I’ve mechanically cleaned everything, I wipe it down with acetone. (2) The backside of the weld will oxidize, resulting in what’s commonly referred to as “sugaring.” This isn’t sanitary or pretty and results in a poor weld. Purge the backside of the welds with argon. If, like me, you don’t have a dual regulator setup to do this, there’s a product called Solar Flux that works really well at preventing back-side oxidation of the weld but it’s a pain to remove. Because of this, I make sure all my welding is done on the side that is exposed to wort with the backside of the weld being exterior to the fermenter. This keeps the build as sanitary as possible given less than ideal resources available. Thus, the reason for the 6-inch (15.25-cm) ferrule allowing me to get my TIG torch on the inside.
If you don’t have the ability to do the welding yourself, my suggestion would be to talk to your local homebrew shop. Those folks probably know a fellow homebrewer in the area that can help you out.
Next, weld the ferrule to the keg. The heat tint on the weld surfaces need to be removed. This can be done while the weld is still hot using a dedicated stainless wire brush, or the same buffing wheel used to polish the outside the keg. Once the weld has cooled, I wipe down with acetone again and apply Bar Keepers Friend to passivate the area. This eliminates any free iron the weld area may have been exposed to and passivates the stainless, providing a durable coating.
Once the ferrule is installed, drill all your holes for the goodies you’ve selected into the tri-clamp cap. Most of the goodies I’ve welded in place can be purchased at Brewershardware.com. I went with a 16-inch (41-cm) thermowell to ensure my thermometer will be submerged in my 10-gallon (38-L) batches. Standard metal twist drills work well here. Drilling in steps works best at the lowest speed your drill will allow with cutting oil (example: If drilling a 1-inch hole, I would start at 1⁄4-inch and work my way up in 1⁄4-inch increments). Don’t just jump to the final diameter on the first plunge. Tight tolerances on the holes do make for an easier and nicer weld. When laying out your holes, make sure there’s sufficient room for installing and tightening the tri-clamps or whatever fittings you’ve selected. Once everything is drilled and cleaned, weld them in place accordingly.
Pressure Test

You’ve just taken a pressure vessel and modified it. If you plan to do pressurized fermentations, or carbonating in the fermenter, or just in case your CO2 blow-off port gets clogged, you want to test the fermenter to ensure it can handle the pressures it will be subjected to before the pressure relief valve (PRV) releases. Ask yourself, would you rather find out now in a controlled test, or later by accident? Sanke keg PRVs, from what I’ve found, are set around 55 psi. The kegs themselves have a max pressure of 60 psi marked on them. You can purchase lower PRVs if you choose, but please use one. I chose to pressure test to the 60 psi.
For the fellow nerds out there, I first did some quick math to give me a feel good. The hoop stress of a thin-walled pressure vessel is:
σ =pressure x radius/wall thickness.
304 stainless generally has 35,000 psi yield strength. Plug that in, the keg radius (~7.75 inches/19.7 cm), and the wall thickness (0.045 inch/0.11 cm) and solve for pressure and you get about 200 psi is what the keg could handle before detrimental yielding (not necessarily rupture). Now the keg isn’t a perfect pressure vessel in its geometry as well as the fact it has welds, which all would likely decrease that ~200 psi, but I now felt more comfortable taking the Sanke fermenter to original rating of 60 psi.
To pressure test, I took a 1.5-inch (3.8-cm) tri-clamp cap and drilled and tapped it to a 1⁄4-18 NPT thread for a quick release air compressor fitting. Note this a common thread size for PRVs that can be purchased on McMaster.com. I then installed caps and a pressure release on the 1.5-inch (3.8-cm) tri-clover fittings on my 6-inch (15.25-cm) cap to prep it for install into the fermenter. This next step is crucial: Fill the fermenter with water. I left maybe 0.5 in. (1.25 cm) of headspace for air in the fermenter. The rest was filled completely. With water being incompressible, if the pressure test doesn’t go as planned, a rupture will result in a fraction of the energy being released. The high ductility of 304 stainless also means failure would likely not be as exciting as you may think.
After adding water, I installed my modified 6-inch (15.25 cm) tri-clamp cap, tightened down all the clamps, set my compressor regulator to 0 psi, set up a camera, and connected the air hose. I pressure tested the unit outside while I was inside the shop to establish a safety barrier. If you are doing this with friends and/or family around, make sure everybody is safely located. This is a prime opportunity to ask someone to hold your beer. I ramped the pressure from 0–60 psi slowly over four minutes then held for an additional 5 minutes. I then shut off the air supply, inspected for leaks and signs of anything bad, and slowly bled off the pressure. Ensure you always have a means to depressurize in a controlled manner. A 6-inch (15.25-cm) tri-clover cap pressurized to 60 psi will have close to 1,700 lbs. pushing on it. You don’t want to be on the other side of that when removing the clamp.
Sanke fermenter build complete!
Custom-Built Accessories
Cooling coil
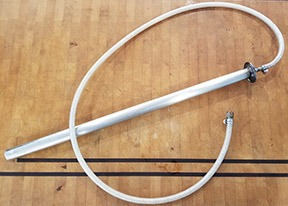
I used about 25 feet (7.2 m) of 1⁄2-inch stainless tubing for a cooling coil build. Bending the coil was quite the experience. If this is a feature you want, you’ll need a mandrel to bend the tubing around that will result in a finished coil small enough to fit into the tri-clamp ferrule you’ve chosen for the keg. Next, fill the tubing with glass bead grit blast media. You can get it cheap at Harbor Freight. You could also use play sand but removing the sand will be much harder than the glass bead media, which practically falls out. Pack it in good by shaking and adding until the tube is full. This prevents the tube from kinking while bending it around the mandrel. Make sure you ate your Wheaties that day because bending the tubing was quite the workout. If I were to do it again, I would go with 3⁄8-inch tubing for an easier time bending.

Dip tube
It sounds like a no-brainer, but some design into the dip tube can really reduce your yeast pickup. I found that a 1-inch (2.5-cm) diameter dip tube 1.5 inches (3.75-cm) from the bottom of the fermenter gives me best results for my beers. The clearance to the bottom is such that the yeast cake is below it while minimizing how much beer I leave in the fermenter. Additionally, the 1-inch (2.5-cm) diameter dip tube allows for slower liquid velocity and therefore less yeast pickup.
Oxygenation/carbonation stone
A 1.5-inch (3.75-cm) ferrule welded to a 1.5-inch (3.75-cm) cap that’s been drilled and hose barb welded to it allows for an inexpensive oxygenation/carbonation stone. I’ve used a tri-clover compatible Corny post adapter from Brewershardware.com to hook up to my CO2.


