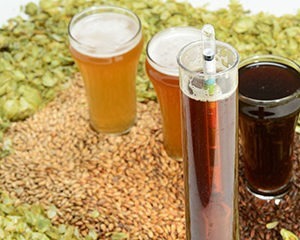
Setting Up a Homebrew Laboratory
Everyone has their own reasons for homebrewing. Some do it for the creativity, others to be able to drink something they can’t find in a store. Some enjoy making things themselves, or the challenge of brewing clone beers, or to see how well their beer does in a competition. Homebrewing is a skill you can keep improving on and learning about. Of course, the most common reason to homebrew is because it’s a lot of fun and you end up with a bunch of beer to drink.
One of the things I love about homebrewing is that you can make beer as simple or as complex as you want. You can upgrade your system over time and add new tools to make things easier, more efficient, and tastier. Many people start out brewing with the basics and upgrade as they get more involved in the hobby. This is true of the brewing system, as well as the homebrewer’s laboratory. Elaborate kettles and lab equipment may not be necessary to make beer, but they can help bring your beers to the next level. It is not hard to make beer. It is hard, however, to make good beer. And even harder still to make good beer on a consistent basis. Whether you’re just starting out, or are an old pro, I’ll take you through the basic equipment required to set up your own homebrew lab and start dialing in your recipes.
Don’t let the word “lab” scare you away from this article. You may even be doing some of these things already! Brewing is one big science experiment and the more you do it, the easier it becomes and the more you understand. You start with just four ingredients but the variety of what you can produce is mind boggling.
Just as everyone has their own reason for homebrewing, there are many different reasons a homebrewer may decide to add some testing equipment to their process. There’s the desire to learn even more about brewing. The challenge of hitting all your calculated values. Maybe you have a specific problem you’ve been experiencing and are trying to find a fix. You may notice some off flavors you want to work on identifying and eliminating. Some of these tests provide peace of mind and take a little of the unknown out of the process. The more you know about your beer and brewing system, the more you can improve. And who doesn’t want to make better beer?

The Basics
Sanitation
One of the first things you learn when homebrewing is that you need to keep everything clean, so I’m not going to go into detail here. All homebrew supply stores sell various types of brewing sanitizer. Bottles of 70% ethanol, which can be purchased at a drug store and then fitted with a spray nozzle, are also handy to have around. I like spraying down carboy caps anytime I take a sample, even if it doesn’t touch anything. While I am not going to get into the precautions and procedures of sanitation here, just know that it is of the utmost importance in the homebrew laboratory.
Brewing Notebook
This is where you’ll keep track of your recipes and what you did on brew day; what you planned, and what actually happened. If you were aiming for a mash temperature of 156 °F (69 °C) but you ended up at 150 °F (66 °C), write that down. For your next mash you might want to aim a little higher. Any data you collect along the way should go in here. What was your mash temperature, when did it start, end, when did you add your hops, what was the alpha acid percentage of the hops, what was your starting gravity, etc. These notes should go beyond brew day as well. Any time you take a sample during fermentation, note the date and results. Every time I bottle I forget how much sugar I need so I flip back to my last batch of the same style in my notebook and there it is. If I want to make an adjustment based on style, I can alter my recipe based on previous results. You want to fill in sensory information on all of your batches too. More on sensory in a bit.
Thermometer
You probably already have a thermometer, but do you know if it’s accurate? One brew day I had three different thermometers all read different temperatures. You can check the accuracy by taking the temperature of a cup of ice water, which should be 32 °F (0 °C). You can also check it against another thermometer (that works) or when water starts to boil, at 212 °F (100 °C)(at sea level). Different types of thermometers can also be really handy for different steps in the brewing process. I use an infrared one on the outside of my kettle as a quick check of how quickly it’s heating up. It’s also handy when I’m chilling my wort — no need to sanitize another piece of equipment! It’s not super accurate but works great for what I am using it for.
To get a good temperature reading on my mash tun I use a meat thermometer with a probe designed to withstand the heat of an oven. Usually these are waterproof and you can stick the probe way down in the middle of your mash to get a more accurate temperature reading. Some of them even come with two probes and you can make sure you have consistent temperatures throughout your mash.
Hydrometer
This is something most of you are already familiar with as well. A hydrometer can tell us a lot of great information. It can tell you when your beer is done fermenting, and with a few calculations, the efficiency of your brew system and the alcohol content of your beer. Keep in mind hydrometers are very user- and temperature-dependent. These also need to be calibrated. Check out the videos made by the Brewers Association and American Society of Brewing Chemist on how to use and calibrate a hydrometer: https://www.asbcnet.org/lab/webinars/Pages/BeerMethodsSeries.aspx.
Wine Thief
If you’re going to start taking more measurements of your beer then you’ll need a way to get samples. The best way to do this is with a wine thief. With one of these, tipping and pouring from your carboy is no longer necessary and the risk of oxidation is decreased. Simply stick your sanitized wine thief into your carboy and pull out your sample. Since these are so long, they can be hard to sanitize (same goes for a racking cane when it’s time to transfer your beer) so take extra care when sanitizing. If you go with a glass wine thief then storage containers meant to fit under the bed work pretty well to keep them safe when not in use, and can also house things like tubing and other brewing accessories.
Beyond the Basics
pH Meter
There’s plenty of information on adjusting pH for brewing online so I’m not going to go into much detail here about how to make adjustments, but I do want to talk a little about pH meter use.
pH meters range in price from $20 to $800. For a homebrewer I would look in the $50–$200 range. More expensive ones are often easier to use, more accurate, and easier to calibrate. pH meters need to be calibrated frequently and pH buffer solution, used for calibration, does not last for a very long time after it’s been opened. Once opened, buffer solutions typically have a 3–6 month shelf life. You’ll want to calibrate your meter every time you use it, so if you don’t brew very often you might be better off with single-use packets. Keep in mind temperature will affect pH readings. Some meters have an automatic temperature correction function built in but this can only go so far. You will want to chill to room temperature before testing. Hot samples will also shorten the life of your probe, as well as leaving the probe sitting in a sample for an extended period of time. Never let your pH meter dry out and don’t store it in water when not in use, use a storage solution recommended by the supplier.
Refractometer
These are also used to measure starting gravity and with the help of some calculations, final gravity. They only need a drop or two of sample vs. 100 mL or so when using a hydrometer. The biggest downside is that they’re not accurate once there’s alcohol in your finished beer, although there are calculations available for converting refractometer final gravity readings.
Magnetic Stirrer Hot Plate
I like equipment with multiple uses and these are really handy to have in your lab. They can be used to grow the number of yeast cells in a yeast starter, for conducting forced fermentation tests, and for stirring pH samples for more accurate measurements. If you want to get into micro and plating samples of beer, which this article doesn’t cover, you’ll also need one for making media. The combination heat and stir capabilities are going to be more useful, but also more expensive. The stirring function is the more important one, so if you’re on a tight budget, just stick with a stir plate. You can find stir plates at most homebrew suppliers or refer to this article (https:/byo.com/project/build-stir-plate/) on how to make a stir plate using an old computer fan.
Microscope
This is another versatile piece of equipment. Not just for brewing either, it’s just fun to have a microscope around to look at whatever you want! With the help of a hemocytometer you can start counting the yeast cells in a representative sample of your yeast slurry and calculate how much yeast you need to add to each batch of beer. A methylene blue dye will identify dead cells, allowing you to calculate the viability of your yeast. A microscope will be most useful to those who are collecting and reusing yeast or propping up wild yeast. Pitching the correct number of yeast cells is going to lead to healthier, more reliable fermentations with fewer off flavors.
If you’re just looking at yeast, a microscope with a 40X objective lens (400X magnification when you add in the 10X eyepiece) is all you need. If you eventually want to be able to look at bacteria you’ll need to look for one with a 100X oil immersion lens. Basic microscopes are available for around $300 but ones at this price point may only last a few years.
Outside Testing
Equipment required to perform some tests such as IBUs, color, and accurate alcohol measurements are not worth the price of the equipment on the homebrew scale. For those who want to know how their calculated values match up to measured values, there are several labs that offer testing for homebrewers. It can be an educational and beneficial learning experience to find out how the actual ABV and IBUs compare to your calculated values.
Tests
The following two tests are fairly simple to do without much equipment. They are a great start to a more advanced homebrew lab and can provide some great information on troubleshooting or may highlight ways you can improve your brewing experience.
Forced Fermentation

This is an easy test that will quickly (2–3 days) tell you what gravity your beer should finish at. This is great for troubleshooting and can help determine if you have a yeast problem or other brewing issue. For those who make small batches or are concerned with cutting into their final volume too much, this one might not be for you.
How to do it:
Add 50–100 mL of yeast to a 1- or 2-L Erlenmeyer flask with a magnetic stir bar inside. Add about 600 mL of wort and cover with tinfoil. If you have a combination hot plate/stir plate, start spinning your pitched yeast with a little bit of heat. Try to keep it below 70 °F (21 °C). You want enough heat to get the fermentation moving along but you don’t want to get to a point where you are stressing or killing the yeast. The stirring is more important than heat as it introduces oxygen and keeps the yeast in suspension. Essentially, you’re making a mini batch of beer. With the continuous agitation, heat, and plenty of yeast, this mini fermentation should finish in 2–3 days. This will tell you what you should expect your main batch of beer to ferment out at. The forced fermentation is intentionally overpitched to show you what the wort is capable of fermenting to given plenty of yeast
If your main batch of beer and your forced ferment finish at the same expected final gravity, great. If both the forced ferment and your main batch finish higher or lower than expected, the difference is most likely due to the brewing process. If you are an all-grain brewer, I would first look at mash temperature then the crush of your grain. You may not have had an even mash temperature, or maybe you didn’t get an accurate temperature reading.
If your forced ferment sample finishes lower than your main batch, you either have a stuck fermentation, or you didn’t pitch enough yeast.
Forced ferment tests can be helpful if you’re not quite sure if your beer is done or not. This test isn’t necessary on a regular basis but could be used when troubleshooting fermentation issues or experimenting with different recipe and process variations.
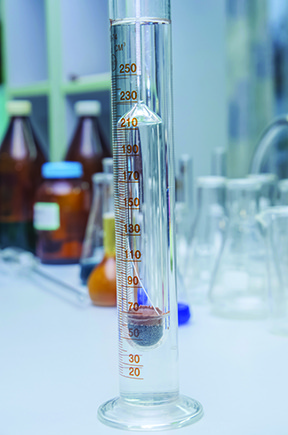
Sterile Wort Test
This is a quick and easy check on the sterility of your brewing process and heat exchanger. Collect a sample of chilled wort into a sterile container, before any yeast has been added. Working as quickly as possible, open the sterilized sample container with one hand (this takes a little practice) and fill using a sanitized wine thief with the other (as pictured above). Close the centrifuge tube and put it in a cup or some type of holder in case it leaks. Put the sample somewhere warm for a few days and then check for signs of fermentation. Signs of fermentation would be a hiss of carbonation when you open the tube, a turbid sample, or an off aroma.
Assuming you did everything correctly, and didn’t introduce any bacteria while chilling your wort or filling your carboy, your sample should be sterile and not show any signs of growth after a few days and smell like warm wort. This is a good check if you use a counterflow or plate chiller and aren’t quite sure you’re cleaning it well enough.
Depending on your setup, it might be best to take the sample as you’re filling your carboy, or maybe even after the carboy has been filled but before the yeast has been added. I like to buy sterilized 50 mL centrifuge tubes as they’re easy to work with and have some give if your sample does start to ferment. This experiment is also a good introduction to micro as it gets you to work on sterile sample collection techniques.
Sensory
Sensory evaluation is a huge part of quality control for professional brewers and the same techniques can be used in your homebrew lab. Your beer could hit all your target numbers perfectly but be undrinkable due to an off-flavor. Once you are able to identify off flavors, you can make the necessary brewing improvements to avoid those flaws in future beers.
The Beer Judge Certification Program (BJCP) is an excellent resource if you want to learn more about evaluating beer and identifying where in the brewing process off-flavors come from. The BJCP is a non-profit organization that ranks and certifies beer judges for homebrew competitions. Part of being a beer judge is assessing beers on technical merit and providing feedback on ways to improve next time. The BJCP has a ton of information on off flavors, including a “Beer Fault List” that covers various brewing faults, what they taste like, and most importantly to the homebrewer, how they are caused. Check with your local homebrew club to see if there are any study groups you can join. Some other useful resources are Tasting Beer: An Insider’s Guide to the World’s Greatest Drink, by Randy Mosher and Brewing Better Beer: Master Lessons for Advanced Homebrewers by Gordon Strong. You can even set up your own sensory lab to get a better understanding of how different ingredients affect your beer, which you can learn more about in this article: https://byo.com/article/ingredient-sensory-methods/
Have a standard set of evaluation questions to ask yourself when you taste your beers. Get into sensory mode and be intentional about it. How would you rate the hop aroma or malt sweetness? Is the body full or thin? How does it compare to what you expected? If you notice any off flavors, go back to your notes from brew day. Was there anything that may have triggered this flavor profile?
Looking at Your Data
None of this matters if you don’t actually do anything with your data. It can be as simple as making a note of your water strike temperature and mash temperature and then adjusting for the next batch of beer if need be. Or you can start tracking daily gravity readings and chart out your fermentation curve in a Microsoft Excel spreadsheet.
Just remember, none of this is really necessary to make beer, but it can help you learn even more about this joyous hobby, and help you make better beer. You can make recipe adjustments based on data you’ve collected. You can be confident in what is taking place inside your fermenter. It can help you design recipes as you’ll have a better understanding of what changes result in various outcomes. And, if you’re like me, it can be a lot of fun.
Where to Buy Equipment and Supplies
Most homebrew suppliers offer a range of lab equipment and gear.Ebay is another great place to get inexpensive lab equipment such as a hot plate and stirrer, a used microscope, or pH meter. Cynmar is a good place to get consumable lab supplies because they have affordable prices and often sell supplies in packs of 10–25. This is great if you’re only working on the homebrew scale and don’t need 500–1,000 centrifuge tubes. Once you get to that stage, you can switch over to Weber Scientific of Fisher Scientific. Websites like Amazon are another option to get sterile supplies in smaller quantities.
Starting a homebrew lab doesn’t have to be difficult or expensive. Just like when you first started homebrewing, there are always ways to improve and challenge yourself. Whatever your reason for starting a homebrew lab and expanding on the tests and measurements you take, you’ll discover more and more possibilities with every batch of beer. With homebrewing there is always something new to try, and something new to learn.