Small-Batch Brewing

Like perhaps many of you, I started brewing in college, having been given a 1-gallon (3.8-L) all-grain brewing kit for my birthday. That first brew day was predictably chaotic — my mash swung between 140–170 ˚F (60–77 °C) — but the resulting beer was drinkable, and intriguingly recognizable as beer. And with that revelation I was just about hooked. Soon enough, I grabbed a copy of John Palmer’s How to Brew and noticed something: The world seemed to be built for 5-gallon (19-L) brewing. But I had neither the space nor the money for a larger system, and so I stuck with the small format. It’s been about six years now, and even though I’ve since brewed a decent number of 5- to 10-gallon (19- to 38-L) batches on the family brewery’s pilot batch rig, I still feel most comfortable with, and derive the most enjoyment from, my (now thoroughly over-engineered) 1.25-gallon (4.7-L) system. To each their own . . . but is this a defensible position? Have I earned the stares of disbelief that experienced brewers tend to cast on my gear?
The advantages of a larger system are pretty obvious: You get way better heat retention given the lower surface area-to-volume ratio, weighing things is easier since you don’t need a jeweler’s scale, and the homebrewing world is built for the 5-gallon (19-L) format so companies like Blichmann Engineering and Ss Brewtech build about every nice piece of technical equipment you need. Oh yeah, and for about the same amount of effort you get about four times as much beer as I do per batch.
However, I think small-format brewing has some tremendous advantages too. Advantages that make it, if not perhaps an outright replacement for many of you, then a system worth building out as a way to brew high-risk beers, rapidly develop recipes, test out new ingredients, and be able to brew every weekend if you’d like without worrying about building up a stockpile of beer (which may not be a problem for you, granted!).
Pros & Cons
Most homebrewers I’ve told about my system have responded in two ways, usually in this order: A dumbfounded, numb shock, and then laughter. This is largely because of the most obvious “con” of 1-gallon (3.8-L) brewing: The massive amount of effort it can take to build a system, and the virtually equal amount of effort it takes to brew a 1-gallon (3.8-L) batch and a 5-gallon (19-L) batch. But there are a number of significant “pros,” some subtle and some obvious, which I think deserve mention (note that for this article I am focusing on all-grain brewing, however many of the points can be made for extract brewing as well):

Pros
Cost
Each batch is about one-fifth the cost of a larger batch, cost of heat (electricity/gas) aside.
Cost savings are also found in terms of the actual gear (like kettle cost), but if you decide to soup up your small-batch system with a grain mill, oxygenation system, or a pH meter, the difference in cost between brewers of traditional batch sizes doesn’t exist. But — great news — basically every upgrade is useable on a larger system, excepting the mini auto-siphon. In my experience, the fear of “wasting money on a small system you might outgrow” is unfounded in practice as much of the equipment carries through to larger batch sizes as well.
Risk
I only brew “safe bet” batches once every third or fourth brew, because even a beer that’s merely drinkable is pretty easy to burn through when you only brew six imperial pints. Small batches don’t just allow, but virtually encourage, massive risks by nature of the low stakes.
Yeast/Accurate Pitches
A pack of liquid yeast a month or two old is roughly a pitch and a half for a 1-gallon (3.8-L) batch.
Better yet, with a flask as small as 1 L you can make a starter that targets two or three times your pitch rate, and store the surplus in sanitized or sterile jars for future batches (I use 100-mL jars to keep on theme, and be sure to record the date of the starter).
Recipes Scale
Pretty much every recipe for 5 gallons (19 L) works on a 1-gallon (3.8-L) scale by a clean and easy division of five; I like to use BeerSmith to account for differences in efficiencies, but that’s it.
This works in reverse too; making prototypes of new beers very straightforward if you want to scale up.
Batch Splitting
Batch splitting is a fairly well-known move, but even if you don’t want to commit to a full 1-gallon (3.8-L) setup, the ability to boil the wort of a 5-gallon (19-L) or larger batch with different hops, whether to compare EKG and Fuggle for a single-hop British bitter, or even to compare different whirlpool hops for a New England IPA, provides a reasonable argument for co-opting your 8-quart (8-L) soup pot.
Low Weight
I hurt my back while backpacking a few summers ago, and while I’ve since recovered, I’m always nervous about lifting heavy stuff. If you’re a brewer who, for any reason, has limitations on how much you can lift, I’d emphatically recommend brewing small batches. The heaviest thing you’re likely to carry is 1.5 gallons (5.7 L) of water (13.2 pounds or 6 kg).
Cons
System Sensitivity
This is not as big an issue as you might think, but you’ll probably need a 0.1 g-scale and a syringe with clear 1-mL gradations for acid additions. The good news is that the standard brewing calculators work great at the 1-gallon (3.8-L) scale.
Hard-Earned Quality & Consistency
High quality isn’t out of reach, and largely depends on how lovingly you handle yeast, but consistency requires a refractometer (hydrometers are not great for brewing on this scale because the sample size required consumes too much of the precious stuff), and the ability to measure pre- and post-boil volumes within, say, 0.1 gallon (0.4 L). You’ll need a sight gauge, or perhaps a good kitchen scale and a calculator, to accomplish this.
The Work
It takes almost the same amount of work, and perhaps the exact same amount of time (4.5 hours for me, most often), to brew anywhere from a tenth to a quarter as much beer as you’d get from a larger system.
Now that you have a sense of what’s at stake with small-batch brewing, let’s dive right in to how it’s done!
Brew Day
Setup
Since everything is physically lighter and smaller on this scale, I find it easier to set everything up. This is a big advantage for apartment brewers, and even with aging brewers (who said old? You’re 68 years young). In terms of weighing grains, I’d suggest weighing with grams, especially for small-percentage character grains. Granted, a change of 15 g in chocolate malt on a recent porter recipe moved the SRM just two degrees, so it’s not a huge deal.
The Mash

Here in particular, careful measuring, and thus error mitigation, are huge. For strike water, I like precision on the order of a cup, and water salts to within perhaps 0.05 g, worth a few ppm, though for plenty of styles I’m sure a quarter of a gram or more would be fine. You will, however, need to be able to see 0.1 g gradations at least.
Beyond that, handling small volumes of water is generally easier — it heats faster, for one. And speaking of heating strike water, whether or not I preheat my mash tun, I like to overshoot the strike water temperature by 3–5 ˚F (1–3 °C), letting it drop over a few minutes. It happens fast, so this is an easy and painless bit of security.
pH is generally well-behaved at this scale, and I’m often within 0.2 of my target, using Bru’n Water to estimate acid and base additions and target a profile using reverse osmosis water as my source water. For the mash of a recent beer, I was on the dot at 5.40. Those 10 mL plastic syringes work great for acid additions.
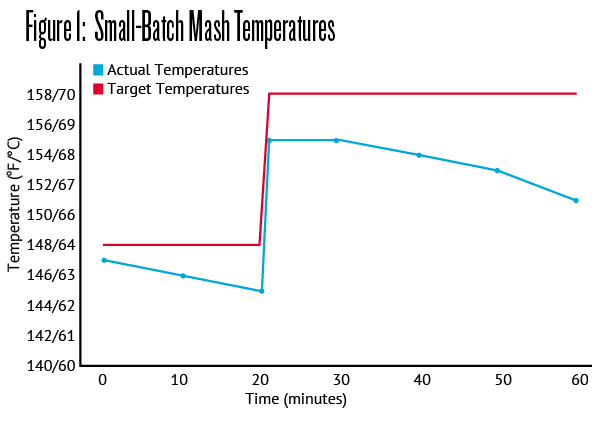
Finally, there is temperature. Let’s look at the numbers for that recent mash, illustrated in Figure 1. I have some bad news: The temperature of even an insulated, Igloo-based small mash tun drops like a rock. Over an hour, I lost about one degree °F (0.5 °C) every ten minutes, though an addition of boiling water kept me within 145–155 ˚F (63–68 °C) which, for a hefeweizen, I’ll take. For a beer with a high mash temperature target, that would be too broad of a range, but there are solutions:
Hot water: An addition every 20–30 minutes should do it, with brewing software as your guide, and assuming a degree lost every 10 minutes or so.
More insulation: You can surround your tun with an electric blanket, if you have one lying around, though towels work too; I’ve used these to modest success. Don’t forget to preheat your mash tun, even with these.
Targeted insulation: Cover your mash with a cut-to-fit disc of Styrofoam. Styrofoam is food-safe and inexpensive, making this an easy solution.
Recirculation: Or, build a HERMS (heat exchange recirculation mash system) — a sous vide heater and pump gets you most of the way there. In fact, if you don’t mind copper contact, you can toss your immersion chiller (if it fits) into your mash tun and pump hot water through it. I like a water temperature about 2 ˚F (1 °C) north of my target mash temperature, since you’ll be bleeding heat constantly, so you need to overshoot.
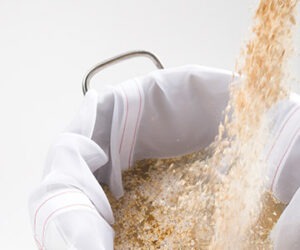
The Sparge
I’ve done a few continuous sparges, and I’m confident it’s not worth the effort on this scale, especially given the super low cost of grain. However, if you have a second tun or small pot, I’d recommend bumping your mash efficiency somewhat with a two-stage batch sparge (which is to say, mash, drain, add sparge water, let sit for 5–10 minutes, drain again). Proponents of this method love its speed, as do I; you can drain your tun, start the boil and add first wort hops, and be near a boil by the time you drain your tun the second time. A word of advice, though: Overshoot your “sparge’’ water by about a pint to a quart to ensure you hit your target volume (if you can measure your kettle volume, that is — we’ll cover that next).
The Boil
First things first: PBG (pre-boil gravity). Your best friend from here through packaging from a data perspective is a refractometer, as you can use it the standard way to determine gravity all the way through pitching yeast, and then throughout fermentation by using a calculator (in BeerSmith or online) to convert the reading to an ABV, since pulling full samples of beer for a hydrometer reading is not practical at this scale.
Speaking of measurement, if you want a simple but effective means of measuring volume without installing a sight glass into what may be your soup pot, you can take an old wooden spoon, add a gallon (3.8 L) to your kettle, submerge the spoon to that point, and mark the point. That’ll tell you where you are volume-wise at the end of the boil. To be more exact, add 0.1 gallon (0.1 L) marks. Take a ruler and note the difference in height and, assuming your kettle isn’t super awkwardly shaped (has aggressively sloping sides), you can extrapolate out your volumes this way.
The boil in a small batch will be the most familiar process component for an experienced homebrewer. Every addition works the same, though you do have to scale them. I use 0.44 g of Wyeast’s nutrient, for example, given their 1.1 g/5 gallons recommendation. The only difference, crucially, is the boil-off rate: I clock a very consistent 0.3 gallon (1.1 L) per hour on my system when employing my usual low rolling boil.
Finally, given the big difference that an extra pint or two in your post-boil volume will make on your gravity, I like to keep dried malt extract (DME) and clean water around for adjustments. And if you do have a means by which to measure volume and establish your mash efficiency, BeerSmith will get you shockingly close to target — on this most recent brew day, I was dead on for my PBG, and a single point above my target original gravity (1.049 vs. 1.048).
Chill
The standard options come into play here. I currently submerge my HERMS coil in an ice water bath and pump the wort through (for five minutes without the ice first in order to sanitize it), but of course your old immersion chiller would work. You can also leave the kettle in a fridge, but it’ll take hours and hours to chill this way, believe it or not. An ice bath will be a good deal faster than that, but in my experience it’s far slower than you’d expect.
Ferment
Here we are, at what I view as the most important step at this scale (perhaps any). Fortunately, it’s not all that hard to nail, you just have to commit to doing everything right. No sacrifice, in my experience, has panned out.
Any commercial yeast will do, though liquid yeast, as mentioned earlier, is often a slight overpitch (which is great), and dry yeast comes in sachets big enough for maybe 3-5 batches, if you have a vacuum sealer in order to preserve it you can try this approach after opening the sachet with sanitized scissors. Note that reps for dry yeast companies would likely advise against this practice due to the possibility of contamination, and dry yeast is cheap enough that using half and dumping the rest isn’t too wasteful. One plus to liquid yeast, though: if you build a starter that’s a few times too big, you can save the excess yeast for future batches, cutting down on the single biggest cost at this scale, which is naturally the yeast. But if you want to just pitch from a vial or pouch without consulting a viability calculator, you can get away with tossing the yeast into a 100 mL graduated cylinder, and pitching half — that’ll be quite close to the correct rate.
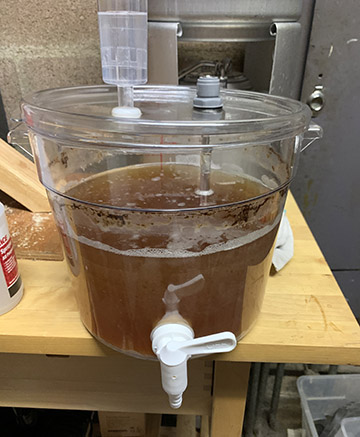
There are a broad array of choices for fermenters; perhaps my favorite thing to build. Those 1-gallon (3.8-L) jugs work wonders, though grab a wide-mouthed version if you can. You can now buy 1-gallon (3.8-L) conicals, believe it or not, if you’re so inclined. I make my fermenters out of 6-quart (6-L) Cambros, adding bottling spouts, and two grommeted holes in the lid, one for an airlock and the other for a thermowell.
Then, there’s oxygen. Small-scale batches are insanely kind to the good ol’ shake-to-oxygenate method. If you want to oxygenate for liquid yeast pitches I target 1 L/minute of pure O2, for about 60 seconds.
Finally, there’s the fermentation chamber itself. I’m going to recommend thermowelling your 1-gallon (3.8-L) batches (a 6-inch/15-cm thermowell works great, and grommets are cheap), but if that’s too much, taping the probe to the fermenter’s side should work in a temperature-controlled fridge. If you don’t have temperature control, then you are in the same position as brewers of larger batch sizes, sticking to styles that fit with the temperature. Though I do have one magical bit of advice for you if you’d like an easy fridge solution: Surf through Craigslist for a small wine fridge. They’re often underpowered, which limits temperature swings, and some even have the ability to set the chamber temperature, which is fantastic.
This element has been the biggest challenge for me in my pursuit of competition-ready beer, and if you’re going to upgrade anything in your small-batch setup, put your money here first. In reality, controlling fermentation temperature of smaller batches is easier as fermenters take up less space at this scale.
Packaging
Kegs remain my favorite option (I love my 1.5-gallon/5.7-L Torpedos), but bottling is incredibly easy. Given the higher variations in packaging volume, I’d suggest adding priming sugar directly to each bottle. Either way, once you’ve racked, the rest is as it would be on any other scale.
Conclusion
Small-batch brewing requires a good bit of work and attention to detail, but it also produces such small batches of beer that it’s almost impossible to think of a beer too stupid to brew on this system. So if you find yourself suffering through the last 3 gallons (11 L) of that batch you brewed a few months back but don’t have the heart to dump it, or you have an idea for a bizarre experimental beer with such a low chance of success that you’d never brew 5 gallons (19 L) of it, then I highly recommend grabbing a 1-gallon (3.8-L) jug, 2.3 lbs. of grain, 9 g of hops, and brewing nine bottles of wild, fun beer, that’s probably at least drinkable, and may even be resplendent and ephemeral. Isn’t that why we started brewing in the first place?
Anyone interested in learning more about Adrian’s tiny system can check it out in the May-June 2021 submission of the Drool page here.
One Shot of Beer, Please (sidebar)
As the brewer of already comically small batches of beer, I decided last year to brew one quart (1 L) of beer, and the result was perfectly adequate. But upon telling my brother of my triumphant micro exploits, he responded with a sigh, a roll of the eyes, and a fateful jeer: “What’s next, a shot of beer?”
Oh yes, that’s what’s next. I took his acerbic words as a challenge, and fortunately, through that 1-quart (1-L) batch, I’d developed a method of mitigating the otherwise insane mash heat loss on this scale — utilizing plastic bags and a sous vide bath set to the mash temperature. Throw in a 50 mL graduated cylinder and a PET bottle with a CarbCap®, and you, too, can brew a Frankenstein’s monster of a beer.
Technically speaking, the process was seamless: Salt a gallon (3.8 L) of water (per the recipe below), crush some grain with a hammer, add that and your hops to a sealed sous vide bag, mash at 152 °F (67 °C), isomerize at 180 °F (82 °C) (you’ll get 17% bittering efficiency at this temperature, per Milk the Funk), run the tiny pouch under cold water to cool, strain into the “fermenter,” place in a temperature-controlled fridge at your fermentation temperature (no need to thermowell given the extremely high surface area-to-volume ratio), wait, cold crash, rack to a PET bottle, carbonate, and enjoy. Surprisingly straightforward!
As for the big question: The taste. I recorded the following notes: “Malty, round, yeasty, just a touch thin, no real off-flavors besides light astringency, possibly due to high-temperature mash, warm due to carbing method, would consider brewing a gallon of it.”
Here’s the recipe:
45 mL of Pale Kellerbier:
15 g Munich malt
DME to correct gravity if necessary
1.15 g 4% AA hops
0.1–0.2 g dry ale yeast
For the water (per gallon/3.8 L)
0.6 g Gypsum
0.5 g CaCl2
Step by step
Mash with 75 mL of prepared water as 1 mL of water is absorbed per g of grain. Mash, with hops, at 152 °F (67 °C) for 60 minutes, then 180 °F (82 °C) for 60 minutes.
Chill and rack to a 50-mL graduated cylinder. Add 0.1–0.2 g dry ale yeast, ferment at 65 °F (18 °C). Yield will be ~45 mL beer, 15 mL sediment. Carbonate at ~12 psi, 38 °F (3 °C), in a chilled PET bottle (the beer will, as it did for me, absorb a ton of heat and be raised into the high 50s/low 60s °F/15–17 °C if you don’t chill the bottle prior to adding wort).