Top 10 Homebrew Priorities

If this is your copy of Brew Your Own and you didn’t randomly pick up this magazine in the world’s hippest dentist office, then there’s an outstanding chance that what I’m about to write will come as no surprise to you: The most important thing you can do to improve the quality of your beer is to guarantee that everything that touches your beer (post-boil) has been properly cleaned and sanitized. Now, before you flip to the next article in disgust at the simplistic nature of that advice, let me also say this: I know that you know that. But what about what comes next? That’s what this article is about — deciding what to prioritize during your brew day to improve your beer and become a better homebrewer. As much as we might wish otherwise, very few of us have an unlimited budget in time or money for our favorite hobby. Choices have to be made, and some things are just going to have to wait. The goal of this article is to give you a batting order of brewing improvements so that you can get the most out of your process as soon as you can, and identify those things that are only going to make improvements at the margins, and can therefore wait. When that Powerball ticket finally hits, then by all means, feel free to shred this article — but until then, here’s a “Top Ten” list of homebrewery improvements in order of importance.
Before we go any further, however, I’d like to provide a brief word on the origin of the data to be presented. These findings are not just my opinion, they are the result of a survey of homebrewers. The survey was disseminated widely (online), and input was received from more than 800 homebrewers representing every geographic region of the United States (and 24 other countries!). Respondents provided input on their brewing history, personal demographics, equipment, and other pertinent information. While the initial list of “Brewing Priorities” was created by me, respondents were given the opportunity to provide their own priorities; none outside of the ten generated by the author were repeated with any significant regularity, suggesting that we hit pretty much all of the “big” issues. So, without further ado, here is the list of the 10 most important homebrewing priorities.
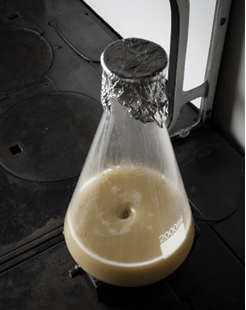

Yeast health and pitching rate. [Cost: $2-10/batch]
Finishing in a distant but strong second was yeast health and pitching rate, for the same reason that temperature control did so well: it’s a major contributor to effective fermentation. As we always say, “brewers make wort — yeast make beer,” so keeping your yeast cells healthy and happy is a great way to improve the quality of your beer. Old or under-pitched yeast are likely to experience more stress, and more stress usually means more off-flavors in the form of esters, under-attenuation, and incomplete clean-up of byproducts. This is an easy fix – just consult a good resource like BYO’s yeast pitching rate table (https://byo.com/resources/pitching) and build up your pitch accordingly, either by purchasing more yeast or making a starter. In terms of overall yeast health, the simplest method is to use yeast with a recent “packaged on” date, or, if re-pitching, use an effective yeast washing/harvesting procedure. Your yeast (and your palate) will thank you.
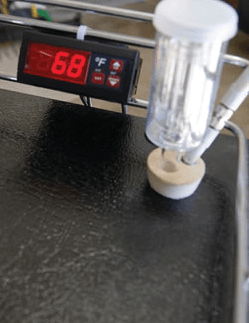
Temperature control during fermentation. [Cost: $50-250, one time]
This was the by-a-mile winner of the survey, and with good reason: Temperature control is probably the most important contributor to proper fermentation, and effective fermentation is what brewing is all about. A ferment that’s too cold can lead to sluggish yeast that underperform and, in the case of some yeast strains, don’t produce either the attenuation or flavor/aroma profile that you’re expecting. Addressing this one isn’t always easy, but there is a range of options available to you. At the top end, you can acquire an extra fridge or chest freezer and rig it with a temperature controller for near-pinpoint control of your fermentation temps, from start to finish. A good temperature controller can be had for about $50, and secondhand fridges/freezers can often be had nearly cost-free from places like Craigslist.com. If you don’t have the space, financing, or moving capacity, there are lower-tech options as well. Wrapping a fermenter in a damp towel can help keep temperatures under control by evaporation — just keep re-dampening that towel. (The towel has limits however; it can reduce by a few degrees and it doesn’t work in high humidity. You can also put the fermenter in a water bath and keep replacing plastic soda bottles filled with water then frozen. Water is a better conductor of heat than air.) Storing location of your vessel can be a big help as well; basements or rarely-used rooms with closed heating vents often hold fairly steady temperatures in the low-60s Fahrenheit (high teens Celsius) in winter, and storing near a radiator or heat vent can help hold temperatures higher during colder months or to encourage yeast to finish strong at the end of fermentation. Proper temperature is essential, but so is consistency: You want to avoid wide swings of temperature fluctuation as this can encourage yeast to drop back off to sleep when temperatures slip or over-produce undesirable byproducts and fusels if temperatures stray too warm. If you can, shoot for the dedicated fermentation refrigerator with a basic temperature controller that will keep your fermentation temperature within a constrained range.
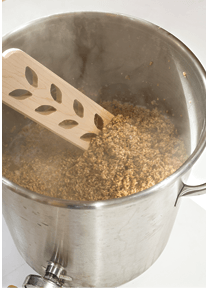
Mash procedure. [Cost: $0]
It’s no surprise that mash procedure and conditions came in at number three in our list. Mash temperatures (whether a single infusion or multiple-steps), mash density, vessel geometry, flow rates, and more all contribute to the quality of your finished beer. At the most basic level it dictates the relative amounts of different kinds of sugars and proteins in your wort, which are major contributors to mouthfeel, ABV, and flavor. Depending on the pH, mash procedure can also be a source of astringency (whether from too-high a sparge temperature or from channeling during runoff), acrid off-flavors (if your mash is scorched in a direct-heat system), and numerous other small but important details. All of these fine controls and potential pitfalls are wrapped up in a single process, and as a result the mash is worthy of your attention. For simplicity’s sake, you can utilize a single-infusion mash with either a no-sparge or batch sparge method; for the more-adventurous, step and decoction mashes, fly sparging, and recirculating systems offer a greater level of control. But don’t neglect the basics: A steady mash temperature of 152 °F (67 °C) is a great starting point for reliable beer.
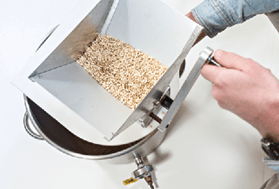
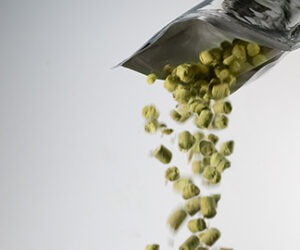
Freshness of ingredients. [Cost: $100-150]
Tunnel vision for yeast freshness could leave you wanting in other areas, so be sure to procure the freshest grains, extracts, and hops you can get your hands on as well. Stale grain will often have a mealy flavor and texture that will translate into your finished beer. Old malt extract will also contribute off flavors to your homebrew. Hops aren’t immune from age effects, either, unless they’re packaged properly and stored refrigerated or in the freezer. The biggest threats to hops are oxidation and a loss of alpha acid percentage, and in extreme cases you can get a moldy or cheesy contribution from old hops. Bottom line: Your ingredients should be stored cool, dry, sealed, and stable. Check your “packaged on” dates. For added malt freshness, consider acquiring your own grain mill rather than having the local homebrew shop crush for you. And always buy your ingredients from sources that have good pull-through and are unlikely to have ingredients sitting around for months on the shelf.

Attenuation. [Cost: $0]
Regardless of your position on the flavor impacts of residual long-chain carbohydrates, there’s no question that a good, complete attenuation can address a lot of brewing ills. Complete attenuation means, among other things, a much greater probability that your yeast have cleaned up the mess they left in the initial stages of fermentation. The fix for this one is mostly process — in fact, it’s helped along by much of the yeast and temperature control items we’ve already covered — but you may find it necessary to invest in some kind of warming blanket to keep things moving along. Warming up the yeast an extra 2-3 degrees Fahrenheit (~1.5 °C) are often the difference between a “finished” beer and a precursor-lousy tub of molasses (hyperbolically speaking).
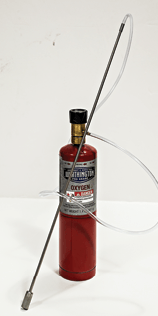
Oxygen. [Cost: ~$50 up front, then ~$0.50/batch]
There are times when you need oxygen (after chilling, at pitching), times when you hate it (post-boil/pre-chill, after the start of fermentation), and other times when it just doesn’t matter (pre-boil, usually). Avoiding it before chilling and after fermentation has started is a simple task: Limit splashing and agitation of the surface, and only transfer the beer when necessary (in other words, knock off the unnecessary secondary fermentation vessel unless absolutely necessary). Adding O2 when you want it, though, takes a bit of effort and coin — you’ll need to invest in an oxygenation rig (really just a simple regulator, tubing, and a 0.5-micron sintered stone attached to the end of it) and a cylinder of oxygen from your local gas supply or hardware store. There’s only so much oxygen you can get into solution by splashing, shaking, or utilizing an aquarium pump — 30 seconds of pure oxygen just before pitching cuts your start times dramatically.

Prompt chilling. [$30-150, one time]
Strictly speaking, you don’t need to actively chill wort — but like many things this far down on the top 10 list, chilling your wort may save you from the “death by a thousand cuts” that can occur when the aggregated impact of a lot of small things result in a not-so-hot (pun intended) beer. At the completion of the boil, Dimethyl Sulfide (DMS) may still be forming in your wort — only now it isn’t being boiled off, so it’s best to limit its production in the first place by cooling your wort. It’s also worth noting that the sooner you get your wort to pitching temperatures and get your yeast in there, the safer it will be from contamination. And while often considered a superficial benefit, prompt chilling reduces the risk of chill haze later on in the finished beer. A setup as simple as a snow bank or an ice bath, or low-tech equipment like an immersion chiller or a counterflow chiller are all solid options here, but for my time and money nothing beats a plate chiller. Even with just a gravity feed, my Shirron plate chiller brings near-boiling wort to feed-water temperatures at a rate of about one gallon (3.8 L) every two minutes, and even your ground water will be cool enough to enable you to oxygenate and pitch immediately.

Water chemistry and adjustment. [Cost: $30-100]
There’s good news: For most people, your water is probably okay to brew with, especially if you’re brewing with extract. The rule of thumb is that if it tastes good enough to drink, then go ahead and brew with it. But some simple water knowledge and tinkering can add quite a bit to your beer. The simple starting point is getting a water report from your city, or getting a brewing water analysis run by a company like Ward Labs. Excessive mineral content in your water (“hard water,” high levels of calcium, carbonate, bicarbonate, etc.) can impact both fermentation and final flavor; consider diluting with distilled or reverse osmosis (RO) water. Chlorination is also worth considering: municipal water that is chlorinated can leave residual chlorine that could combine with yeast-derived phenols and leave your beer smelling like a plasticky mess. A simple water filtration housing (attachable to your faucet via a $2 adapter) loaded with an activated carbon filter will eliminate even the possibility of chlorine issues, and has the added benefit of filtering other impurities from your tap water as well! Finally, that brewing water report will give you the information you will need to know if you want to make minor adjustments (small additions of gypsum, baking soda, etc.) to fine-tune your beer’s water chemistry.

Fermentation Vessel. [Cost: $25-30/vessel, recurring 1-2 times/year for plastic]
Assuming you don’t have the cash for a stainless conical, your options here come down to one question: Glass or plastic? Glass carboys have the advantage of absolute oxygen impermeability, and are easily scrubbed clean and sanitized. Having said that, I still think you should go for one of the better PET plastic fermenters. They’re only marginally more expensive than the beginner’s bottling bucket, and less expensive (usually) than glass, but they have the benefit of being lightweight and shatterproof, and therefore will never result in a huge mess of spilled wort (best case) or severed limbs (worst case). I’ve left beers and meads in them for as long as a year with no detectable oxidation. One word of warning, though: They WILL scratch easily and leave behind a new neighborhood of potential-contaminant housing, so use a good no-scrub cleaner and sanitizer like One Step to avoid having to break out the carboy brush.

The Diacetyl Rest. [Cost: $0]
If you’ve gotten this far down the list, then you may think that controlling for off-flavors is already covered, but there’s one last detail you may want to account for: That dastardly vicinal diketone, diacetyl. Most yeast strains produce at least some diacetyl, which they’re happy to clean up, in a healthy and complete fermentation. To limit the risk of residual diacetyl flavors, depending on the style of beer you are brewing (especially lagers), increase your fermentation temperatures by a few degrees at the end of fermentation, for a period of about 24–48 hours.
Beyond the Top Ten
The ten things noted here should definitely be on your list to at least consider, if not actively address. I would argue that they constitute a roadmap to solid brewing outcomes, and will probably address the vast majority of beer faults you might experience. There’s just one last thing I’ll add to this list, so maybe it’s really a “Top Eleven” (though I admit, that’s much less psychologically satisfying): CONSISTENCY. Brew the same way, every time. Have a routine. Brew regularly so that you remember your routine, and take notes so you remember what you did each brew day. Tied into this is making sure that your equipment is always calibrated and ready to go before you start brewing, which will ensure more consistent results every time. And when you need to make changes, do them one at a time, and gauge the impact on the beer of that one change. The more consistently you brew, the easier it will be to determine the effects of any changes in your process, and will make you confident in your ability to produce a reliable product from one batch to the next. It’s like golf. Have you ever seen Jim Furyk hit a golf ball? Guy looks like someone just stuck him with a cattle prod. But he does it the same way every time and damned if that ball doesn’t fly. Prost. Also, questions regarding this survey story’s methodology, question wording, or other polling aspects can be sent to the author at [email protected].