Understanding Brewing Ingredients

I was making pancakes one day with a box of Bisquick mix and noticed that there are a bunch of recipes on the back for things you can make with Bisquick. In addition to pancakes, there are recipes for shortcakes, dumplings, biscuits, and waffles to name just a few. The ingredients listed for these recipes include common baking ingredients like eggs, sugar, vanilla, butter, and milk.
By adjusting the same basic ingredients in subtle ways, you can create a wide variety of flavors. The analogy for beer here is obvious. Using the four basic brewing ingredients we can create an almost infinite variation in beer.
As I was contemplating my pancakes, I also came to the conclusion that I am an expert on baking ingredients. Not because I’m an expert baker, but simply because I have expert level knowledge about what every single ingredient in the pantry tastes and smells like and I even have expert knowledge about which flavor combinations work well together.
I’ve been sampling these ingredients almost daily for a lifetime, and cooking with them for many years as well. A day rarely passes where I don’t have some combination of milk, butter, flour, eggs, and sugar, for example. I also have expert knowledge of which ingredients work best together — for example sugar and butter is great in cookies and cakes, and I know precisely how they taste together. Over the years I’ve sampled countless other combinations as well.

Unfortunately, when it comes to beer brewing ingredients, few brewers will ever develop the same level of expert knowledge. Even though I’ve been sampling beers since around the time I reached a legal age, it was only recently I’ve taken a dedicated interest in isolating individual flavors and ingredients.
However, with practice and some concentrated work, you can achieve not only a basic understanding of individual brewing ingredients but also how they work together to make great beer. In this article I’m going to focus on some of the tools available to assist you in gaining expert knowledge of beer brewing ingredients.
Brewing for Flavor
To frame the discussion, I need to start with a confession — I am an engineer, struggling to become an artist. I’m far from the only one. An unfortunate byproduct of the history of both homebrewing and craft brewing in America is that it evolved over time to be a fairly technical pursuit.
When I started brewing in 1987, the level of expertise in ingredients and processes that was readily available to the public was pathetic.
Homebrewing and craft brewing took off in the early 1990s with further development of (and easier accessibility to) the science, ingredients, and techniques we still use today.
Over the years, I’ve come to realize that homebrewing is so much more than just robotically selecting ingredients to match a style and running some numbers. Randy Mosher (author of Radical Brewing and other fine books) was one of the first authors to open my eyes to brewing as an art form.
While I’m an engineer by training, Randy is a graphic artist, so he has an entirely different approach to brewing. When I discuss beer with him, he talks about flavors and aromas. Chocolate malt, he will tell you, tastes nothing like chocolate. It has coffee overtones, and is sharp and in many ways more piercing than black patent malt.
He also talks about how ingredients combine to produce distinctive flavors, how flavors transform and evolve during the brewing process, and how beers are often built around the flavor profile of a single ingredient. At one point I recall him brewing a commercial-size batch built around the flavor of roasted bananas. He had to roast hundreds of pounds of bananas, and the finished beer was pretty good.
My key takeaway from him, however, was not the roasted banana beer, but instead the understanding that brewing beer is a balance between the technical and the artistic. Yes, you can make good beer by robotically focusing on the technical part of brewing, but truly great beer is also an artistic endeavor. And the artistry is largely focused around flavors and aromas.
You are manipulating the flavors and aromas of the beer in complex ways to ultimately create a unique experience for the drinker. It is important to understand that the drinking experience has nothing to do with IBUs, mash temperatures, or bitterness ratios. The drinking experience is centered around flavor and aroma. To become a brewing artist, you need to master the flavors and aromas of the ingredients you use.
SMASH and Small-Batch Brewing
What tools do you have for truly understanding your ingredients? For the July-August 2014 issue of BYO I wrote an article entitled “SMaSH Brewing: Single Malt & Single Hop” (digital subscribers can access it at: https://byo.com/article/smash-techniques/). In the article I outlined how you can use a single malt and single hop to make a wide variety of beer styles, and also gain a much deeper understanding of the flavors the malt and hops impart to the finished beer.
The fundamental idea is to limit yourself to one hop and one malt for the beer so you get a clear uninterrupted idea of how that malt and hop perform in an isolated beer. You can easily extend the idea to include variations in yeast or water by experimenting with different yeasts or water profiles again with the purpose of isolating the flavors you are experimenting with.
Given the current pandemic, some of us have switched from brewing larger 10-gallon (38-L) batches to small stovetop 2- to 5-gallon (8- or 19-L) batches. Given fewer social gatherings, I realized it was not possible to drink larger batches fast enough, so I moved to smaller batch sizes, which allows for more variety.
The smaller batch sizes also gave me more room to experiment. While I might not want to try a radical new ingredient or odd yeast on a large batch, I could afford to dump a small 3-gallon (11-L) batch if my crazy idea did not work out. Also if you brew repeated small batches you have the opportunity to vary one ingredient at a time, so you can play with changing just the yeast, or just the malt, or just the hops.
Grains
The flavor profiles from grains can be challenging to assess without making beer. Traditionally, many brewers took a sample of crushed raw grain and tried to sample the flavor directly by chewing it. Unfortunately, this method extracts more of the bitter (sucking on a tea bag) tannins and raw grain flavor from the husk than you get in brewing, but this still can be effective particularly for some of the roasted or sweeter grains.
A better method for sensory evaluation of grains was developed in the last few years and standardized by the American Society of Brewing Chemists (ASBC). It involves taking a measured amount of crushed grain and water and doing a hot steep to create a tea that can be evaluated for flavor profile. The full ASBC method is as follows:
1. Weigh a sample of 50 grams (1.75 oz.) of base malt. If evaluating specialty malts, instead use 25 g (0.88 oz.) of specialty malt blended with another 25 g (0.88 oz.) of base (pale) malt. For dark roasted malts, use 7.5 g (0.25 oz.) of roast malt with 42.5 g (1.5 oz.) of base (pale) malt. Obviously you can double or triple the amount of malt and water if you need a larger sample for a group to evaluate.
2. Mill the grains in a clean electric grinder for about 10 seconds. A coffee grinder works well for this as you want a coarse flour consistency (finer than you would typically crush it for brewing).
3. Heat 450 mL (1.9 cups or 0.95 pint) of water to 149 °F (65 °C) and combine it in with the crushed grain sample in an insulated thermos or growler and shake it for 20 seconds to mix the grain and water. Let the mixture stand for 15 minutes.
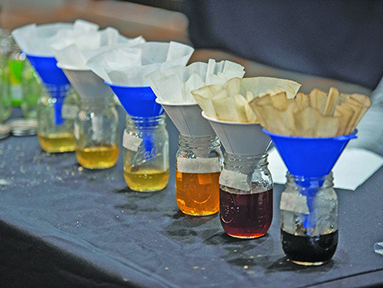
4. While the mixture is steeping, place some filter paper (Ahlstrom 515) at the top of a clean beaker or glass. A coffee filter is a suitable substitute if you don’t have access to lab paper filters. Wet the paper with some deionized water.
5. Swirl the thermos/growler to bring the particles back into solution and pour the mixture into the filter. Draw the first 100 mL (just under 1⁄2 cup) off the collected wort and pour it back into the thermos to collect any remaining grains then pour that also into the filter. Allow the filter to drain completely leaving your liquid sample.
6. Let the sample cool. Do your sensory evaluation when it has reached room temperature, within four hours of filtering.
Once your tea is complete, you sip the resulting wort. Look for common flavors such as bready, malty, toasty, nutty, or grainy, as well as the common fruit flavors like plums or raisins. Darker varieties often have coffee, burnt toast, and similar roast flavors. Again this is a great project to do with a small group or brew club.
Some maltsters publish “spider charts,” which are so named because they look like a spider web, for their grains online. These are typically developed by a panel using the ASBC sampling method and can be useful to aid you in grain selection if you don’t have the time to evaluate a lot of grains yourself or for educating yourself as you compare your notes to an expert panel’s.
Hops
Aside from brewing, the best way to familiarize yourself with hops is using a dry rub. Over the years I’ve had the opportunity to brew with a number of professional brewers and this is the method they use to assess hop freshness and aroma. It’s best if you have several hop varieties to compare, so purchase 5–6 packets of fresh hops. This is also a great experiment to try with your homebrewing club.
To assess the hops, open the package and use a spoon to crush several hop pellets into a fine powder. Next you take a small amount of the powder and put it in the palm of your hand, and then rub your two hands together vigorously. Next open your palms and get your nose right down in the middle and take a deep breath.
If you try this with a few varieties you will easily be able to tell the difference between fresh hops that “pop” and hops that may be old, stale, or poorly packaged. You can also get a pretty decent impression of the aroma and flavor profile of the hop.
Since hops are an agricultural product that can vary widely in quality depending on where they were grown, the growing season, how and when they were harvested, packaged, transported, and stored, it is important to do this test before you brew. Many brewers have made the mistake of taking a perfectly good batch of beer and dropping a few packets of stale hops into it without evaluating the hops first.
A second method of hop evaluation is using “hop teas.” The concept here is to simply steep a small quantity of hops in hot water and then separate the hops from the tea using a filter to produce a hop tea. While this method is not standardized and not as popular as the dry rub, it can be an effective method for evaluating the profile of new hops.
In addition to doing your own hop evaluation, many of the major hop producers offer online descriptions and charts to aid you in selecting hops. The spider charts are very useful and are typically developed by a panel smelling the raw hops and rating the hop aroma from a scale of zero to five.
For example, Hopsteiner (https://www.hopsteiner.com) produces a set of spider charts and descriptions for each of their hop varieties. The flavor axis they use tracks well with the types of aromas and flavors you can expect in the finished hops. These include Citrus, Fruity, Floral, Herbal, Spicy, Resinous, Sweet, and Other.

Yeast
It can be difficult to evaluate a yeast strain and its effects short of actually brewing a beer. If you do get the chance to visit a location like either of the two White Labs breweries (in San Diego, California and Asheville, North Carolina), you can sample several different beers made with identical wort but different yeasts. Obviously you can also brew small-batch or SMASH beers and vary only the yeast yourself.
However there are a surprising number of aids available to help you evaluate yeast flavor without brewing. To use these you need to understand the basic flavors that come from the major byproducts that yeast produce during fermentation.
It is interesting to note that most of the significant flavors yeast produce are also considered off-flavors. For example, phenolics that play a significant role in creating the clove flavor in a Bavarian wheat beer and many Belgian beers would be considered an off-flavor in many other styles. In fact of the 16 major beer “off-flavors” listed on a typical Beer Judge Certification Program (BJCP) score sheet, nine are yeast-related. So when we talk about a yeast flavor level, it needs to also be in the context of the style of beer we’re brewing.
Here are the major yeast flavors and off-flavors:
Acetaldehyde: A green apple or fresh cut pumpkin flavor produced as an intermediate compound during fermentation. Healthy yeast will typically convert this into alcohol.
Alcoholic/Moonshine: Hot alcohol flavor produced by the presence of higher order fusel alcohols including isoamyl alcohol, propanol, butanol, and isobutanol that is typically associated with fermenting at too high
a temperature for the yeast strain used.
Diacetyl: A butter, butterscotch, or honey-like flavor produced by diacetyl and pentainedione that is a byproduct of fermentation. Typically yeast will mop these up in later fermentation, particularly if you perform a “diacetyl rest” by raising the temperature a few degrees at the end of fermentation.
Esters: Fruity flavors like pears, roses, and bananas caused by the “esterification” of alcohols. The most common is ethyl acetate, which has the aroma of pears. Ester production is driven by an enzyme in the yeast called alcohol acetyl-CoA transferase (AAT) and can be enhanced by fermenting at high temperature. It is common in many English ale yeasts, for example.
Phenolics: Vary from a clove to spicy, smoky, and even Band-Aid/diaper flavors. Phenolics are naturally produced by many yeasts, wild yeasts, and bacteria and are largely driven by the choice of yeast strain.
Solvent: Hot, spicy, paint thinner, wood polish, or nail polish remover flavors and aromas. This is typically caused by out of control ester production from high fermentation temperatures and poor yeast health.
Sour/Acidic: Lactic, sour, sourdough, or vinegar flavors. Typically this is caused by a bacterial infection that produces lactic or acetic acid. Some yeast strains can also produce lactic acid, which is sour.
Sulfur: Rotten eggs or a burnt match odor that is caused by hydrogen sulfide or sulfur dioxide gas. Typically the levels produced are determined by the yeast strain, and is often associated with lager yeasts or yeast fermented at a low temperature.
Yeasty: Bready, yeasty aroma and flavors associated with young beers. This is most often caused by yeast remaining in suspension and beer that has not been properly aged. The driving yeast factor here is the “flocculation” rate for the yeast, which determines how quickly the yeast will fall out of suspension after fermentation. High flocculation yeasts drop out more quickly.
Now that you have an understanding of the basic yeast flavors, how can you put this to good use? Well it turns out that the major yeast producers provide data sheets that describe many of these off-flavors in addition to the typical data sheet showing fermentation temperatures and flocculation. Sometimes you need to dig a bit to find them, but the data is typically listed under “fermentation data” for the strain.
For example, the popular WLP001 California Ale yeast from White Labs lists the following fermentation data: Acetaldehyde: 14 ppm, Ethyl Acetate (ester): 17.46 ppm, Propanol (fusel alcohol): 37.23 ppm, Isoamyl Alcohol (fusel alcohol): 90.15 ppm, and Total 2,3 Pentainedione (diacetyl related): 8.61 ppm from a test batch at 4.8% ABV. As you might expect for this very clean strain, the esters, diacetyl, and acetaldehyde are all low.
In addition to being able to read an in-depth data sheet, understanding the yeast flavors listed earlier will help you when evaluating your own beer. Is it a little too fruity? Perhaps choosing a yeast with lower esters or fermenting at a lower temperature next time might correct it. Too much phenolic clove flavor? You simply need to choose a different yeast strain as the strain primarily determines the phenolic content. Buttery? You may need to perform a diacetyl rest.
Water
Water is perhaps the most challenging of ingredients to evaluate on its own. You can taste bad water and determine it is unsuitable for brewing. For example if your tap water is poor when making coffee, concentrated orange juice, etc., then it is probably also bad for beer. However most of us have a difficult time determining subtle differences in water by taste alone.
Fortunately it is now easier to get accurate water tests done than in the past. Options include data from your local water supplier, purchasing a brewing water test kit, or sending a water sample into a test lab like Ward Labs. No matter which option you choose, make sure you perform a brewing water test that includes the “big six” water ions, which are: Calcium (Ca), Magnesium (Mg), Sodium (Na), Sulfate (SO4), Chloride (Cl), and Bicarbonate (HCO3).
You can quickly determine if your water is suitable for brewing by checking your water test results against the “good” range for typical brewing water: Calcium [50–150 ppm], Magnesium [10–40 ppm], Sodium [0–150 ppm], Sulfate [50–250 ppm], Chloride [0–250 ppm], and Bicarbonate [0–250 ppm]. If you are within these ranges you can brew without worry. If you are under on some ions you can add water salts, and if over on some ions you can dilute with distilled or reverse osmosis water.
If you are an all-grain brewer, you can also use this data along with your grain bill to estimate and adjust your mash pH. While I don’t have space to explain the entire mash pH adjustment process in this article, many authors have written on this topic and a variety of online software tools can be used to help with these adjustments.
There are several approaches you can take to making water adjustments for a particular beer style. One is to adjust your water to either match the water profile of a popular brewing city, and the other is to adjust for a particular beer style. For example if I’m brewing a Pilsner, I could choose to try to match my water to Pilsen, Czech Republic’s water source, or I could simply pick a water profile that matches a light lager. Adjustments are made by adding water salts or diluting your local water depending on whether you need to raise or lower a given ion. Again, software can aid you here as the best match can be found by doing a “least squares” fit of the water data, which can be difficult to do by hand.
The other common approach to water adjustments is to adjust the “sulfate-to-chloride” ratio, which some authors refer to as the “seasoning” for the beer. The ratio can be calculated easily for your home water profile by dividing the sulfate ion content in parts per million (ppm) by the chloride ion count. A ratio of 1.0 is considered balanced, while a number above 1 (more sulfate) will enhance the bitterness of the beer and a ratio below 1 (more chloride) will enhance the perceived malt character.
Making adjustments to the overall water profile to fit a style as well as adjusting the sulfate-to-chloride ratio gives you quite a bit of control over the water profile and can really help you match water to fit a given style. As with other ingredients, the best method to understand water is to experiment with small batches, making one adjustment at a time.
Conclusion
Developing a comprehensive understanding of beer brewing ingredients is a task that can literally take a lifetime. Only through dedicated effort can you begin to understand the individual flavors that hops, malts, yeast, and water contribute and how they fit together to produce a spectacular beer. Still, it is an enjoyable journey and one well worth embarking upon.