The first time I went to the hop harvest in Yakima, Washington I was able to go into an operating hop kiln. In a hop kiln a machine lays fresh hop cones onto a large burlap-lined floor about 18–36 in. (16–91 cm) thick, 20 ft. (6.1 m) wide, and 20 ft. (6.1 m) long and then hot air from a large gas-fired blower blows up through the burlap-lined floor until the hops are about 8% moisture. The burlap is then moved so the hops can be conveyed to the hop bailer. The most striking part of the hop kiln, other than the sheer volume of hops it contained, was the amazing aromas being driven off by the drying process. I was there with about 30 other brewers and we all commented on how we wanted that flavor in our beers and not dried off. This started a quest in my mind about how to retain these amazing flavors and aromas.
Hops are dried because otherwise mold will quickly take foot on the cones. While some of the oils that are driven off in the kilns are absolutely amazing, others, like the onion/garlic-causing thiols, are considered an off-flavor in beer. Any program of working with wet hops needs to focus on the extraction of these desired oils and their related flavor and aroma impacts while minimizing the off-flavors. This is our goal today.
When Vinnie Cilurzo acquired the Russian River Brewery from Korbel Champagne Cellars he was bequeathed all of the hop rhizomes that were being grown by Korbel. Russian River’s new home would be in downtown Santa Rosa, California and there was no room for a hop field. So Vinnie asked Brian Hunt, owner of Moonlight Brewing, if he could plant them on Brian’s brewery property. Brian had the only registered abbey brewery in California and needed to have an agricultural use to allow the brewery to operate in the middle of wineries. It was a perfect match. They shared the hops and many of the responsibilities of cultivating and harvesting them. Each year they would brew wet hop beer with their own hops. While Sierra Nevada Brewing Co. had been brewing wet-hopped beers for about a decade at that point, this was the first wet hop beer I had ever tried and I knew I would need their help if I was going to succeed in this adventure.
Any program of working with wet hops needs to focus on the extraction of these desired oils and their related flavor and aroma impacts while minimizing the off flavors
Brian graciously agreed to share some of the recipe formulation concepts with me as well as allow me to taste a half dozen batches he had done that year (2006). I made an appointment to go to the brewery, a place very few people got to visit, and excitedly got in my car to go. I should mention, Brian had taught me to brew about nine years earlier and we spoke every week while he made deliveries. When I arrived he called to tell me he decided to go on deliveries early but the brewery was unlocked and to pull samples from Tanks 3, 4, and 7 and call him back. I pulled the samples in pint glasses and took them out to the loading dock. I used one empty keg as a table and another as a chair and gave him a call. He walked me through each recipe and what he tasted and what he would do different. Then he sent me in for three more samples from different tanks. This went on for a few hours, the whole time he was dropping kegs at bars in San Francisco, when he finally had me pull a sample from a keg that had clearly been in the cellar for a long time. This beer was a wet hop beer that was one year old and it was a great example of a beer past its prime.
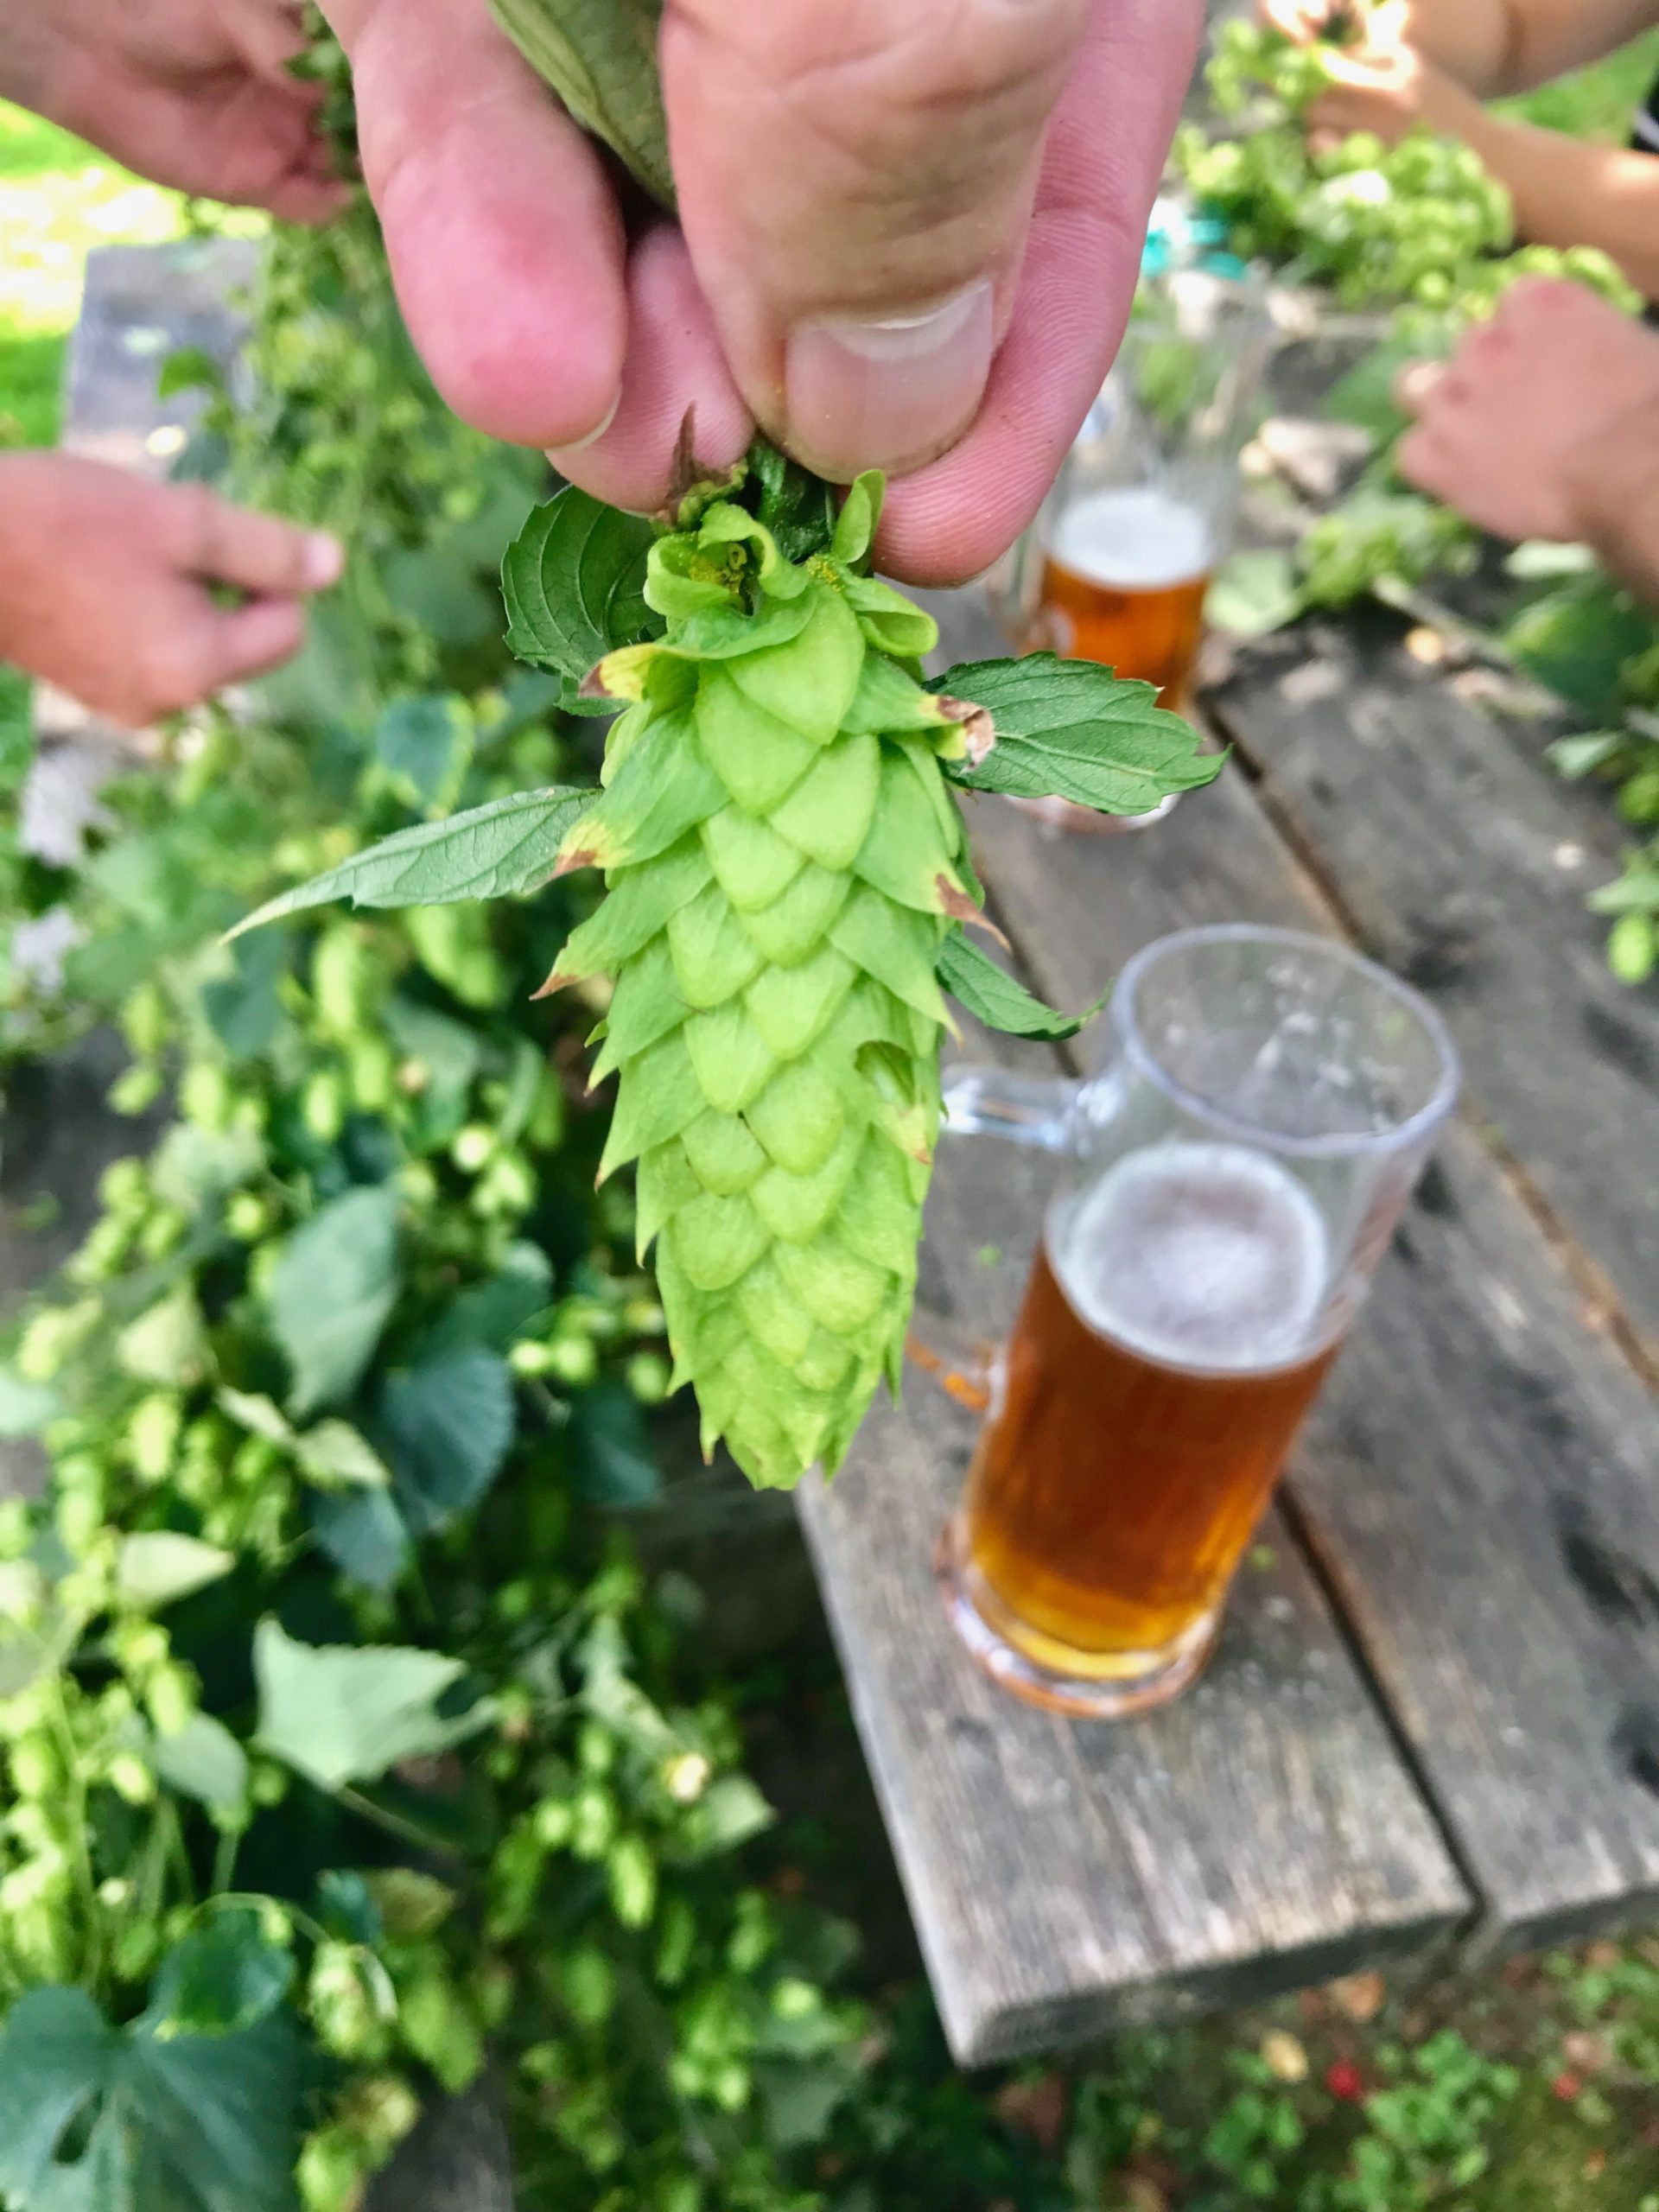
Using wet hops in your beer is fun and rewarding. But if you’re harvesting your own hops, we highly recommend trying to get a team together for harvest and brew day. It’s more enjoyable when you have friends and/or family helping out.
This education and tasting was an amazing head start on the road to making a nice wet-hop beer. Much of the information I am sharing is from Brian and Vinnie and the rest is what I learned after ten seasons of brewing wet-hop beers.
The first problem is how to acquire wet hops. I did not have room to grow hops but many homebrewers do grow them. If you are lucky enough to grow them or be in a club with someone who grows enough to share — that would be your best source. You will have to work with the varieties available, as it will be limited. Also, the window for harvest is very narrow so you will only have a few days a year you can acquire each variety. I needed 100 lbs. (45 kg) for my recipes and I had to organize a grower to stand in the middle of a very automated process of shaking off the cones from the bines and sending them to the kiln and convince him to box them and overnight them to me. In the beginning this was a challenge but as the popularity of wet-hop beers were on the rise back then, it became easier and large hop dealers started providing the service. Usually I would get 30-days notice of an expected harvest date and a list of varieties to choose from. Then, 48 hours before delivery, I was given the right of refusal in case I didn’t have an empty fermenter.
Once I knew the hops were coming and the variety I was receiving, I had to devise a recipe to make the best use of them. For me, these were simple pale ales or West Coast IPAs, using the character of Maris Otter as a base malt to build off of. Building grain bills was something I was quite familiar and comfortable with — working with the wet hops on the other hand was a new concept. The first problem was: I had no idea what the alpha acid percentage was in the hops. The lab work would not be complete before my brew was already in the fermenter so I had to make an educated guess. I used the middle of the hop average as published by Hop Union as my guideline. If you grow your own hops, you may want to consider testing the alpha acid % one year on your hops. A test costs roughly $60 (USD) and several companies, such as White Labs, offer the test to the public.
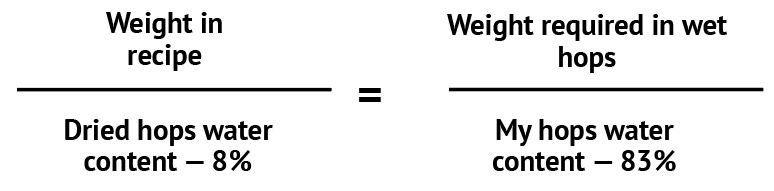
The next problem was accounting for the water weight of the un-dried hops. A dried hop is normally about 8% water. I had to measure the water in my hops so I could get an idea of how many to use. A simple solution to do that is bake them at a low temperature in the oven to dry them to a paper consistency. But before I could do that, I needed to come up with a recipe using standard dried hops. I can then convert the recipe to wet hops once I get the % water found in the wet hops. So let’s say I got the call that Centennial hops were on course for my brewery. The following is a favorite recipe of mine scaled to 5 gallons (19 L) for this exercise:
Wet Your Whistle (pellet-hop version)
IBU = ~70 SRM = ~6 ABV = ~6.3%
Water (for mash and sparge):
Reverse osmosis (RO) water
0.5 g/gal. gypsum
0.1 g/gal. CaCl2
0.1 g/gal. baking soda
5 mL/gal. 10% phosphoric acid
Grist: 10 lbs. (4.5 kg) Crisp Maris Otter malt 1 lb. (0.45 kg) Weyermann Vienna malt 1 lb. (0.45 kg) Castle Château Cara Ruby malt
Target mash pH 5.4 measured at room temperature
Hop Schedule: 2 oz. (57 g) Centennial hops (60 min.) 2 oz. (57 g) Centennial hops (5 min.) 2 oz. (57 g) Centennial hops (0 min.) 1 oz. (28 g) Centennial hops (hop back) 2 oz. (57 g) Centennial hops (dry hop for 3 days)
This was an easy recipe that fit the mold in my mind as a perfect balance between hops and grains for a wet-hop brew day. Just for fun, you may even want to brew your base recipe so you can compare the two — maybe brew it a couple weeks before to have on hand. But back to the story . . . on wet-hop day the first thing I did was lay out newspaper on the brewhouse floor and open all the boxes and dump out all the hops. This let me look for leaves and twigs as well as find some of the brown cones and mix the hops together so I could get a good sample. I would then take exactly 100 grams and put them in the oven at 140 °F (60 °C) for 30 minutes and re-weigh them. I would get a number like 17 grams. (Your number is likely to be between 15 and 30 grams depending on harvest and transportation conditions.)
So let’s run with this. My 100 grams of wet hops was 17 grams of hops and 83 grams of water, which means it is 17% hop material and 83% moisture. Of course you don’t need to use 100 grams but it does make the math just that much easier.
If we rearrange this a little we get wet-hop equivalent for 4 out of our recipe’s 5 hop additions = (0.83 x 2 oz.) / 0.08 = 20.75 oz. (588 g) of wet hops for each of those additions. The hop back was required in my brewery to prevent clogging. You could either drop this addition if you don’t have a hop back or can simply add the 10 oz. (280 g) either as a hopstand addition or the dry hop addition. This calculation is performed for each addition and we get our new hop schedule (note that I rounded down):
Wet Your Whistle (wet hop schedule)
20 oz. (570 g) Centennial wet hops (60 min.) 20 oz. (570 g) Centennial wet hops (5 min.) 20 oz. (570 g) Centennial wet hops (0 min.) 10 oz. (280 g) Centennial wet hops (hop back) 20 oz. (570 g) Centennial wet hops (dry hop for 3 days)
Now that we know how to weigh our hops we can start the brew. The first thing you will notice is there is a lot more vegetal matter in the kettle and you may have to change the way you deal with hops by using a bag or changing how you rack out of the boil kettle. The next thing you have to cope with is storing the hops till you are ready for a dry hop addition. Wet/dry hopping sounds odd but it is the best descriptor for the process. After trying many things, including dry hopping with a variety that is harvested later and shipped later I found that freezing wet hops does a great job of preserving them for a few weeks. It is not the perfect solution but it works well enough.
When you get to the dry hop process, just like when working with whole-leaf hops, the hops will float on the surface of the beer and you need to find a way to get them wet. In a professional brewing situation, I set up a pump-over system and would splash the beer (in a CO2 environment) for a few days. I have also put all of the wet hops in a keg with a sock gasket and pushed the finished beer through it for a few days; like a larger version of a Randall. This method had a problem with clogging. There are a couple good small-batch (homebrew) approaches. First, if you own Corny kegs and a CO2 regulation system, putting the hops in a CO2-purged keg and inverting the keg every time you walk by for a few days is one solution. Getting the beer off the hops could be a challenge if you simply let the wet hops float though. Another idea would be to bag the hops and place a weight in the bag (such as glass marbles or stainless steel washers . . . something that is easy to clean and sanitize) then tie it off. The bagged hops can be added to a keg or the fermenter, but be sure to attach an anchor chain outside of the fermenter, like a long strand of unscented floss, in order to rescue the hops from the beer when complete. Take note though, pulling this much hops through a Corny keg top opening can get messy. I recommend placing the keg in a pan of some sort if you are pulling inside your house to catch the beer that might trickle out from the sides of the bag.
I can’t stress how important it is to not leave the beer in contact with the hops for too long. A strong flavor that the drying process removes from hops is the flavor of fresh cut grass. Prolonged contact will continue to extract more and more of this flavor. Yes, you will get some of that character and that is part of the wet-hop experience, but the idea is to stay on the side of freshly mowed lawn and not towards decomposing pile of grass. For a small batch, the easiest method to separate the hops from the beer is to bag them with weights.
I like the flavor of wet-hop beers served clear so I always used finings in the final transfer. Then I carbonate as normal. These beers are very fragile and ethereal — much like the hazy IPAs, they are best consumed fresh. It’s fun to experience those flavors and aromas that get pushed out of the hop cones during the typical drying process. If you haven’t already tried this, I implore you to give it a try. If brewed correctly they are like hop candy.
Hop creep isn’t new, so why are we hearing so much more about it in recent years? Brewing scientists now believe it has to do with a push from brewers for hops to be kilned at lower temperatures to preserve aromatics. The Wizard also gets geeky about hop utilization and shares a different approach to beer competitions.
Dry hopping is the practice of adding hops to beer at the tail end or post-fermentation. However, there is a lot more to it than that. There are many factors including time, temperature, quality, and quantity of hops that play pivotal roles in what you’ll get out of dry hopping.
Subscribe Today!
Become a subscriber today and you'll receive a
new issue every other month plus unlimited access
to our full archive of backlogged issues.
This website uses cookies to improve your experience. You can opt-out if you wish.AcceptRejectRead More
Privacy & Cookies Policy
Privacy Overview
This website uses cookies to improve your experience while you navigate through the website. Out of these, the cookies that are categorized as necessary are stored on your browser as they are essential for the working of basic functionalities of the website. We also use third-party cookies that help us analyze and understand how you use this website. These cookies will be stored in your browser only with your consent. You also have the option to opt-out of these cookies. But opting out of some of these cookies may affect your browsing experience.
Necessary cookies are absolutely essential for the website to function properly. This category only includes cookies that ensures basic functionalities and security features of the website. These cookies do not store any personal information.
Any cookies that may not be particularly necessary for the website to function and is used specifically to collect user personal data via analytics, ads, other embedded contents are termed as non-necessary cookies. It is mandatory to procure user consent prior to running these cookies on your website.