Wort Aeration – Providing an environment to flourish
 Without proper wort aeration lag time can increase, making your beer more susceptible to other organisms growing in your beer. You can kick fermentation off quicker with some oxygen. No need to be nervous about oxidative off-flavors — post-boil beer has little oxygen present, making pre-ferment the perfect time to aerate or oxygenate your wort.
Let’s discuss the difference between aeration and oxygenation, as both will get you to the same goal of adding oxygen, albeit using slightly differently methods. Aeration requires only a system for adding air to your beer, which contains about 21% oxygen (as well as 78% nitrogen, 1% argon, and a trace amount of carbon dioxide.) You may have deduced that oxygenation of your wort would be adding 100% pure oxygen to your beer. This would require a tank of pure oxygen, or an oxygen machine. When discussing the process of adding oxygen, many simply refer to it as aeration.
Yeast are amazing little fungi that can live aerobically, respiring oxygen, or anaerobically, fermenting sugar. Brewers yeast, Saccharomyces cerevisiae, prefers to eat sugar than use oxygen when enough sugar is presented to them. Although yeast can survive without oxygen completely, the overall health of the yeast can be affected, as can budding (the yeast’s reproduction method) and growth.
What oxygen really provides is a better way for yeast to produce fatty acids and sterols; both also known as lipids — important components of the cell membrane which influence budding ability and growth. While oxygen is present, yeast can be respiro-fermentative, consuming both oxygen as needed for producing lipids, and sugar, for energy. Another way yeast obtain the lipids needed is to actually have them available to the yeast in the form of dead yeast (trub). The cold break, which settles in the bottom of your fermenter, contains a mix of lipids.
How much oxygen do my yeast need?
Unfortunately, your post-boil wort is oxygen deprived, and has almost no oxygen. Hot wort will not do a good job of holding oxygen, it leaves with the steam when the boil gets volatile. Once you’ve cooled your wort, you are ready to aerate.

The goal when adding oxygen is to get your wort to around 8 parts per million (ppm) dissolved oxygen. This is ample oxygen for the yeast, and is often consumed quite quickly during the first stages of fermentation. Many commercial brewers are comfortable getting their beer in a range of 5–10 ppm. If you own a dissolved oxygen meter you’ll be able to check this with some accuracy. If you are like most homebrewers (and even many small breweries), you will not own an oxygen meter of your own. The saturation point of oxygen through aeration in wort is around 8 ppm — which just so happens to be your target!
It’s hard to add too much oxygen when aerating. If using pure oxygen though, you can over-oxygenate. If you’re under-pitching your yeast, you may have a situation you’d want a bit more oxygen than 8 ppm in your beer. In this scenario you’d want to use oxygenation instead of aeration.
How can I aerate my wort?
Agitation: Shake, Splash, and Stir Methods
I’ve grouped a few techniques together, as these are all the most manual solutions to aeration, and all work quite well. Although these agitations can vary in approach and volatility — splashing, shaking, and stirring have been shown to be highly effective method for adding oxygen.
Splashing may be the easiest method to implement — maybe you’re doing it already accidentally. Moving your cooled wort via a siphon hose from your kettle to your fermentation vessel, leave the hose end near the top of the vessel. This will allow the wort to splash into the vessel. Some companies do make a device you can attach to the end of your tubing that will spray your wort often called a “siphon spray wort aerator.” This adds additional oxygen, though a single splashing transfer of wort through an aerator (or not) probably requires additional oxygen. You could continue to transfer between two cleaned and sanitized vessels a few additional times to increase your oxygen to an acceptable level. Or, once transferred, you could stir or shake your wort to help further aerate the wort.
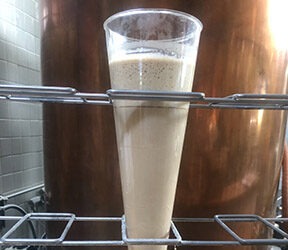
Stirring your wort is a logical approach to aeration. By using a stirring rod or perforated paddle you agitate the wort using either a powered drill, or your own brute strength. Most stirring rods (sometimes called aeration rods or aeration paddles) that you connect to a drill will be perforated or have hollow paddles. This allows for excellent agitation, creating a whirlpool. Paint stirrers can work as well from your local hardware store. Depending on the rod you may see a good amount of foam. Be careful if using a stir rod in a glass carboy. If you’ve splashed your beer into your carboy 1-2 minutes should suffice. I’d recommend trying 2-3 minutes if this is your only agitation.
If you’re in an open pail, or open-top fermenter, using a brewing paddle or a whisk will work as well. You’d probably want to whisk and stir pretty aggressively for around 15-20 minutes to get somewhere near 5-8 ppms. Maybe have a few additional arms around to help when you wear out.
Shaking is another agitation method that’s proven successful. If you’re able to safely splash the wort around in your carboy for a minimum of 15 minutes, you’ll have dissolved an ample amount of oxygen in to your wort. Simply sitting and rocking your fermenter back and forth will do — the more splashing you create the better. Always be careful when doing this with glass, it’s easy to slip and lose a batch of beer, your carboy, and potentially cause bodily harm.
Injection: Aeration & Oxygenation
The most effective method of adding oxygen is to use pure, 100% oxygen. Most folks don’t have the means or machines to create pure oxygen, so we typically buy it in a tank from a gas supplier. A typical homebrewer’s oxygenation injection system will include:
• an oxygen tank
• an oxygen tank regulator
• two sections of tubing
• in-line air filter
• diffusion stone
Combined, these items give you everything you need to properly oxygenate your wort in 60 seconds. Pure oxygen (flammable, so be careful) passes out of the tank though the regulator into the tubing and an in-line sanitary filter (to your second section of tubing) and to the diffusion stone in your wort. Without a diffusion stone the oxygen will be released in large bubbles and will not dissolve as easily in to your liquid. There are different grades of oxygen, and all grades will work, just be sure to put an in-line filter in your tubing. If you do happen to get medical-grade oxygen, you wouldn’t necessarily need the filter, but it doesn’t hurt to leave it in.
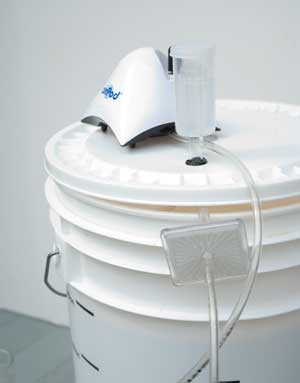
Aeration injection looks similar, but doesn’t require the oxygen tank or regulator. Instead a simple aeration injection set up would be:
• aquarium pump
• two 3-foot (91-cm) sections of ¼” tubing
• in-line air filter
• diffusion stone
A small pump is needed to pressure the outside air through the filter, and down through your diffusion stone in the wort. If using aeration, 15-25 minutes is recommended.
Any micron-sized stone will do, most commonly they are 0.5-micron, or 2-micron stones. A 0.5-micron stone creates very fine bubbles, but can often become clogged if not kept completely clean. Look for a pump with a ¼” barb, as most in-line air filters and diffusion stones come in this size.
Can I get away without aeration or oxygenation?
Although the answer is yes, that answer is completely situational. As mentioned earlier, dead yeast cells and trub have a good concentration of lipids. If you’re repitching onto some yeast trub, you’ll likely have your lipids covered. If you’re using appropriate quantities of fresh yeast that was aerated during propagation (you made a starter on a stir plate or aerated during the process), then providing more oxygen is strictly supplemental, and a lesser amount can be added.
Another consideration is that aeration provides you with extensive yeast growth and activity. The more yeast, the more yeast by-products are produced. This can lead to higher esters and fusel alcohol in your beer. This is often dependent on the yeast strain. Over-pitching your yeast can also have the same effect. In exceptionally clean styles of beer, less aeration may be preferred. This is especially true in say an imperial stout or Scotch ale, big beers that will produce a lot of yeast over time. Letting them ferment at a slower pace may provide a cleaner finished beer than aerating.
Aerating is beneficial
Aeration can be vital to yeast health and growth. If you can provide oxygen early on, your yeast will be more robust and have an easier time propagating. You’ll also see a reduction in lag time giving your yeast a better opportunity than bacteria to colonize your wort. It also increases your odds of a quick and complete fermentation. Aeration is an easy and effective brewing technique to add to your brew day.