Yeast Culturing from Bottles

A wide variety of brewers yeasts are available to homebrewers these days. But sometimes the particular strain you want isn’t commercially available. However, it might be possible to culture it from a bottle-conditioned beer.
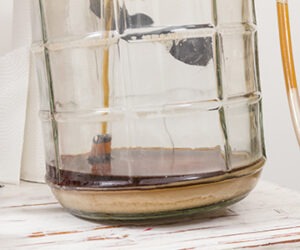
Most commercial beers are filtered, and some are flash pasteurized, before bottling and do not contain yeast. However, some brewers bottle-condition some of their beers. Often, the brewer will advertise this fact on the label of those products. If not, the tell-tale layer of sediment on the bottom of the bottle indicates a bottle conditioned beer.
Keep in mind, however, that some brewers use a different strain of yeast for bottle conditioning than they do for primary fermentation. The yeast on the bottom of most Bavarian hefeweizens, for example, is a standard lager strain. Franziskaner, for example, is bottled with a bottling strain, not a hefeweizen strain. One exception to this rule is Schneider Weisse, which evidence suggests is bottled with its fermentation strain. British bottle-conditioned beers, more often than not, are conditioned with their fermentation strain. To give one example, Fuller’s 1845 reputedly is conditioned with its fermentation strain.

Also, you should know that some brewers use more than one strain of yeast during fermentation. If you culture yeast from a bottle, there is no guarantee that you will raise all the relevant strains. And if you do, they will most likely not be in the proportions the brewer uses. Some sources claim Saison Dupont is fermented with three strains, but — with some work — all three can be cultured from a bottle of the beer.
Other beers that are well-known to have yeast that can be cultured and brewed with are Sierra Nevada Pale Ale, Chimay, some Rogue beers and some of the beers from Kalamazoo Brewing (Bell’s). Also, see the recipe on page 50 for Ommegang Abbey Ale, which can be brewed with yeast cultured from a bottle.
The success or failure of your attempt will mostly depend on the condition of the yeast you try to culture. If you get fresh beer that has been stored cold and is not extremely alcoholic, you have a good shot at recovering
some yeast from the bottle. Yeast that have been stressed — from heat, age or high alcohol levels — are much harder to culture.
The yeasts most homebrewers want to culture come from British, German or Belgian beers. Unfor-tunately, the boat trip these beers endure — and the high alcohol content some of them exhibit — make culturing yeast from them difficult. You’re better off trying to culture yeast from your local or regional micro. (Of course, if you visit Europe and can get some fresh bottle-conditioned beers, load up that suitcase for the flight home!)
If you find a bottle-conditioned beer that you think is a good candidate and you wish to culture yeast from it, here’s how to do it.
Sanitation
Keeping all the equipment you use clean and sanitized (or preferably sterile) is the most important key to culturing bottled yeast. The number of viable yeast cells in a bottle may be very low and any contaminating microorganism that lands in your culture may grow faster than your yeast and render your culture useless. Take your cleaning and sanitation more seriously than you would for a regular batch of beer.
When culturing yeast from a bottle, the main idea is to get the yeast — which may initially be in poor health — viable and then grow it up to usable numbers.
The first step is to feed the yeast some wort to “wake it up.” The easiest way to do this is to add a small amount of wort to the bottle.
Preparing the wort
The wort you add should provide carbohydrates, oxygen and other nutrients to the possibly fragile yeast cells. The concentration of these elements should be low enough not to put any stress on the yeast. Therefore, make your initial wort at a specific gravity of 1.015–1.020. Aerate or oxygenate it well and add a pinch of yeast nutrients. Use “complete” yeast nutrients, not DAP (diammonium phosphate), which is sold at many winemaking shops as yeast nutrient.
You will only need a small volume (usually 2–3 mL) of this wort — just enough to barely cover the bottom of the bottle. If you are culturing yeast from a 750 mL bottle, as many Belgian beers are packaged in, the amount of wort you use should be proportionally larger, around 6 mL.
At each step along the way, you want to feed the yeast a manageable amount of wort. When stepping up healthy yeast cultures, the usual rule is to pitch the yeast culture to a wort 5–10 times the volume of the culture. In the early stages of culturing yeast from a bottle, sticking to 5X step-ups is a good idea. This both gives the yeast a manageable amount of wort to consume and limits the amount a stray contaminant can grow. In the bottle, aim to add roughly the same volume of wort as the sediment occupies.
Wort Meets Yeast
Before opening the bottle, wipe the neck and cap off, preferably with a 70% ethanol solution or drug store isopropanol. Pour off the beer, leaving the yeast sediment undisturbed. Use a butane lighter to flame the top of the bottle. You can also use a gas kitchen stove as a flame source. Let the alcohol evaporate before flaming the bottle and keep the alcohol capped while flame is present. Wave the bottle through the flame slowly a couple times; you don’t need to torch the glass until it’s hot. This should kill any microorganisms that were hiding up under the lip of the cap.
Set the bottle down and let it warm to room temperature, with the top covered with sanitized aluminum foil to prevent contamination.
Pour the feeder wort down the side of the bottle onto the yeast. If the bottle has a punt or other indentation, swirl the wort gently to rinse any yeast from the “island” into the “moat” of wort around it. Do not add enough wort to cover the “island.” Flame the top of the bottle and either affix a (sanitized) fermentation lock or cover it with sanitized aluminum foil.
Depending on how much yeast is viable, the amount of time it takes to “wake them up” varies. Likewise, you may not always see visible signs of fermentation at the first stages of yeast culturing. The best thing to do is let the bottle incubate at relatively warm temperatures — 70–90 °F (21–32 °C) — for 1–3 days, looking for foaming or a slight clouding of the wort. (Many times the top of a refrigerator will be warmer than room temperature and is a good spot for incubating cultures.)
Incidentally, don’t expose the yeast culture to strong light sources either to keep it warm or to look for signs of fermentation. You don’t need to keep your culture in absolute darkness, but keep it out of sunlight or other bright light.
The First Step Up
Once you see signs of fermentation, or three days have passed, transfer the fermenting wort to a small culture of fresh wort, around 15 mL. A great container for this is a 15 mL sterile culture tube, available at scientific supply shops. These come individually packed and sterilized and have a cap that can be placed loosely on the tube, allowing gas to escape during fermentation.
You can take a small cardboard box and cut a round hole in it to serve as a tube holder. This is especially handy if you are handling many tubes.
For your 15 mL culture, you may want to add a tiny pinch of lysozyme — just one or two crystals — to your wort. Lysozyme is an enzyme that kills lactic acid bacteria and is available at most home winemaking shops. Although it only kills certain strains of bacteria, this affords a bit of extra protection against contaminants that may have been present in the bottle.
To transfer the wort to your 15 mL (about half a fluid ounce) culture, remove the fermentation lock or foil from the bottle, flame the tip, let the glass cool for a second and pour the yeast sample from the bottle to the 15 mL culture tube. Cap immediately and again incubate the 15 mL tube at 70–90 °F (21–32 °C).
In 1–3 days, you should see some sign of fermentation. This may be foam on the top of the wort, cloudiness in the wort or just a layer of yeast at the bottom of the tube. If you see this, you are basically home free. You have cultured yeast from your bottle. (As we’ll see later on in the article, this may or may not mean that it makes good beer. But, you’re on your way.)
If your 15 mL (0.5 fl. oz.) culture ferments, the yeast should be healthy enough be able to withstand a 10X step-up. To get to pitching quantities for a 5-gallon (19 L) batch, you will need two more step-ups — one to around 150 mL (5 fl. oz.) and a second to around 1,500 mL (51 fl. oz.)
The Second Step Up
For your 150 mL (5 fl. oz.) culture, you can use wort with a specific gravity of 1.030–1.035. Aerate well, and maybe add a tiny pinch of yeast nutrients, but don’t bother with the lysozyme at subsequent stages unless the culture smells sour.
Incubate the culture at 70–80 °F (21–27 °C) for 2–5 days, or until fermentation is complete. (The decrease in the upper temperature limit is simply because I like to raise my yeast in the final step-ups at conditions somewhat closer to my actual fermentation conditions.)
Assessing the Yeast
This is a great stage to decide whether the yeast culture you’ve raised will be suitable for making beer. Pitched with a 15 mL (0.5 fl. oz.) culture, a 150 mL (5 fl. oz.) culture should ferment like a little batch of beer. You should see the kraeusen rise and fall as the yeast works. And, when they’re done, the resulting liquid in the culture should taste like beer.
To find out if this is the case, decant a decent amount of the liquid into a sanitized container and refrigerate overnight. A 50 mL culture tube works great for this, but a baby food jar — or any other small, sealable container — will work just fine. Fill the container to the rim, seal and store cold. Refrigeration will settle most of the remaining yeast out of the liquid and allow you to taste the starter beer without a yeast bite interfering with your sampling. If the starter beer tastes good, then step the beer up to 1,500 mL (51 fl. oz.) and brew with it. If it doesn’t, chalk it up to experience and try again.
The Final Step-Up
For the final step-up prior to pitching, I add one small twist on the procedure. I let the 150 mL (5 fl. oz.) culture ferment completely and then I only pitch the yeast sediment. In the previous steps, I pitch the whole culture. The reason for pitching only the sediment is to discard any mutant cells (if present) that are not flocculant.
Once the 1,500 mL (51 fl. oz.) yeast starter shows activity, it is ready to pitch. Alternately, you can let it ferment out, and perform a second taste before using the yeast on a whole batch of precious homebrew.
Other Approaches
Some homebrewers reputedly use a much simpler procedure to raise bottle-conditioned yeast — they just fill an empty bottle-conditioned beer with wort and pitch it to their beer a few days later. If you can get that to work for you, great but I think my approach would have a much better success rate. Admittedly, it’s much more work, but you don’t overwhelm the small amount of yeast in the bottle with more wort than it can ferment.
Speaking of much more work, another approach some homebrewers have taken is to plate yeast from a bottle out on a petri dish filled with nutrient agar. Then, they will pick individual colonies from the plate and grow up multiple samples of the yeast. Each is evaluated for flavor and performance before using it. If you have the time (and lab skills to do this), this is another option.
What About Lambics?
You can culture bacteria and wild yeast from beers as well as brewers yeast. Lambics are a popular target for homebrewers to grab cultures from. Bottle-conditioned lambics, like those from Cantillon, have a wide variety of microorganisms potentially present. By using the procedures I describe — minus the lysozyme, of course — you will most likely obtain a mixed culture of microbes.
Keep in mind that some of these microbes have growth conditions that are dissimilar from brewers yeast. Growing up Brettanomyces (a wild yeast), Lactobaccilus or Pediococcus takes more time than raising brewers yeast does. As a result, many home lambic brewers simply maintain a standing mixed culture of “bugs” they have harvested from various bottles. I use the Wyeast Lambic Blend (Wyeast 3278) for primary lambic fermentation, then I supplement it with my own mixed culture. I think this adds a bit of complexity to my lambics.