Build a Cider Press
A small cider press can cost hundreds of dollars. It is not difficult, however, to build your own press using inexpensive materials. The design of the press is flexible, to take into account the variation in the materials you can find. To get an idea of the trade-offs you can make, it is useful to look at what the press has to do.
Pomace
After you gather and wash your apples, the first step is to crush or mill them into a kind of pulp, known as pomace. Some juice will be released in the crushing process — and the rest must be extracted by pressing.
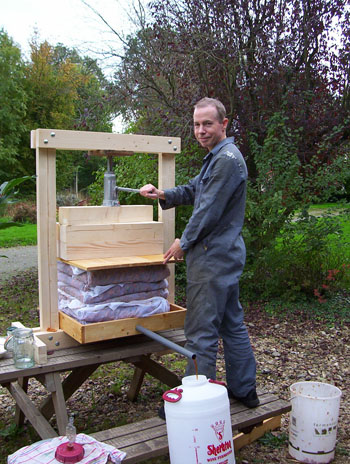
The pomace must be held in a container when being pressed, and traditionally this was done by wrapping it in a cloth square to make a “cheese.” Each cheese is assembled in the cheese former, a simple frame (as shown in photo 1). A number of such cheeses are stacked vertically in the press. Underneath, a tray (shown in photo 2) collects the juice and directs it to a container. Above the cheese levels is a flat plate which applies pressure. It is possible to place slatted wooden separators between each cheese during pressing to provide flow channels for the juice, but this is not essential. Around the tray, cheeses and top plate is a strong frame, and between this frame and the top plate is a device which exerts the pressure — such as a screw jack or hydraulic jack. (The inset photo on this page shows the cider press extracting juice.)
Once the maximum amount of juice is extracted, the pressure is released and the pressed pomace discarded. The apple juice can then be made into cider — or in the case of juice made from eating apples, drunk directly.
The Parts of the Press
The juice tray
This is a good place to start your design, as the dimensions of the juice tray determine nearly all of the other component dimensions. The base of the tray must be fairly strong, and have a surface that will not contaminate the apple juice or be damaged by its acidity. An offcut of laminate countertop is a cheap solution. A standard kitchen countertop is 25–26 inches (64–66 cm) deep, and the ones based on MDF/particle board with a thickness of around 1 1⁄4 inches (~3.2 cm) will be fine. The tray can be square or slightly rectangular, although it shouldn’t be too wide as this increases the deformation of the horizontal frame beams when the press is used.
Next, glue and screw a softwood lip on each of the four sides (as shown in photo 3); 4 inch x 3⁄4 inch lumber is about right for this. Bore a hole in one of these sides to take a length of plastic water pipe; the hole must be level with, or fractionally lower than, the bottom of the tray. A pipe with an internal diameter of around 1 inch (2.5 cm) makes cleaning easier. Seal and varnish the softwood lipping using polyurethane varnish.
There needs to be some kind of locating arrangement on the underside of the juice tray to prevent it from slipping sideways in the press frame. This could either be a tongue that fits between the lower frame members, or slats which fit on either side of the frame (as shown in photo 4).
The “cheese” former and cloths
Traditionally, a cloth made from natural fibers was used for wrapping the cheeses of pomace. A better solution now is either plain nylon sheer curtain fabric or maybe shade cloth. Allowing for the cheese to be completely wrapped with some overlap, each cheese cloth would ideally have a minimum dimension of twice the interior size of the cheese former, plus a couple of extra feet.
To make a cheese, you place the cloth centrally over a rectangular (or square) frame — as shown in photo 1 — to give the cheese its form. As the cheeses must be a bit narrower than the juice tray, and allowing for the fact that they tend to spread slightly under pressure, it’s a good idea to make the interior dimensions of the cheese former about four or five inches smaller than those of the tray, say 20–21 inches (51–53 cm).
For the first cheese, the former is placed directly on the tray. For the later cheeses, you will need a couple of wooden slats to support the former on top of the cheese underneath, to stop it sliding down. The dimensions of these slats are not critical, provided that they are longer than the width of the cheese former. Again, these slats should be coated with polyurethane varnish. Once the cheese has been folded, slide the slats out and place them on top of the cheese ready for the next layer. (Photo 9 shows the cheese former and slat, resting in the tray.)
The Press Frame
The rectangular press frame is built from planed softwood lumber, roughly 2″ x 4″ (5.1 x 10 cm) in section, although it might be better to increase the upper cross beams to 2″ x 6″ (5.1 x 15 cm) to resist bending forces. (Photos 5, 6 and 7 show the important details of the frame. The parts list on the page 59 gives the parts you would need to build the press as shown.) There is no real benefit to building a stronger frame than this with a view to increasing the pressure of the press, unless you also reinforce the juice tray and top plate. In any case, the extra pressure isn’t going to make a big difference to the volume of juice extracted. The top and bottom horizontal beams are double, both to resist bending forces and to provide a more stable base for the juice tray.
The width of the frame needs to be very slightly larger than the juice tray. The height depends on the number of cheeses and the minimum height of the jack which applies the pressure. The frame members are attached to each other using carriage bolts with washers under the nuts. Mark the wood with a pencil where the drill holes will go. Double check your measurements carefully before drilling the holes.
For stability, short cross beams are attached to the ends of the lower frame members using hex lag screws. When using the press, it is easier to place it on a table or workbench to have a convenient working height, and also so that the apple juice can be poured directly into a container. The length of the juice outlet pipe depends on the size and shape of the table supporting the press, and where you can position the collecting container.
Other Components
Once the stack of cheeses is in place, you need to add a top plate to spread the load of the jack across them. This can be a pine board or an offcut of a table top, with about the same dimensions as the juice tray. This should be varnished on both sides. Make sure that there are no sharp edges or corners on any part of the press which could damage the cheese cloths. (The fully-assembled press is shown in photo 8.)
The easiest way to apply pressure to the cheese stack is with a car jack; a hydraulic bottle jack is probably the simplest type to use. As the head of these jacks is usually quite narrow, there needs to be a hardwood board — or better still, a steel plate — between the two upper cross beams of the press frame against which to push.
Whatever type of jack you use, it will usually have limited travel, so as the cheeses are compressed, you will need to add wooden blocks to fill the gap between the top plate and the jack. At first, this is fairly easy; later on, the cheeses tend to spring back as the pressure is released, making it difficult — if impossible — to add further blocks. A variety of block thicknesses could help.
Milling the Fruit
If you don’t have a fruit mill, there are other ways to crush or pulp the apples. You could put them in a strong plastic tub and crush them using a length of 4″ x 4″ lumber fitted with a cross piece to act as a handle. Alternatively, you can buy simple rotating blades that attach to an electric drill. For safety — and to reduce mess — these are used in a pail with a lid; the shaft of the blade passes through a hole in the lid. For large volumes, though, you may want to buy or build a fruit mill.
Operating the cider press
Assemble the press and clean the parts which will come in contact with the apple juice — tray, cheese former, top plate. You can crush the apples in advance and keep the pulp in sealed containers for a day or two, if necessary. Position a collecting container under the juice tray outlet pipe. If this is going to be the fermenting vessel, it’s best to sanitize it first using sodium metabisulfite. Six-gallon (23-L) fermenting barrels work well.
Make the first cheese of apple pulp by filling a cloth laid over the former frame. Fold over the ends of the cloth to close the cheese. Next, remove the cheese former, lay the slats on top of the first cheese. Then, place the cheese former on top of the slats and prepare the next cheese. Repeat until you have a stack of five or six cheeses. Remember that you can add slats between cheeses, to serve as juice channels, as you go.
Place the top plate on the cheese stack, and position the hydraulic jack between the top plate and the press frame. Add extra pieces of lumber as spacers if necessary.
Start applying pressure to the cheese stack with the jack. Once the jack reaches the end of its travel, release the pressure and add more spacing lumber before pressing again. Continue until the amount of juice produced tails off. After the press is used, it should be cleaned before being put away.
Steps
1. Every “cheese” is assembled in the cheese former, a simple wood frame.
2. At the bottom of the cheese former is a tray that will collect the juice.
3. The next step is attaching a softwood lip on each of the four sides with glue and screws.
4. The base of the frame needs to have a locating arrangement, such as slats, that fit on either side.
5. The press frame is built from planed softwood lumber.
6. It would be best to use 2″ x 6″ (5.1 x 15 cm) wood for the upper cross beams to resist bending forces.
7. The width of the frame needs to be slightly larger than the juice tray.
Parts and Materials
Frame:
Lower horizontal beams: 3 ft 4 in x 2 in x 4 in (2)
Upper horizontal beams: 3 ft x 2 in x 6 in (2)
Uprights: 4 ft x 2 in x 4 in (2)
Supports: 20 in x 2 in x 4 in (2)
Carriage bolts: 5⁄16 in or 3⁄8 in x 7 in (8)
Hex nuts: 5⁄16 in or 3⁄8 in (8)
Flat washers 5⁄16 in or 3⁄8 in (16)
Hex lag screws: 5⁄16 in or 3⁄8 in x 5 in (8)
Juice tray:
Laminated countertop: 25 in x 25 in x 1-1⁄4 in (1)
Tray sides: 25 in x 4 in x 3⁄4 in (2) 25-3⁄4 in x 4 in x 3⁄4 in (2)
Bottom slats: 20 in x 4 in x 3⁄4 in (2)
Flat head wood screws: No.8 1-3⁄4 in (40)
Juice outlet pipe: 1 in diameter plastic water pipe, length variable
Cheese former:
Sides: 21 in x 4 in x 3⁄4 in (2) 21-3⁄4 in x 4 in x 3⁄4 in (2)
Flat head wood screws: No.8 2 in (8)
Support slats: 32 in x 4 in x 3⁄4 in (2)
Waterproof PVA glue
Polyurethane varnish
Making cider
Making cider from apple juice (or perry from pear juice) is not that different from making other fermented beverages. However, cider and perry is often made to be sparkling, so you will need either bottles that will hold pressure (such as Champagne or beer bottles) or a pressure barrel for a secondary fermentation.
Ingredients
You can ferment apple or pear juice from the press to make cider or perry around 5–6% ABV. Or, you can add sugar to apple juice to make apple wine, at 8–11.5%, depending on how much sugar you add. For a traditional New England style cider, add a couple pounds (~1 kg) of raisins and a couple pounds (~1 kg) of brown sugar per every 5 gallons (19 L) of juice. Apple ciders can be spiced with cloves or apple pie spice. (Soak the spices in vodka and add the extract to taste.) A small amount of grape tannin — half a teaspoon or less per 5 gallons (19 L) — can also be added.
Process
Sanitize your fermentation vessel. Pour in the apple juice and other ingredients, if applicable. Add 1⁄2 teaspoon of sodium metabisulfite (dissolved in a small amount of water) per 6.0 gallons (23 L) of juice. Let the juice sit for 24 hours, then add wine yeast. (Champagne yeast works well.) Seal your fermenter, leave to ferment for four weeks then rack the cider into a second fermenting barrel. Seal the new vessel with a sanitized airlock and leave it to complete the fermentation. When the fermentation has completely stopped, put the cider into bottles or a pressure barrel. Add 1 1⁄2 tablespoons of sugar per gallon of cider for the secondary fermentation, which will add sparkle to the cider. Do not add more than this quantity of sugar as excess pressure may cause bottles to explode. Leave for several weeks before tasting, as the flavor mellows noticeably with time. If you want your cider to be clear, add 1⁄4 teaspoon of pectic enzyme per 5 gallons (19 L) before fermentation and fine with Bentonite or Sparkalloid (per manufacturers instructions).