Build a Fermentation Chamber

As a resident of the Southern U.S., temperatures for most of the year are too high to conduct a proper fermentation schedule for the homebrews and meads I make. Like many homebrewers, it’s advantageous for me to brew and ferment my beer in the family two-car attached garage. One option for controlled fermentation is to use a chest freezer. Due to space considerations, this is not an option for me. Also, the thought of lowering full 6.5-gallon (25-L) carboys into a chest freezer makes my back hurt just thinking about it. My solution was to build an insulated chamber that could hold two 6.5-gallon (25-L) carboys without taking up much wall space. A small, 6,000 BTU room air conditioner, purchased from a local yard sale, is used to cool the interior of the chamber.
Building a fermentation chamber is straightforward. It can be sized to hold as many carboys as you’d like and be configured to fit in the space available. First, however, let’s review temperature control.
Temperature Control for Homebrewers
The temperature a beer is fermented at influences the beer’s characteristics. At the proper temperature, pitch rate and level of aeration, fermentation starts quickly, proceeds in an orderly fashion and finishes at a reasonable final gravity. In the proper temperature range, no off flavors or aromas are produced (unless the beer is contaminated for some reason).
Beer fermentations that are run too warm result in beer that is overly estery. Fermentations at very high temperatures produce “fusel oils” — higher alcohols that cause the beer to taste “hot” and produce headaches in those who drink the beer. Fermentations that run too cool are slow to start, proceed sluggishly and frequently stop short of the expected level of attenuation. Individual yeast strains have their own suggested fermentation temperatures. Most ale strains fall in the 65–72 °F (18–22 °C) range. Lager strains usually do best at 50–55 °F (10–13 °C). Some Belgian yeasts are meant to be used at temperatures up to 85 °F (29 °C).
Pitching rate and aeration also influence how a fermentation proceeds. In fermentations where the temperature is likely to move outside of the recommended range, pitching an adequate amount of yeast and aerating well becomes even more important.
There are a number of ways that homebrewers control the temperature of their fermentations. Let’s review the most common methods.
Major Build Components:
(1) Sheet 2” Rigid Insulation Board (Owens Corning Extruded Polystyrene)
Large Tube Clear RTV Cement
Box of 4” Nails
Used 6,000 BTU Air Conditioning Unit
Metal Shelf Grating and Wooden Framework
(6) ½” x 11” Threaded Rod, Bolts, and Washers (legs for shelf)
Johnson Controls Temperature Controller
Wood & Nails (for door and door frame, A/C support shelf, A/C guard)
Rigid screening (for A/C guard)
(3) 4” Door Hinges
(2) Door Clasps
1” Roll Window Insulation (pre-glued one side)
Power Strip
Digital Thermometer with Remote sensor (optional)
Metal (or wood) table as base
Passive Control
The most common method of controlling fermentation temperatures, especially for beginning homebrewers, is passive control. Many homebrewers simply wait for the cooler months of the year and place their fermentation buckets or carboys in the basement or some cool spot in the house or garage. (Some Belgian beers can be brewed successfully in warmer months) This can work well for ales, and even lagers under the right circumstances. However, a sudden change in the weather can spoil your plans.
Wet T-shirt
The wet T-shirt method involves draping your fermenter, usually a carboy, with a wet T-shirt. Frequently, a small reservoir of water is placed next to the carboy, with the T-shirt dipping into it. Alternately, the whole carboy may be placed in a picnic cooler or garbage can with water in the bottom. Water evaporates from the T-shirt, cooling the carboy. As water evaporates, more water is wicked up from the reservoir to replace it. A fan can blow air across the T-shirt to increase the rate of evaporation.
The wet T-shirt method is surprisingly effective when the ambient temperature is 5–8 °F (~2.5–4 °C) over the desired fermentation temperature and the air is dry. In an air-conditioned room, the wet-T-shirt method can allow a homebrewer to brew ales in the prescribed temperature range.
When using the wet T-shirt method, use an old T-shirt you don’t plan on wearing again and change the shirt every few days. If you don’t, it will begin to mildew.
Fridge or Freezer
The wet T-shirt method is a low-cost, low-tech method of cooling beer fermentations. However, it has its limitations. Although you can cool a carboy by several degrees Fahrenheit, you’re still relying on the ambient temperature (and humidity) to be in an appropriate range. And, fine-scale control over the fermentation temperature is hard to achieve.
Another common method is to use a refrigerator or freezer, controlled with an external thermostat, as a fermentation chamber. The external thermostat reads the temperature inside the fridge or freezer and turns it on when it exceeds the set point selected by the user. When the temperature drops a few degrees below this set point, the thermostat cuts off power to the cooling unit.
A fridge or freezer set up like this allows the homebrewer to brew ales or lagers and hold the temperature within a few degrees of whatever value he wishes, no matter what the ambient temperature.
Glycol-Jacketed Fermenters
Some conical fermenters are sold with their own temperature controls built in. When the temperature of a fermentation rises above the set point, chilled glycol is moved through tubes surrounding the vessel, cooling it. Glycol-jacketed fermenters allow you to set the temperature of fermentation. In a chest freezer fermentation chamber, all your carboys will experience the same temperature.
Why Build a Fermentation Chamber?
With all the temperature control options available to homebrewers — especially the chest freezer option — why build a fermentation chamber? There are a few good reasons. First, for many homebrewers, Thier chest freezer serves not only as a fermentation chamber, but also as a serving unit. Once beers are fermented and kegged, the temperature is lowered and beer is stored at serving temperature in the freezer. Building a separate fermentation chamber allows the homebrewer to dedicate the chest freezer to serving, and not have to wait until their latest keg is done before brewing their next batch. In addition, whereas chest freezers come in a few basic shapes, you can build your fermentation chamber to fit the space you have available. My chamber holds two carboys, one in front of the other. Yours could hold two or more side-by-side, or stacked on top of each other — whatever you have space for in your brewery.
Here’s how I built my fermentation chamber, and ideas for how to improve it in the future.
Overview of the Build
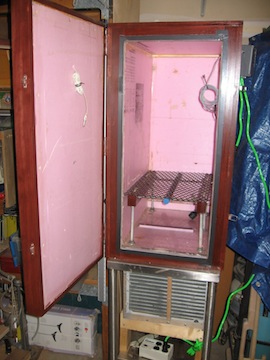
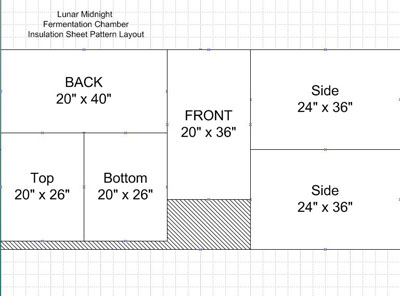
The chamber is constructed from a single sheet of 2” (5 cm) pink Owens Corning extruded polystyrene rigid insulation board. The panels were cut using a long, very sharp razor knife using a long metal straight edge as a guide.
The panels are glued together with RTV cement. I found several of the commercially available “insulation cements” from the big box store to be inadequate. Long nails were used to hold the panels together while the RTV cement dried. Once dry, a thin bead of clear RTV cement was run on all the interior corners of the chamber to fill any air leaks, and add rigidity. A wooden frame was attached to the door panel, and on the edge of the chamber opening to permit hinges to be installed. Two metal clasps were installed to allow the door to close securely. 1” (2.5 cm) window insulation strips were cut and attached to provide a tight seal on the inside of the door face.

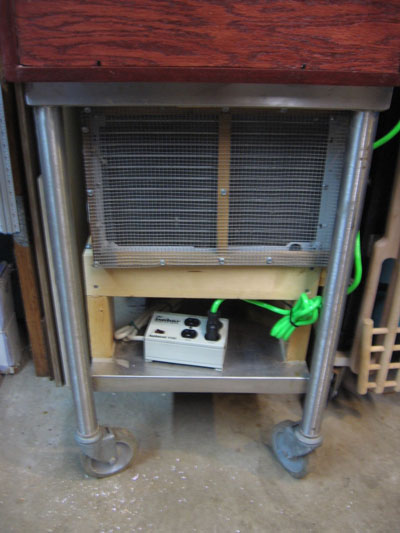
The A/C unit is turned 180 degrees so the back faces out the front of the chamber. This permits any heat generated by the A/C to escape and be dissipated out the front instead of being directed towards the wall. A rectangular 1” (2.5 cm) wooden frame with galvanized screening protects the air conditioner’s cooling fins from damage.
 A 5” (13 cm) grinder (with metal cutting blade) was used to carefully cut a rectangular 2” x 11” (5 X 28 cm) rectangular hole cut into the table top. In retrospect, drilling 4 holes and using a jigsaw with a metal cutting blade might have been easier. A matching hole was cut into the bottom insulation of the chamber floor. The air conditioner’s vents are directed up through the holes in the table and chamber. Small pieces of leftover insulation were fit around the A/C vents to assist in directing the flow up into the chamber, and provide a near airtight seal.
The bottom of the chamber is bonded to the top of the stainless steel table with clear RTV cement.
A metal grate shelf sits inside the chamber 9 1⁄2” (24 cm) off the bottom and is supported by wooden sides and threaded rod legs. The 1” (2.5 cm) length of pipe running under the shelf grating was installed to keep the shelf from flexing under the weight of two full carboys. Elevating the carboys off the bottom permits incoming cooled air to circulate around them more effectively. In operation, the A/C’s power is set to “On/High Cool.” It is plugged into a Johnson A419 Temperature Controller, which electronically decides when to power the A/C unit on and off.
The controller’s temperature sensor probe runs through the insulation and is taped to the side of one of the carboys. This makes the controller have a more accurate reading of the beers actual temperature than simply measuring the air space inside the chamber. When the controller senses the temperature has risen, it completes the circuit and the air conditioner powers on. Once the set point temperature is reached, the controller opens the circuit and the A/C unit powers off. Additionally, an inexpensive digital thermometer is attached to the front of the door and the remote sensor is run through the door and hangs down. It is used to give a quick reading of the actual air temperature outside and inside the chamber without the need to open the door.

You might ask “How does such a DIY solution work?” So far, it performs surprisingly well. With 95+ °F (35+ °C) daytime summer high temperatures, the chamber’s interior remains nearly constant (within 1.5–2.0 °F/0.75–1.0 °C of set point). By constructing the chamber walls from 2” (5 cm) thick rigid insulation board, there is very little heat gain in the chamber over time. During the hottest parts of the day, the A/C unit will run for a few minutes to reach the set temperature then shut off and hold temperature for between 20–30 minutes. More importantly, our household electric bill has not increased enough to be noticeable. When the A/C unit fails, I can simply find another used unit as replacement without the need to replace the chamber and controls. As always, I like to make upgrades to my projects to boost performance and functionality. Future upgrades for consideration include:
•Encasing the remaining portions of the exposed chamber with thin foil insulation sheeting and ½” (1.3 cm) oak veneered plywood. This will give it a more “old time” icebox appearance, protect the foam board insulation, and improve the “R” factor.
•Modify the A/C unit to push colder air. The A/C unit will need minor internal modification to allow it to push the colder air needed to ferment lagers.
•Replace the metal grate shelf with a wooden rack made from vented hardwood slats.
•Install a dryer vent through the back of the chamber wall to improve the cool air flow from the A/C unit by reducing back pressure.


