The Indoor/ Outdoor Brewery


Like so many homebrewers, I started off several years ago by brewing 5-gallon (19-L) extract batches in my kitchen. When it was time to step up to all-grain brewing and 10-gallon (38-L) batches, I was faced with several options: 1) I could set up a brewery in my filthy, too hot/too cold garage with no plumbing, 2) I could drag everything out to my yard and back inside again and be completely at the mercy of the elements, or 3) I could set up a full brewery in my basement. The third option would require a heavy-duty exhaust fan system to remove the 1–2 gallons (4–8 L) of moisture from the boil-off, the overpowering hops smell (which my family doesn’t care for), and the carbon monoxide (CO) from high-power gas burners. And I was told by more than one contractor that an exhaust system would create negative air pressure in my basement, which would pull in dangerous radon gas (welcome to New Jersey!). I could eliminate the CO problem by having an electrician run 240 V lines for a full electric brewery, but that would still leave me with the moisture, smell, and radon issues.
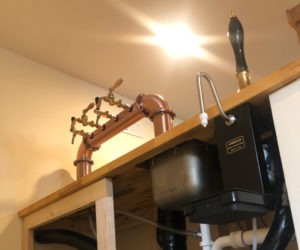
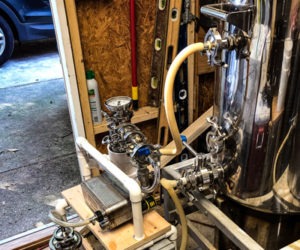
As none of these three options were particularly attractive to me, I racked my brain to come up with an alternative: How about an indoor/outdoor brewery?! Why not mash and ferment in the comfort of my climate-controlled finished basement, then conduct my hour-long boil with a high-powered gas burner in my backyard? Since I didn’t have a conveniently located window (for those that do, you could just run a hose through it), all I needed for this plan to work was the willingness to drill a ½-in. (15 mm) hole in the back wall of my house to install a copper transfer pipe with the appropriate fittings and quick disconnects. So if you don’t have a window, or if you want to keep insects and the heat/wind/cold out of your house while brewing, or if you simply prefer a more clean solution, then this project may be for you.
I collect my wort in a grant (I use an insulated beverage cooler) instead of a boil kettle. Once all the wort is collected in the grant, I pump it through the wall pipe and out to the kettle. When the boil is over, I pump (or just use gravity) the wort from the kettle, back through the wall pipe, and into the fermenter. This setup has allowed me to brew year-round in relative comfort, and at a great price. If you already have all of the other brewing equipment, the cost of the wall pipe itself, with camlock fittings, is less than $20!
As a recent upgrade (optional but highly recommended), I purchased a wireless BBQ thermometer with a temperature alarm. I attached the stainless steel temperature probe to the kettle using a compression fitting and some small O-rings, so I can monitor the kettle temperature from my basement to avoid boil-overs.

Tools and Materials
1 ft. (30 cm) of 1⁄2-in. (15-mm) copper pipe
(2) 1⁄2-in. (15-mm) copper x FPT adapters
(2) 1⁄2-in. (15-mm) MPT camlock fittings
Pipe soldering equipment (solder, flux, torch)
Teflon tape
Epoxy putty
5/8-in. (16-mm) drill bit (masonry or wood)
Electric drill (hammer drill preferred for masonry)
A brewing pump (if you don’t already have one)
Wireless remote digital thermometer (optional)
Probe compression fitting ½-in. MNPT x ¼-in. probe (optional)