Step Mashing
Step mashing developed because brewers sought a simpler, less expensive alternative to decoction mashing that still retained many of decoction’s benefits.
In decoction mashing the brewer separates portions of the mash and heats them to increase the temperature of the entire mash. This increases enzyme activity and gives the brewer more control over body, alcohol content, and other characteristics of the finished beer than a single infusion mash provides.
When most brewers refer to an infusion mash, they mean a single-temperature mash done to convert grain starch to sugar. Such a mash uses a single steep temperature between 150°F and 158° F, held for about 60 minutes.
A temperature program step mash involves simply increasing the temperature of the entire mash in a series of steps, without separating and heating portions of the mash.
Steeping or Mashing?
The way brewers use the word “infusion” may be a little confusing.
Webster’s 1922 dictionary offers two definitions that apply to brewing. First, infusion is a process involving the pouring in or addition of a liquid (water) to some other substance (grain) to extract “the virtues” (sugar). Second, infusion is the steeping of some substance in liquid (the mash) without boiling.
Most brewers use the term infusion only for a single-temperature mash, some use it for mashes where temperature is raised through the addition of hot water, and others use it to mean any mash that isn’t a decoction. These differences aren’t critical, but it is important to know the difference between steeping and mashing.
Although steeping grain in hot water is by definition an infusion, that doesn’t mean it’s necessarily a mash. The dictionary definitions don’t reveal much about mashing malted grain, with no mention of the protein breakdown or the conversion of starch to sugar.
When barley is processed by the maltster, enzymes in the grain break down the protein “wall” surrounding starch granules. This breakdown is called modification and is allowed to continue until nearly complete.
The makeup of protein in most malted grains used for brewing has been modified so the starch content is easily dissolved in the mash. If you steep the crushed grain in hot water at almost any temperature, all the “virtues” of the malt will dissolve. Unfortunately, without careful control of the mash temperature, all you’ll get is dissolved starches and not the sugar you’re after. This is where enzymes come into the picture.
Our Friends, the Enzymes
The conversion of starch to sugar is a chemical process in which long chains of molecules are separated into shorter ones. Even when all the right materials are present, sometimes chemical reactions just don’t happen. In many cases energy has to be supplied to get things going. In others, the presence of a substance called a catalyst will start the reaction.
Substances that accelerate reactions but don’t participate in them are called catalysts. You’ve heard of catalytic converters — they’re part of your car’s exhaust system. When hot exhaust gases pass through a container of platinum catalyst, smog-causing pollutants react with other exhaust gases and are broken down into less harmful pollutants. The converter may last the lifetime of the car — the catalyst it contains doesn’t go anywhere, doesn’t react chemically, and doesn’t get used up. Think of enzymes as catalytic converters — that’s what they are!
There are three major enzyme types of interest for brewers doing step mashes. Since each of these enzymes works best within a very narrow range of temperatures, trying to make each of the three happy during a mash program results in a three-temperature step mash.
Proteases, a group of a dozen or so enzymes that work best at an average of 122° F, assist in the breakdown of proteins into simpler proteins and amino acids. This enhances the beer’s clarity and adds important yeast nutrients. At 140° F beta amylase helps break down starch and dextrins into fermentable (maltose) sugars. Finally, at 158° F alpha amylase helps the breakdown of starch into smaller dextrins, most of which are not fermentable.
The amylases, together called diastase, give the brewer a source of control over beer body and dryness. One way to get this control is to mash at a compromise temperature somewhere between 140° F and 158° F to balance the activity of beta and alpha enzymes. Mashing closer to 140° F will give a dryer, light-bodied beer, while mashing closer to 158° F will give a fuller, sweeter, lower-alcohol beer.
A second method is to perform two rests, one at 140° F and the other at 158° F, but to proportion the time spent between the two.
Balancing beta and alpha activity with a single, well-selected saccharification rest (to convert starches into fermentable sugars) is an easier way to go when starting temperature program mashing.
In addition to having favorite temperatures, enzymes enjoy working in a fairly narrow range of wort acidity. The 95° F rest, called an acid rest, can be handy for brewers making very pale beers with alkaline water that would otherwise produce mashes with too low a pH. At 90° to 115° F two other enzymes, phosphatase and beta glucanase, work to increase the acidity of the pale malt mashes and to break down gums found in under-modified grains such as flaked barley and traditional lager malt.
If much dark grain is used, then an acid rest is probably not needed since dark grains, in general, help to acidify the mash. (Also, a simple way to increase the acidity is to add calcium sulfate to the mash.)
Why Temperature Program?
Temperature program mashing is also called upward step, multi-step, or simply step infusion mashing. A total mash duration of 60 to 120 minutes is divided into two or more periods in which the mash temperature is raised and held during each successive period. For example a 15 to 20 minute acid rest at 100° F is followed by a 30 minute protein rest at 122° F and finally the saccharification rest (for starch conversion) at 153° F for 40 minutes.
This process will take longer than the sum of the rests because it takes time to raise the mash temperature from one rest to another. Until you’ve done it a few times, you’ll miss your target rest temperatures and have to make adjustments. Plan for two hours (at least) for your first three-temperature step mash. That’s not total brew time, of course.
Temperature program is an alternative to decoction mashing but shares some of the benefits. The low-temperature (100° F) rest can be used to somewhat acidify alkaline water and is also useful for breaking down gums that can lead to slow or stuck lauters when using under-modified malts.
The protein rest is probably less important for most pale malts available now but is still important if you’re using a large percentage of wheat in your recipe.
Finally, the use of one or two saccharification rests provides a high degree of control over wort fermentability, resulting beer body, and alcohol content.
If you’re just starting into all-grain or just beginning with new equipment, you’ll soon discover that temperature control can be difficult and may seem impossible. Be patient, and please remember: Good, drinkable, satisfying beer can be made even if you miss every rest temperature by several degrees and hold the rests for half or twice as long as called for.
There are two ways to increase mash temperature. Commercial brewers apply heat to the vessel, usually through steam jackets, while stirring. This is difficult and requires a certain level of experience because too much heat will cause the mash to overshoot the temperature. The other method, which is not usually used in commercial breweries, is to use additions of hot water to raise the overall mash temperature. This is more predictable because there are calculations that detail how much boiling water to add to different temperature mashes to achieve the desired temperature.
A Bit of Equipment
As you’d expect, there’s a wide variety of equipment that can be used to do temperature program mashes. Popular options include the dual food-grade plastic bucket system, the picnic cooler with false bottom (see page 32), or the bucket-and-grain-bag technique.
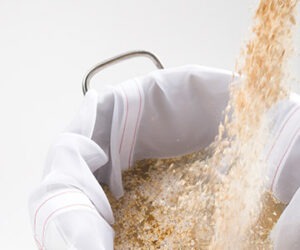
Although you could probably collect most of the essential hardware and put together a system for nothing, one low-cost way to try an infusion mash is to buy a nylon sparge bag at your local homebrew supply shop. Combine the sparge bag with a standard five-gallon, food-grade plastic bottling bucket and adjustable spigot, and you have nearly everything needed for a mash. Just buy a two-foot length of vinyl tubing to fit over the bottling bucket spigot, and you’re in business.
The type of nylon sparge bag needed is 6.5-gallon type, sewn into a cylindrical shape with a flat bottom. Usually the side of the bag is a very fine nylon mesh, and the flat, circular bottom is a much coarser material. These bags should cost less than $10 each, and you’ll need just one.
Open the nylon sparge bag out into the five-gallon bottling bucket, doing your best to fit the bag down into the bucket with no big folds or wrinkles. The bag should be about four inches taller than the bucket; fold this extra length down over the bucket rim. Close the valve on the spigot, and check for system leaks using a pan full of hot water. Dump out the hot water.
In addition to the bottling bucket with spigot and the sparge bag, you’ll also need the following:
- A six-gallon or larger kettle for the final boil
- A three-gallon pot or some other source of about two gallons of sparge water
- A one- to two-quart measuring cup to transfer boiling water to the mash
- A pan to use for mash recirculation
- A good, trustworthy thermometer
Step by Upward Step
The basic idea of temperature program mashing is to add energy to the mash. One way to do this is to use additions of boiling water to successively raise the mash temperature to desired rests. There are three complications:
- The temperature of the mash continuously drops during the rest.
- Each addition of boiling water makes the mash harder to raise to the next rest temperature.
- The final rest must be achieved with a mash that contains no more than 1.5 quarts of water per pound of grain, approximately. If the mash is too thin, hot enzymes are less stable and the enzymatic reaction is significantly slower. Therefore, there is more chance to denature enzymes (strip them of their usefulness).
The first of these problems is controlled by using a well-insulated mash tun, the most popular being the Rubbermaid “Gott” water cooler. The bottling bucket insulates much better than a metal pot but still loses heat quite rapidly. Still, if you already have the bucket, less than $10 puts you in business to get your feet wet, so to speak.
The second and third problems are controlled by using the minimum amount of water possible for the first infusions, saving the bulk of the water for when it’s needed most: to raise the mash to the saccharification (third) rest temperature. Calculating the water needed for an infusion isn’t too hard to do. You’ll be amazed at how soon you’ll be hitting those rest
temperatures!
Calculating Water Additions
There are two basic physics things to keep in mind when you do your calculations and when you start making adjustments to your results. First, the energy needed to raise the temperature of water is about three times greater than that needed to raise grain temperature the same amount. Second, a lot more energy is needed to raise the temperature of 20 quarts of mash than is needed for 10 quarts.
Second, you’d like your final rest to include about 1.5 quarts of water for every pound of grain, and as a rough rule of thumb for a three-step mash, the first rest should be done with about 0.6 to 0.7 quarts water per pound of grain. These are just starting points to make initial calculations easier, not golden numbers.
Two formulas are needed: one is used to compute a number that tells us how much energy is necessary to raise the mash temperature, and the other is used figure out how much water to add to the mash to get a final rest temperature. The number obtained from the first formula has to be re-computed after each addition of water and gets a little bigger with each addition. This just means the temperature of the mash gets a little harder to raise after each infusion — it contains more water and proportionately less grain.
With pocket calculator in hand, here we go…
1. Multiply the total grain bill weight by 0.6 to find the number of quarts of 105° F water to add for the first rest.
Example: Grain bill weight GW = 13 lbs.
13 * 0.6 = 7.8 qts.
Round to the nearest half quart; in this case, 8 quarts.
2. Compute the weight of the water added by multiplying the number of quarts by 2.08 (one quart of water weighs 2.08 pounds).
Example:
8 qts. * 2.08 lbs./qt. = 16.6 lbs.
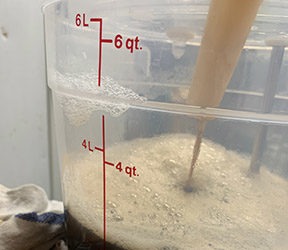
3. Put the eight quarts of 105° F water into the pre-heated, empty mash tun, then add all the grain and mix well. Record the temperature.
4. Compute the heat capacity of the mash. Multiply the grain weight by 0.33, add the result to the weight of the water in the mash, then divide the result by the total mash weight.
Example:
[(0.33 * grain weight) + water weight] / mash weight
or
(0.33*13 + 16.6) / (13 + 16.6) = 0.71
This number is the heat capacity of the mash, relative to that of water, which is 1.0. We’ll use this number to figure out how much boiling water will have to be added to raise this mash to the next rest temperature.
5. The formula to compute the amount of water to add to get the mash temperature up to the next rest (122° F) is:
(mash heat capacity)*(mash weight)*(next rest temp – current temp)(water boiling point – next rest temp)
Example:
0.71(13 + 16.6)(122 – 100) (212 – 122) = 5.1 lbs. (not quarts!)
Note: Make sure to stir the mash and measure its temperature before doing this calculation. The temperature will drop over the duration of the rest, especially in an uninsulated mash tun.
6. Convert the weight of the water to quarts by dividing by 2.08 lbs./qt.
Example: 5.1/2.08 = 2.5 qts.
7. Add the 2.5 quarts of boiling water, stir thoroughly, and measure the mash temperature. Cover your mash tun, and record the reading. This entire process has to be repeated for the next rest. Remember, the mash now contains more water than it initially did, so it will take more energy to raise its temperature. You’ll have to calculate its heat capacity again using the formula in Step 4.
Example:
(0.33 * grain weight) + water weight) mash weight
or
(0.33*13 + 16.6 + 5.1)(13 + 16.6 + 5.1) = 0.75
8. After a 20 to 30 minute rest, stir the mash thoroughly and take a temperature reading. Say the new mash temperature is 119° F. Record the duration of the rest and this new temperature. Then repeat Step 5 to compute the amount of boiling water needed to raise to the final rest temperature of 153° F.
Example:
0.75(13 + 16.6 + 5.1)(153 – 119) (212 – 153) = 15 lbs. (not quarts!)
Convert those pounds to quarts: 15/2.08 = 7.2, or about 7 quarts.
9. Add about seven quarts of boiling water to the mash, stir well, and cover. Let rest quietly for a total of 40 minutes, checking the temperature at the 20 minute mark.
Notice that the total addition of water to this mash was:
Rest One: 8 quarts
Rest Two: 2.5 quarts
Rest Three: 7 quarts
Total: 17.5 quarts
For 1.5 quarts per pound we’d need about 19.5 quarts of water, so this program leaves room for the addition of 2 quarts of boiling water about halfway through the long conversion rest to maintain temperature, if needed.
Into the Kettle
Brewers debate the benefits of the mash-out, the process where a final infusion is added to the mash to raise the temperature into the 170° F range to deactivate any further enzyme activity. You can certainly do a mash-out, or you can simply begin the sparge using 170° to 180° F water.
Attach a length of vinyl tubing to the bottling bucket spigot and set the mash tun up so it can be drained into your kettle. Be very careful to situate everything so the wort draining from the mash tun doesn’t splash into the kettle.
Gently pull up on the sparge bag just enough to ensure its sides are not wrinkled or pulled down into the bucket. Once the bag seems to be conforming to the shape of the plastic bucket, slowly drain the wort into a two- to three-quart saucepan, returning the wort gently and without aeration to the top of the grain bed.
Repeat several times to try to clarify the wort. After it looks like most of the fine flour has been filtered from the wort, begin a slow, controlled sparge while draining the mash tun into the kettle. Equalize the rate at which you drain the wort into the kettle with the rate you add water to the mash tun. Collect about five to 5.5 gallons into the kettle, and begin your 60 to 120 minute boil.
With a little advanced planning and a very minimum of equipment, you can be enjoying temperature program mashing in no time. After only one or two brews you’ll gain confidence in your ability to hit target rest temperatures; what may have seemed like major mysteries will be revealed.