Cultivate Your Own House Yeast
For thousands of years yeast have been used to make bread, wine, and beer. In fact, modern day archaeologists have found ceramic pots in the tombs of Egyptian pharaohs containing dried yeast and beer residue suggesting it was a widely consumed beverage. Yeast are microscopic single cell organisms well suited to extreme conditions and able to adjust to changes in their environment in order to survive. Variations in pitching rate, temperature and nutrient levels can drastically change a beer. The yeast strain used for fermentation can also have a major impact on the flavor and aroma of a beer. This is why classic Belgian beers are brewed with Belgian yeast and German beers with German style yeast. In fact, if two beers are brewed with the same ingredients, fermented at identical temperatures, but fermented with different yeast strains, they can have taste and aroma profiles that will make you think someone switched your fermenters. As a scientist and self-proclaimed yeast geek I have found experimenting with different yeast strains in my homebrewery to be one of the most rewarding aspects of making beer at home. And in this story, we’ll explore the fun of culturing, harvesting, and reusing yeast.
Homebrew Ingredients
These days there is a huge push to buy local food and brewing ingredients to support local businesses and communities and ultimately make a better product. As a homebrewer, there are a lot of possibilities for you to make your beer more local. Using locally-sourced homebrewing ingredients such as hops or malted barley can produce a fresh and unique twist to any beer recipe. If you are up for the challenge you can even malt or roast your own barley (https://byo.com/malt/item/1108-malting-your-own-techniques). Depending on where you live you may also be interested in planting rhizomes (hop roots) and growing your own hops. Although using local hops or malt can add some subtle differences to your homebrew the ingredient most likely to have an overall impact on the flavor and aroma of your beer is yeast, which can also be a local ingredient. Before describing how you can harvest yeast from the environment, let’s first look at examples from a few commercial breweries that use local yeast from the environment to ferment their beer.
Breweries such as Jester King Brewery in Austin, Texas and Jolly Pumpkin in Dexter, Michigan take local yeast to a whole new level by using open fermentation vessels called coolships to capture and utilize local wild yeast and bacteria from the environment to ferment their finely crafted beverages. In fact, long before brewers knew that yeast was responsible for fermentation (thanks Louis Pasteur!), all beers were produced in this way. Open fermentations relying on wild yeast can be risky, though, since there is little selection of what wild organisms fall into the beer. It is not uncommon for a commercial brewery using this method of fermentation to dump at least a portion of this beer down the drain. Fortunately, there are steps that can be used to cut down on the risk of contamination and save the homebrewer the pain and agony of dumping a batch of beer. A quick distinction before we move on, however — not all open ferments rely on wild yeast, and in fact many breweries use open fermenters but pitch single-strain laboratory cultures.
Capturing Yeast
Harvesting wild yeast from the environment is an advanced technique but just as in all homebrewing practices it relies heavily on excellent basic sanitation skills. During the course of the yeast harvesting procedure liquids will be frequently transferred to new containers and come in contact with various pieces of equipment leading to a greater chance of contamination. Before you begin make sure your sanitation skills have been perfected. If you can successfully make a yeast starter you should be able to harvest your own yeast. In addition, there is no one right way to capture yeast from the environment and every method depends on resources available and the details you wish to focus on. I use research equipment like a microscope and yeast viability stains because as a scientist they are available to me, but these pieces of equipment are not absolutely necessary.

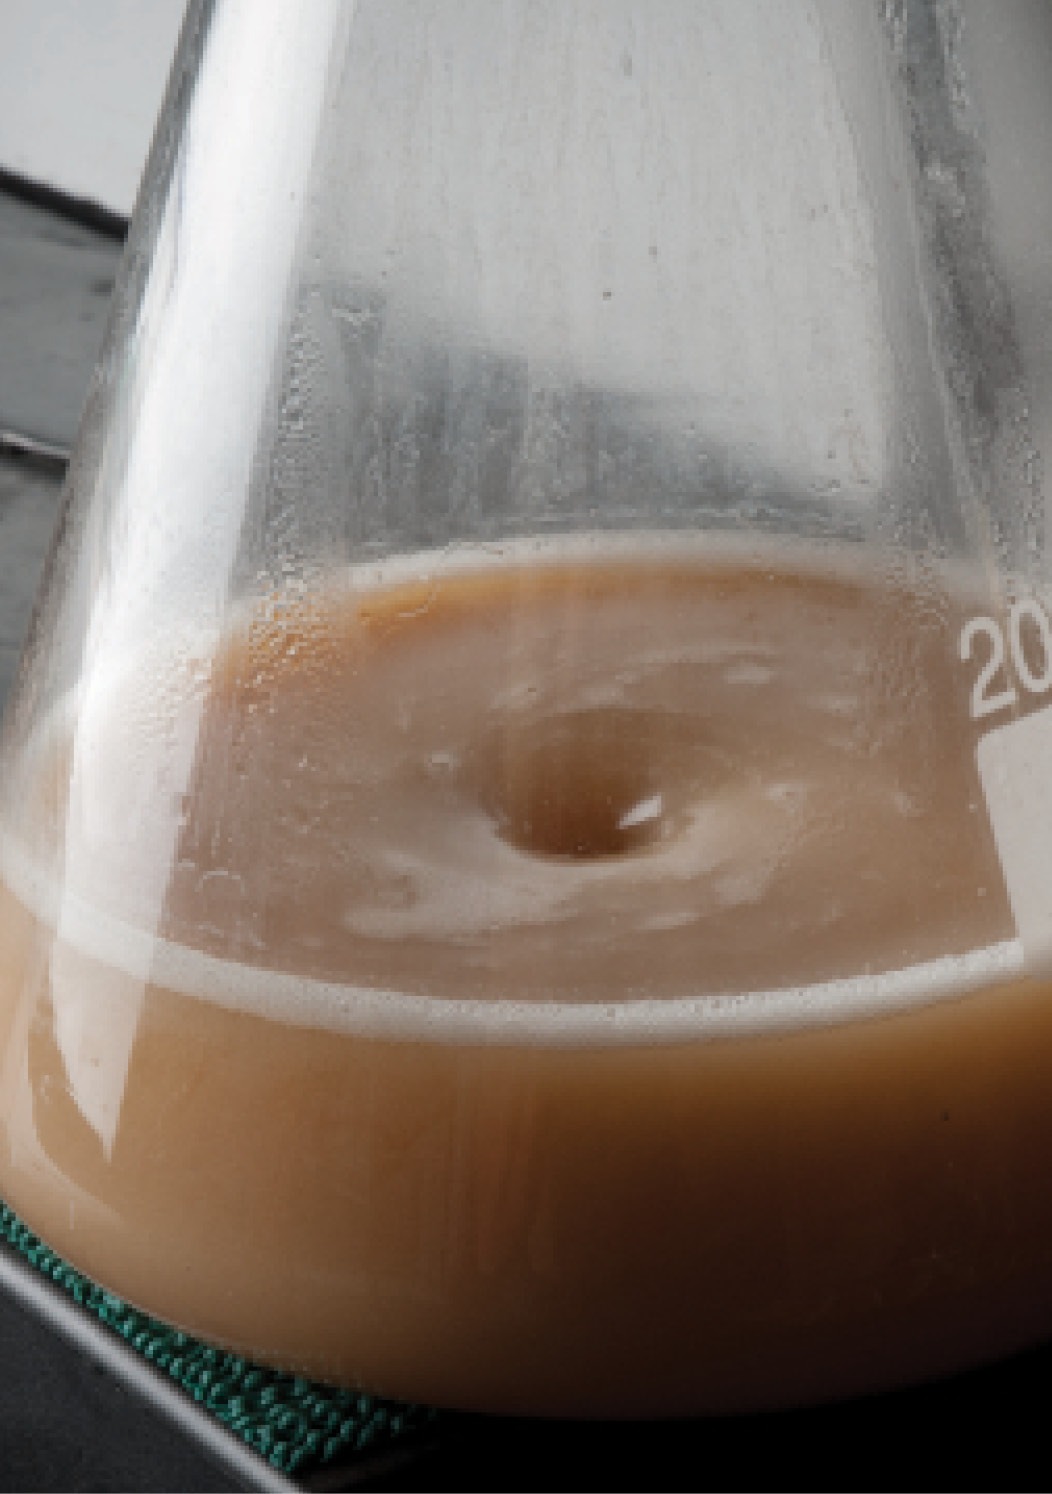
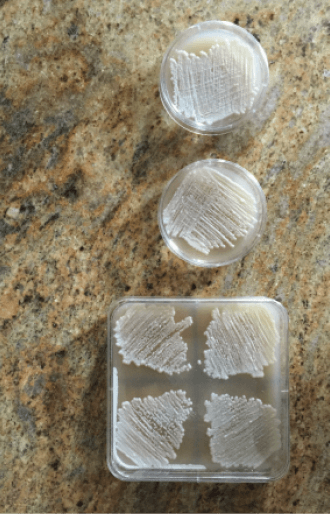
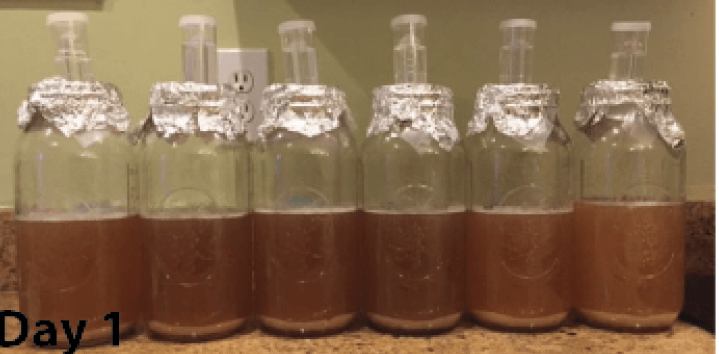
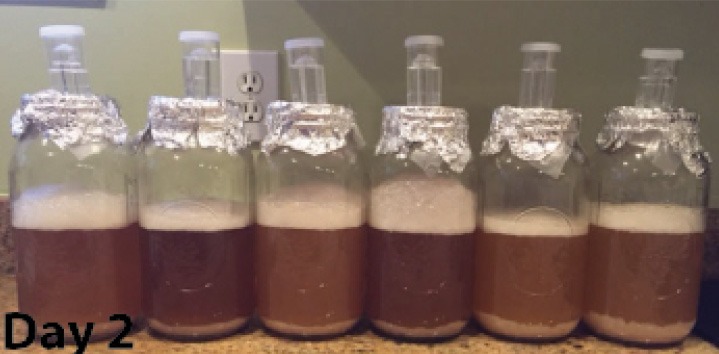
Yeast can be found in the air around us and on plants, so last year I chose to harvest yeast from a honeysuckle bush in my front yard. Flowering bushes and fruits are a great source of wild yeast since they attract birds and bees, which can act as natural transportation for tiny, microscopic yeast. For my harvesting process, I simply dropped 10 honeysuckle flowers into a sanitized jar of approximately 200 milliliters of cooled wort, shook it to aerate it (with the top on of course) and let the yeast on the flowers do their work (see picture on this page of initial fermentation). After 10 days I used basic microbiology tools (plates, loop, and flame source) to isolate six single strains of yeast from the mixed culture (see picture of isolated colonies, below). Don’t worry if you don’t have access to a lab for the isolation step, this is not required. You could instead have multiple jars of cooled wort each with different flowers or fruit from various locations in your yard. This would not ensure that the end result is a single strain of yeast, but this would provide you with multiple sources of wild yeast to test for fermentation. I then took a look at my wild yeast strains under the microscope and while all my individual honeysuckle strains looked very healthy I noticed that four of the six were comprised of both yeast and bacteria. In general, bacteria are considered spoilage organisms in beer but a recent trend in the craft brewing industry involves using strains of bacteria to ferment wort producing sour elements. With this in mind I decided to move forward with all six of them. If you don’t have access to a microscope, the true test for any yeast wrangling experiment is to see how the yeast performs during test fermentations. Here are a few rules I follow: First, if the resulting beer smells good and is free of any kind of mold on top I consider it able to move to the next step. Secondly, I check the gravity and pH to determine if the alcohol is greater than 2% and the pH is less than 4.5, respectively. If it is, it should be free of harmful bacteria and safe to drink. Finally, I taste each of the beers that pass these criteria. Luckily for me all six of my fermentation tests passed with flying colors and were able to be bottled. To my surprise, during the final stages of fermentation there were distinct color differences between the samples (see fermentation time lapse picture below; note color change that appears after fermentation) but after a month in the bottle any differences in color seemed non-existent.
Sample Testing
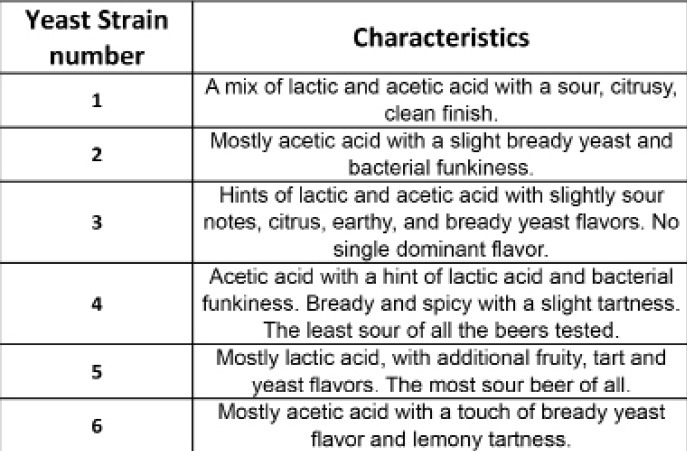
A few days after the beers were bottled I noticed that four of the six samples had developed a film around the inside of the neck of the bottle that eventually disappeared. I determined this film was a pellicle, which is an indication of Brettanomyces, Lactobacillus or other organisms reacting with oxygen during aerobic fermentation. Not surprising, the four that had the pellicle were the ones that I identified using a microscope as containing both wild yeast and what looked like Lactobacillus bacteria. The small volume of each test fermentation meant I only had two bottles of each so I decided to bring them to my local homebrew club meeting so that I could get feedback from my fellow homebrewers on the flavor, aroma, and best possible beer styles to use my local yeast strains in. All samples were pale, straw yellow and hazy most likely due to the low flocculation rate of the wild yeast/bacteria. There was a varying range of aromas described for each beer and no real consensus amongst the group for each individual strain. Sensory evaluations of aroma included hints of bread, lemon, orange, citrus, pear, funkiness, tartness, and phenolic notes. There was, on the other hand, a resounding consensus on the flavor of each of these wild yeast fermented beers from my fellow homebrewers (see the yeast strain characteristics table below).
No matter how many times I do this type of experiment I am always amazed when so many different flavors and aromas from yeast and bacteria are found from one source; in this case only 10 honeysuckle flowers from the same plant. It is very likely that each of these isolated strains of microbes originated somewhere else where something in their environment caused them to adapt in a way that changed their fermentation properties (like a lack of nutrients or eating the sugar on a specific fruit). This illustrates the amazing phenomenon of how the environment can change the characteristics of an organism. If you are not able to isolate single colonies from your main culture you should be aware that there is a potential for the presence of an acetic acid producing bacteria called acetobacter. While propagating your yeast culture at home, try to limit the amount of oxygen exposure in order to keep the acetic acid flavors to a minimum by using tight
sealing containers.
Re-using Yeast
There are numerous methods for collecting yeast for re-use following primary fermentation. Some methods include adding wort directly on top of a primary fermentation yeast cake, washing used yeast with sterile water after transfer of beer to a secondary vessel, and even using acid to wash yeast before repitching. Each of these methods has their own advantages and disadvantages. For example, although the simplest method, adding wort directly to a primary fermentation yeast cake is not generally the best idea because the yeast cake also includes many other undesirable components such as hop material, dead yeast cells and other proteins that have settled to the bottom of the fermenter. All this other material can lead to off flavors and is not ideal for healthy fermentation. Washing yeast with sterile water is a simple way of removing unwanted material from the healthy yeast, but relies heavily on exemplary sanitation skills since the yeast are transferred multiple times to clean vessels.
When yeast are washed with acid most unwanted material (including bacterial contamination) can be removed from the healthy cells, but can be harsh on the yeast and has the potential to damage them. With all this said, I use the sterile water method to wash the yeast of all the non-yeast material. As long as your sanitation methods are solid you should be able to reduce the risk of contamination.

Once your yeast has been properly washed it should be stored at or below 3–4 °C (٣٧–39 °F) and initially be allowed to vent off any carbon dioxide that might be produced. If too much pressure builds up the yeast will die, decreasing the viability. I always try and use my yeast within 2 weeks but have had good viability (see details later on testing viability) up to 4 weeks. This length of time depends on your storage conditions and yeast strain used. White Labs acknowledges that some strains can handle these storage conditions better than others and is one of the reasons why WLP001 (California Ale), a hardy yeast, is such a widely used strain. My suggestion is that if you are new to re-using yeast try WLP001 or an equivalent first while you determine what works best under your storage conditions.
When re-using yeast I follow a few general guidelines that rely on determining the fermentation characteristics of my yeast by tasting the beer they fermented. In general, depending on your storage conditions you should be able to re-use your yeast for a maximum of 7 to 10 generations (although some Belgian breweries and others use their yeast for much longer). With every subsequent re-use of the yeast there will be both positive and negative genetic changes that will be selected for. For example, every time you harvest yeast from the bottom of your fermenter you are choosing the yeast that flocculate (clump and fall to the bottom of your fermenter) the best. As you continue to harvest the best flocculating yeast over several batches your beer will become clearer. Be aware that by selecting for the best flocculating yeast you may also be choosing characteristics that are not ideal such as yeast that attenuate poorly. If you notice signs of improper fermentation characteristics like poor attenuation, do not re-use the yeast. Any doubt and the only place you should pitch your yeast is in the trash. I generally harvest from low gravity (less than 6.5% ABV), low hopped beer and pitch into a beer of equal or slightly higher ABV in order to minimize yeast stress. The above conditions for yeast re-use can be utilized for both ale and lager yeast, but one main difference is that lager yeast can be re-used less times. Again, use your own taste buds as an easy guide to yeast health before re-using.
If you are interested in re-using yeast there are many online videos that you can refer to for the exact details but the basic idea is that you want to collect the middle layer containing healthy yeast from your yeast cake. Although yeast are very hardy organisms, I try to minimize the number of steps I use in order to decrease the possibility of introducing yeast stress and contamination to the culture.
Yeast Care and Storage
As mentioned earlier, around 2 weeks is usually safe for storing yeast, but if you need to store it longer you can feed it with sterile DME-based wort to keep it happy. If possible (especially with longer storage times), before re-using yeast a viability test should be performed using a viability stain, a microscope, and a counting device called a hemocytometer (for more information on how to count yeast see www.hemocytometer.org). The most commonly used viability stain is methylene blue, which enters all yeast cells but is destroyed by the healthy cells leaving only dead cells blue. So by using a microscope to count the number of blue cells compared to non-blue cells you can determine yeast viability. A general rule of thumb is only use yeast when the viability is at least 90%. One issue with this method of testing yeast viability is that some reports suggest that methylene blue loses accuracy below 95%. A hemocytometer is also useful for counting the number of cells to determine pitch rate, but if you do not have access to laboratory equipment approximate yeast cell counts can be estimated by weight using the calculator found at http://www.mrmalty.com.
For long-term storage of yeast strains there are a few options that exist including storing yeast strains on agar plates for up to 6 months at 4 °C (٣٩ °F). Another commonly used option similar to agar plates is an agar slant (basically a test tube with agar media) which can last up to a year at 4 °C (٣٩ °F). The best option though is for yeast to be stored in a -80 °C (-١١٢ °F) freezer, which if stored in the correct solution can last indefinitely. If you are unfamiliar with preparing and using agar plates, check out this link for more information on how to do it yourself: http://bootlegbiology.com/diy/creating-plates/.
You don’t need access to a laboratory to perform yeast isolation. Instead you can use multiple jars of cooled wort with different flowers or fruit from multiple locations in your yard or wherever you want to source your yeast from. This will give you multiple sources of wild yeast to test for fermentation. Here are multiple strains that I harvested from my honeysuckle plant in my yard.
After looking at samples from each of the sample jars, I noticed that four out of the six contained both yeast and bacteria. If you don’t have a microscope try performing some small-scale fermentation tests to see how the yeast perform. If the beer smells good and doesn’t have any mold, it’s ok to move on to the next step. Check the gravity and pH next. If the alcohol is greater than 2% and the pH is less than 4.5 it should be free of harmful bacteria and is safe to drink.
Finally, taste all the beers that pass the first two stages. Take notes on their characteristics and note any distinct color changes between the samples (as seen in my samples, right). Note that these color changes seemed almost non-existent after a month in the bottle.

Final Remarks
Becoming a yeast whisperer by culturing wild yeast, re-pitching previously used yeast, and storing yeast although not terribly complicated, are advanced techniques that should only be embarked upon when the basics of brewing beer such as sanitation and making yeast starters, have been mastered. There is nothing more frustrating than spending a day brewing and eventually dumping it because of contamination. My rule of thumb for making close call decisions concerning contamination issues is this; when in doubt, throw it out. A ruined starter is easer to handle than a ruined batch of beer.
In addition, always keep detailed notes on your yeast handling experiments and procedures to help identify changes to make in the future. It can prevent making the same mistake twice. With that said, I urge you to go outside and begin exploring the endless possibilities of homebrewing with wild yeast.