Big-Batch Brewing
Most homebrewers start out by brewing five-gallon batches, and this is an affordable and manageable size to brew. At some point in their brewing lives, however, many homebrewers at least consider scaling up. Some may want to brew more beer. Others may want to brew the same amount of beer each year in less time. Still others may simply want to brew a large batch or two for a special event.
Brewing larger batches of homebrew has its advantages and disadvantages. The primary advantage is productivity — you can brew 10, 15 or more gallons of beer in roughly the same amount of time that it takes to brew five gallons. The primary disadvantage is the cost of buying the required new equipment. At a minumum, you’ll probably have to spend a few hundred dollars to upgrade your system if you buy everything new. And, there’s added time required on brew day to clean equipment and to heat the larger volumes of water required.
The fundamentals of brewing do not change, regardless of whether you are brewing five gallons of beer with your wise buddy or 50,000 barrels of Budweiser. However, the equipment for brewing does change with scale and your techniques must adapt to it. The biggest difference in brewing larger than five-gallon batches is that your wort is no longer portable.
The key to brewing your first big batch is planning. You will be dealing with new equipment and new techniques in addition to managing more water and ingredients. You should develop a brewing plan that aims to both avoid potential problems and also to deal with likely problems that may arise on brewing day.

Equipment
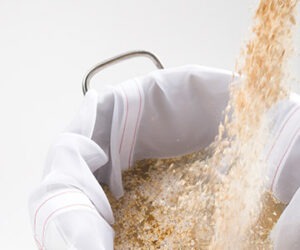
To scale up from five-gallon batches to 10-gallon or larger batches, you will need several key pieces of equipment. For beginners, you’ll need a brewpot capable of holding the wort. The brewpot should be able to hold at least 20% percent more volume than the volume of wort you plan to boil. The “extra” volume allows for the foaming that occurs when the wort begins to boil. To go along with the brewpot, you’ll need a heat source capable of heating the wort and a chiller capable of quickly cooling it. If you are an all-grain brewer, you’ll also need a mash and lauter vessel to hold all your grain. You can ferment in multiple buckets or carboys or invest in a larger fermenter.
There are many sources for brewing equipment, and they have been amply discussed elsewhere. If you simply wish to brew a few big batches for a special event, you have a few other options. If you know an avid homebrewer with a large set-up, you could probably arrange to use his or her system in exchange for some beer. An advantage of brewing on an experienced brewer’s system is that he knows his brewing set-up and can assist you in getting the most from it. The knowledge you get from this may be more valuable than the cases of beer you end up with. Alternately, if there is a brew-on-premises (BOP) shop in your area, you can brew there. You should, however, check the facility out and see if they have the equipment to accommodate your brewing plans.
If you can’t beg, borrow or steal the appropriate equipment, don’t try to brew a big batch of homebrew — you’re just setting yourself up for disappointment. I once spent a very long night in my grad-student apartment trying to cool 10 gallons of wort in my bathtub. The ice I’d set aside for the job melted within 10 minutes and it was hours later before the wort was even close to being pitchable. So, make sure you have the right tools before you start the job.
Water Preparation
Heating the amount of water used to brew five gallons of beer can be done reasonably quickly on most kitchen stovetops, which typically produce less than 15,000 BTUs of thermal energy. For 10-gallon or larger batches, you will need a better heat source. Most brewers who make 10 or more gallons of beer use propane burners to heat their water and boil their wort. Most propane burners are rated at 35,000 to more than a hundred thousand BTUs. Even so, heating the brewing water can take awhile, especially for very large all-grain batches. I recommend that you begin heating your brewing liquor (your treated brewing water) first, and do other preparatory tasks while the water heats.
Extract brewers will need to heat enough water to dissolve and boil the malt extract. If you can manage it, your best bet is to perform a full-wort boil. In that case, you will need to heat a volume of water equal to your batch size plus about 10%, which allows for evaporative losses during the boil. If you boil a concentrated wort, avoid making the wort concentrate too thick. Don’t, for example, try to boil a 10-gallon recipe’s amount of malt extract in your usual 5-gallon-sized amount of liquid. At a minimum, you should expand the amount of wort you boil linearly with batch size. For example, if you usually boil three gallons of water and malt extract and add two gallons of water to your fermenter to make five gallons of wort, you should boil at least six gallons of water and malt extract and add four gallons of water to make a 10-gallon batch. The closer you get to boiling your full wort, the less wort darkening will occur. You’ll also minimize the chance of scorching your wort. (Boiling a full wort has other benefits. See Steve Parkes’ “Homebrew Science” article on page 51 for more on wort boiling.)
All-grain brewers will need a volume of water almost double their batch size. You will need the water that goes into the beer and the water lost to evaporation during the boil, plus the amount of water left in the mash tun when sparging is complete. As I indicated above, this amounts to almost double your batch size. The exact amount will depend on brewing specifics such as how vigorous your boil is and the shape of your mash tun. Having a second burner and large pot reserved for a hot-water tank will help your all-grain brew-day immensely.
Mashing
An all-grain brewer may need to make a few changes to his procedures for mashing larger amounts of grain. However, the procedure really doesn’t change that much from how smaller mashes are performed. As with five-gallon batches, you need to match the mash tun with your brewing procedures. Specifically, if you use a picnic cooler mash tun, you cannot directly heat your mash as you can with a stainless steel vessel. Also, you’ll need more room in your mash tun if you plan on performing step-infusion mashes in which you add hot water to elevate the temperature of the mash.
You should mash in with the same liquid-to-grain ratio as you are used to in five-gallon brewing, usually around 1.25 quarts of water per pound of grain. The amount of time you spend mashing should likewise remain unchanged. The amount of time it takes to collect your wort shouldn’t change much either. This means you’ll be collecting a larger volume of wort per unit time, but you’ll be draining the same percentage of your mash as with five-gallon batches. (Think about it: Commercial breweries don’t collect wort at the trickle that characterizes five-gallon run-offs. There’d be no beer on the store shelves if so.)
Stirring the mash will require a mash paddle. While you could get away with using a large serving spoon to stir a five-gallon mash, you’ll need something more substantial to stir the amount of grains required for a 10-gallon batch. Without a mash paddle, you’ll almost certainly end up with dry “malt-balls” in your mash.
For your first mash in, hitting your target temperature might be difficult because you’re using new equipment and more ingredients than you’re used to. To make mashing in more controlled, pre-heat the mash tun by filling it with hot water prior to mashing in. This will ensure that you don’t quickly lose heat to a cold tun when you begin adding the hot water.
Also, keep a few gallons of boiling water and a few gallons of room-temperature water on hand in case you over or undershoot your target temperature. While you are mashing in, measure the mash temperature when the mash is still thick and make your adjustments as you approach your desired water to grain ratio.
Boil
Although your kettle may be larger, managing the boil doesn’t change much when you switch to making larger batches. You want to maintain a rolling boil for the duration of the boil, just as you should for five-gallon batches. This is can be managed by choosing the right equipment, adjusting the lid and adjusting your burner’s output. Avoiding scorching is also a consideration. If your brewing kettle has a thin bottom, or your burner focuses heat at one point, stirring can help avoid this. You’ll also want to avoid a boilover. With larger volumes of wort, boiling is not only a pain to clean up, it can be a scalding hazard.
Cooling the Wort
Most extract brewers heat less than five gallons of wort and cool it in a sink. Most homebrewers who boil a full five-gallon wort or brew larger batches of beer use one of two different methods for cooling their wort. Some cool by using an immersion chiller; others use a counterflow chiller. This is the part of brewing that changes the most when switching to larger batches. Instead of moving your wort to your source of cold water you need to move the cooling equipment to your wort.
Even if you could move your wort, it would be time-consuming to cool it by immersing the kettle in cold water. As the volume of a liquid increases, its surface-to-volume ratio decreases. In other words, with bigger worts a smaller percentage of the wort is touching the outside of the kettle. Since the outside of the kettle is the surface where the heat exchange occurs, it takes a proportionally longer time to cool a large wort by cooling the outside surface of the kettle.
An immersion chiller is a metal coil, usually copper, that is submerged in the wort. Cold water runs through the chiller, picks up heat from the wort and exits the chiller. To sanitize the chiller, clean it and place it in your wort for the final 15 minutes of the boil. The heat of the wort will kill any stray bacteria or fungi. The wort can be periodically whirlpooled by moving the chiller in a circular manner. Once you stop swirling the chiller, the rotating wort will flow past the coils, speeding the cooling of the wort.
A counterflow chiller is essentially a tube within a tube. With this type of chiller, wort is cooled as it is siphoned from the kettle to the fermenter. As the hot wort flows one way through the chiller, cold water flows the other way. Heat exchange occurs as the liquids flow past each other. Cold wort empties into the fermenter and hot water flows out the other tube.
The effectiveness of either type of chiller can be increased with the use of a pre-chiller. A pre-chiller is an immersion chiller kept in an ice bath. Water from the pre-chiller cools water headed for the primary chiller. The greater the temperature differential between the wort and the water running through the chiller, the faster the wort is chilled.
Fermentation
Although larger fermenters are available, most “big-batch” homebrewers simply split their wort into multiple carboys. Thus, you can ferment your beer exactly as you did before. No matter how many carboys you ferment in, all you need is one empty carboy to rack all your beer to secondary. When it comes time to rack the beer, rack one carboy to the empty carboy. Clean the just-emptied carboy and rack the next carboy and so on. Just-emptied carboys can be quickly washed and lightly rinsed with sterilizing solution. If the beer that just came out of the carboy smells and tastes alright, then the carboy can be quickly processed.
Brewing for Special Occasions
If you are brewing your large batch for a special occasion and want as much beer as possible, you may also want to consider high-gravity brewing. In high-gravity brewing, you ferment a concentrated wort and dilute the beer to working strength at packaging. (See the February 2000 BYO and the January-February 2002 BYO for more information.)
Before hauling a load of homebrew to a wedding or other special event, check to see if you’ll be able to serve it. The liquor licenses or business contracts at some venues may only allow alcohol from designated distributors to be served. Some caterers or event coordinators may object to serving homebrew, especially if they profit from selling their own alcohol. And, of course, be sure that the guests of honor know and approve of your plan. Your buddy may love your homebrew, but his soon-to-be mother-in-law may frown at the sight of your Igloo cooler next to the ice sculpture.