Reusing Homebrew Yeast

As the popularity of homebrewing has grown over the last 20 to 25 years, so has the availability of quality brewing ingredients, especially yeast. Gone are the days when old school hobbyists had a choice between only packets of dry ale or lager yeast. You want to make a dry Irish stout? There’s a yeast for that. A Belgian abbey? There’s a yeast for that, too. Munich lager, lambic, Czech Pilsner? You get the picture. While homebrewing is a great hobby that can be pursued at any level, if you brew frequently, the cost of ingredients for even a 5-gallon (19-L) batch sure can add up. And aside from the initial investment in equipment, yeast is probably one of the costliest brewing ingredients.
Reusing yeast is a simple technique any intermediate or advanced homebrewer can master quickly and something that professional brewers do on a regular basis. Why reuse your yeast if you’re not trying to save money? Maybe you really nailed a beer and you want to replicate it exactly. Or maybe you feel it’s time you developed your own “house beers.” Reusing yeast is also a great way to learn some professional brewing techniques.
To Reuse or Not to Reuse
Cost considerations aside, who should consider reusing yeast? If you’re a hobbyist who brews a few times a year you’ll want to stick with buying yeast for one batch at a time. If you brew frequently, but like to try something different each time — high gravity, highly hopped or flavored beers, then best stick to yeast strains appropriate to your brewing style. If you don’t have a lot of time (or are a little lazy), you’ll likewise want to pitch a one-shot yeast and be done with it. But, for brewers who labor over their kettles frequently, tend to brew similar styles several times a month, would like to lower their costs a bit, or who tend to share recipes, ingredients and tips with fellow homebrewers, then read on.
One big reason the pros, particularly some brewpubs, reuse (repitch) a particular yeast strain is to give their beers a signature character — reusing the same strain of yeast over and over develops a house flavor — the beers all seem to be from the same family. Over time, a versatile strain becomes accustomed to the environment (temperatures, equipment, fermentation, schedules) in a particular brewery and acclimates itself to those conditions.
Selecting Yeast to Reuse
Although professional brewers may use the same yeast workhorse for months before replacing it, expect to reuse your yeast from three to five times, and only under ideal conditions. Choosing the right yeast and the complementary styles you’ll be brewing is the first step. Select a good, versatile yeast for your needs. Your brews — whether ales or lagers — should not be high gravity or strong (6.0% or up) beers, should not utilize a lot of hops, and should not be dry-hopped, flavored with herbs, spices, fruit, coffee, etc. Excess alcohol and hops will stress your yeast, possibly with undesirable results. Other ingredients may impart flavors you don’t want in subsequent batches. The exception to this rule is if you plan to add these specialty ingredients to a secondary fermenter or keg, as you will be harvesting yeast from the primary. The other exception is if you plan on making three successive batches of the same beer — raspberry wheat, for example.
Schedule Brewing for Reusing Yeast
The second step is drawing up a schedule for your anticipated brews. Ideally, you will pitch the yeast from one batch directly into a second, but this does take planning; it is something much easier to achieve in a commercial brewery with a more structured production schedule. In addition to the timing, you’ll want to have an idea of what styles you will brew. For example, you might start with a golden ale, then an amber, followed by a stout. If you’re only going to try for three generations, it doesn’t really matter that much what that last batch is — an IPA, a coffee porter or whatever.
Also, if you know you’ll be reusing yeast from a particular batch, try to ensure the transferred wort is as clean as possible, with as little trub or other residue as possible left behind in the brew kettle.
There are three methods for reusing yeast that we will discuss: Batch-to-batch pitching if racking or transferring and brewing on the same day; harvesting yeast for use at a later date, within one to two weeks, and yeast washing (if you plan to store yeast for a longer period of time).
But first, a refresher course in sanitation is in order. If this seems off topic, think again. When reusing yeast, the goal is to harvest the healthiest, most viable yeast possible. Proper sanitation, that tedious but necessary practice that comes up all the time when discussing homebrewing, is perhaps the most important part of the equation when working with brewer’s yeast.
Sanitation
For the most part, brewers, both pros and hobbyists, utilize the practice of sanitization, not sterilization. In nearly every case, with proper attention to detail, this is sufficient. Every brewer should already have his or her own procedures in place. Everything, repeat, everything that comes in contact with the wort and the yeast must be sanitized. You probably already have a sanitizer of choice — whether it’s a powdered chemical, an iodine-based liquid, etc. Whatever your preference, be sure to have it ready to go and conveniently located in a bucket, filled sink or spray bottle. Many sanitizers are the no-rinse type, but still be careful not to overuse, and follow the manufacturer’s directions carefully.
Make sure equipment to be sanitized is free of all surface dirt — that means dust, wort, bits of dried yeast, etc. Periodically discard and replace any old, grungy and/or scratched plastic buckets and hoses. It may sound obvious, but make sure your hands are clean. Roll up long sleeves and tuck loose shirts into pants while you’re at it. Whatever room or area of your home you are working in, make sure the work surfaces are clean, pets (and their hair) are elsewhere, windows are closed, and ceiling fans are off. A nice breeze is a perfect vehicle for contaminants looking to hitch a ride into your homebrew.
Preparation
Make sure your sanitized equipment (hoses, fittings, spoons, containers, etc.) are placed within easy reach, on a clean cloth or paper towel. Keep a spray bottle of non-rinse sanitizer handy at all times. Some brewers like to use a pure alcohol and flame sample ports and jar lids; whatever works for you. Glass or other containers that are easily sanitized work best. Quart-sized canning or mason jars are per-fect for harvesting and storing yeast (see the photo on page 58). Durable mason jars can be sterilized by boiling and have two-part lids that can be screwed on loosely while still protecting the contents from outside contaminants. Boiled, sterile water can be poured into jars, covered and cooled if you are planning on washing your yeast. Have at least one half gallon in reserve. As with any glass, avoid sudden changes in temperature; never immerse a cold jar in hot water or vice versa. Have a pair of tongs handy if you intend to boil your jars. As an alternative to the standard lids, plastic wrap and a rubber band works well as a cover.
Harvesting
How you harvest your yeast will depend on your fermentation vessel. If you’re lucky enough to own a stainless steel fermenter with a conical bottom all you have to do is pull yeast gently from the bottom port. Open the valve gently and fill the sanitized container quietly with no splashing. Remember to discard the initial yeast plug, the darker, grittier matter — mostly dead yeast cells and trub — that appears first. Ideally, target the middle layer of yeast, which is the healthiest and most viable. Harvest enough yeast to fill a quart jar, leaving a little headroom.
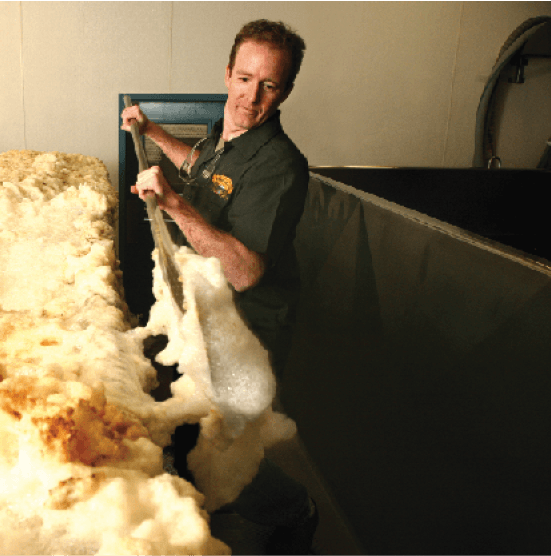
If you’re fermenting in a tried and true plastic bucket, you have two options. Top fermenting ale yeast can be cropped from the top of the bucket during active fermentation (see photo of Sierra Nevada Brewing Co. top cropping their Kellerweis below). Gently and carefully remove the lid of the fermenter and skim the yeast off the top with a sanitized spoon. Discard the dirty layer on the very top and scoop up the healthy yeast just below. The best time to harvest your yeast this way is when fermentation is most active — high kräusen — when there is a thick, rocky head of yeast on the surface of the beer. This means that your window of harvest opportunity is time sensitive — you may have only a few hours or a day or two. A word of caution — this yeast is also freshest and therefore more volatile. If you harvest this way, it is best to pitch it into a new batch of a similar beer as soon as possible. If you want to harvest yeast with the intent to store it for a few days, read on.
The second and probably the easiest method for harvesting both ale and lager yeast is to remove it from the primary fermenter immediately after you’ve bottled or racked your beer to a secondary vessel. Leave a little liquid on top of the yeast cake — just enough to cover it. You’ll need it to gently rouse the yeast that’s settled and get it back into suspension by swishing the mixture around a bit. (You can always add a little sterile water if you need to loosen it further.) Then, it’s simply a matter of pouring the slurry you’ve created into a sanitized container. Use this method if your fermenter is a carboy, but first re-sanitize the mouth of the bottle by spritzing with a no-rinse sanitizer.
Some homebrewers will reuse the yeast cake in its entirety, transferring a fresh batch of wort directly on top, into the old fermenter. This is a terrible idea and is contrary to everything we know about proper sanitation procedures. They will argue that they have never had an issue with this method. My response: If you haven’t had an issue yet, it’s just a matter of time.
Storage
If you’ve timed your brews just right, you can pitch your newly harvested yeast directly into a second batch (and you should, indeed, pitch immediately if you harvest by top cropping as I mentioned earlier). No need to refrigerate your yeast if it will be pitched within an hour or so. Give it a gentle stir (with a sanitized spoon) if you feel it needs it and you’re good to go.
If you plan to use the yeast at a later date — ideally within a week — you’ll need to immediately store the yeast in the back of a cold refrigerator. Yeast will become dormant as it cools, but that doesn’t mean it will stop producing CO2 right away. Cover the jar with the lid screwed on loosely to prevent it from rupturing. Vent the jar once a day for several days and it should be fine. Another option is to forego the lid for the first few days and cover the jar with plastic wrap and a tight fitting rubber band. Replace with the sanitized lid screwed on tightly on the third day.
Although sooner is better than later, the newly harvested yeast should be fine for up to two weeks. If you are unsure of how viable your harvested yeast is after a period of storage, you can test its viabilty by adding some of your yeast to a small amount of wort in a sanitized plastic water bottle. Lightly crush the middle of the bottle to allow for some expansion and put the cap back on. Allow the bottle to sit at around 70 °F (21 °C) and watch for any activity and for the bottle to expand. If you don’t see much going on in the bottle, your yeast isn’t very viable.
As I mentioned at the beginning of this story, however, reusing yeast is best for brewers who brew frequently enough that they don’t need to hang on to their yeast for very long. If you don’t brew often enough that you need to store your harvested yeast longer than a week or so, you should probably stick with buying fresh yeast. Also, don’t reuse yeast if your original batch was sluggish or had off flavors. You’ve spent time and money on your batch of brew, why would you jeopardize it by using old yeast?
Pitching

If you’re not immediately pitching after top cropping, remove your container of yeast from the refrigerator an hour or so before you need it and let it warm up. Avoid any sudden changes in temperature, which could shock the yeast.
When you’re ready to add the yeast to your wort, remove the cover of the fermenter and give the yeast a quick checkup before pitching. What does it look like, how does it smell, how does it taste? By now, you should know the characteristics of healthy yeast. It’s never a bad idea to keep a packet of dried yeast in reserve, just in case.
Spritz the outside rim of the jar with a little no-rinse sanitizer and gently rouse the yeast by stirring with a sanitized spoon, then add the yeast to your wort as you would normally with any pre-packaged yeast.
Many commercial brewers harvest their yeast by a method known as “top cropping.” This is done by skimming the yeast off the surface of the beer during the most active time of fermentation — high kräusen — and repitching the active yeast into a new batch of wort.
Yeast Washing
Yeast washing is a procedure involving the separation of viable, healthy yeast cells from old, dead cells, trub and hop particles. Over time, these undesirable components will become more prevalent in your yeast. By removing them, you’ve prolonged the life of your yeast and can now store it for longer periods of time with more confidence (although remember that storing yeast for too long is not ideal). Here is a simple method for washing yeast:
1. Transfer the wort from your carboy or bucket, leaving enough liquid to cover the yeast cake. Swirl the mixture around to loosen the yeast. Carefully pour what you can into a large sanitized glass container such as a 1-gallon (3.8-L) carboy, flask or two 2-quart mason jars. The mixture may be chunky; that’s fine. By using a large enough container, you will be able to fill multiple jars for future use.
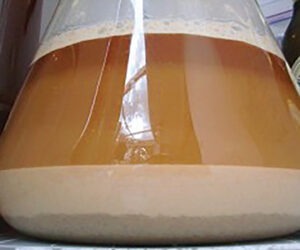
2. Add sterile water to at least double the volume of the slurry. Cover and set aside for 15 to 30 minutes. After that time, you’ll see the liquid has separated; the heavier trub, dead yeast and other unwanted matter has fallen to the bottom, while the creamy, healthy, yeast forms the top layer. Carefully decant the top layer into a sanitized container(s).
3. Screw lids on loosely, venting CO2 daily for several days. Tighten on third or fourth day. When storing yeast, it’s a good practice to label the jar with the date, type of yeast and generation. When the time comes to reuse yeast that has been stored for more than a week or so, use a simple yeast starter to get your pitching population healthy and ready for brewing.
If you need to store your harvested yeast, you can store it for up to two weeks in the refrigerator. You can prolong your yeast’s viability by separating it from any dead cells, trub and hop particles left over from the last batch. This process is known as “yeast washing.”


