Conserving Water
Despite all the pithy bumper sticker jokes about “Save Water, Drink Beer!” the truth is that brewing beer is a terribly inefficient and water wasteful process. Between growing, cleaning, mashing, sanitizing, chilling — it takes many, many times the volume of water as beer produced.
The usual rule of thumb is 7:1 water-to-beer. In other words, it takes 7 gallons of water to produce 1 gallon of beer (or 7 L water to 1 L beer). A decade ago, MillerCoors made big waves and received accolades by achieving a 3.8:1 ratio while brewing.1
To a large brewery, water efficiency equals a large cost savings. And while it may not be as big a deal for us homebrewers, who doesn’t want to save money? And that’s before you even consider the ecological advantages.

For Drew, that concern lives at the front of his mind because drought is never far away in Southern California. There’s very little sense in being any more needlessly profligate than we already are. He’s ripped up most of his water-thirsty grass, but still modern “comfortable” life isn’t mindful. Even Denny, in what most would think of as “damp Oregon” is experiencing “exceptional drought” conditions.
While we homebrewers will probably never hit the highs (or lows?) of MillerCoors’ achievements, there are a few fairly simple and easy things to do to cut down our water usage. These start with reducing water needs, being more efficient with water, and reusing it. Let’s go through each in more detail.
Reduce Your Needs Before You Begin
Homebrewing tends to be a muscle memory rote activity. “Fill the vessel up yea high,” “Rinse with this much water,” “Make this much beer.” But as both of us have gotten older there’s a time to stop and think — do I really need to make 5–10 gallons (19–38 L) of this beer? The answer often turns out — not really. Better to truly focus on the volume you need and waste less beer, ingredients, and water in the process.
You can also reduce your overall water needs by making an extract batch or two. We’ve said it many times before that extract beer’s “bad” reputation isn’t the ingredients’ fault — it’s the inexperienced brewer with no clue how to manage a ferment or sanitize things correctly! Bonus points for a shorter brew day as well.
Be Efficient with Your Cleaning
Cleaning is one of the biggest water and energy spends in brewing. It’s absolutely vital — you won’t catch us pulling that old cheap brew guy mantra of “I’ve never cleaned my plastic buckets and my beer tastes fine.” For our best beer and use of our time, we must keep clean.
You can make your cleaning more water efficient by getting things cleaned early on. Empty a fermenter or a keg? Get that puppy rinsed before things dry and get glued into place! You’ll need much less effort and water to get things done that way. (And maybe rinsing your beer glass with another beer counts — or maybe that’s too much of that crusty old guy logic!)
The efficiency of cleaning, like all chemical reactions, is driven by factors like concentration, temperature, and agitation. We don’t recommend dosing twice your cleaners’ directions, that will just lead to more rinsing and other nasty side effects. It is, however, true that a little extra heat (not enough to melt your plastic) can help along with physical agitation, be it scrubbing or other motion. If you don’t want to scrub, you could look at a semi-professional solution like all the various pump and spray ball gadgets out there to keep your cleaner moving.
Along the same line of thought, not everything needs to be completely immersed in cleaner or sanitizer to get the job done. In fact, the only time that Drew uses a full volume of anything is when sanitizing kegs. He uses a full volume of Sani-Clean so that when he pushes it out via CO2 it makes his kegs well purged of oxygen.
Also, we know that it’s hard to resist, but as long as you’re using a no-rinse sanitizer in proper concentrations — don’t rinse! Those foamy bubbles aren’t going to impact your beer.
In terms of efficiency, it’s hard to beat the idea of stacking things up and doing stuff in a row. This is easy assuming you’ve rinsed your kegs/carboys/fermenters and got a stack of things to go through. For Drew, he’ll stack kegs up by the fours, roughly, and then run the kegs in sequence. Using a single batch of cleaner or sanitizer to get through everything is just a smart plan.
Chill Out to Save
Outstripping all other uses of water during the brew day is the final act: The chilling. Turns out that it takes a fair amount of water to take a batch of beer from near boiling to pitching temperatures.
And we can’t talk about saving water and chilling without first mentioning the easiest way to reduce water usage — embrace the no-chill methodology and don’t chill! While it may feel outrageous in the face of every “good modern practice,” you should remember that force chilling beer is a relatively new practice in the history of beer making. And before quick chilling, lager brewers used coolships and Baudelot chillers to brew clean beer. The notion that coolships are only for funky beers is bunk, as the history of Pilsner-style beer clearly shows.
You don’t have to embrace the full funk life and emulate lambic brewers with shallow trays allowing overnight chilling (and partial addition of wild yeasts and bacteria). You can follow the modern examples from Australia and use a 5-gallon (19-L) HDPE water cube. Fill the clean cube with the hot wort, push out any excess air, and cap it. Let the wort cool naturally overnight in its relatively safe hot pack state. When cooled, pour the cube into a fermenter and pitch your yeast. What you need to keep in mind when doing this is the amount of time your hops will be in contact with hot wort. Drew usually treats everything like it’s been boiled for 30 minutes longer than it was in the kettle — so for a hop addition intended for boiling 60 minutes, he’ll add the hops at the 30-minute mark (while maintaining the full length of the boil). And before you go “but, but that will make terrible beer,” we enjoyed a great number of Australian homebrews made this way on our trip there a few years back and they were great beers!
When chilling the beer, look at how far and fast you can go with the least amount of water. If you have a way to chill your fermenter, you don’t even need to chill the batch all the way. We both have glycol-chilled fermenters, but Drew doesn’t have Denny’s stupidly cold well water, instead dealing with tap water at temperatures in the 70s (low- to mid- 20s °C) during a SoCal summer.
Since chilling becomes less effective as the wort temperature approaches the chilling water temperature, Drew doesn’t even try and get the wort below 90 °F (32 °C) during the summer. Instead, once the tap water significantly slows cooling of the wort, he transfers the wort to his sanitized fermenter and starts the cooling jacket. With 24 °F (-4 °C) glycol flowing around the beer, it’s typically to low 60s °F (16–17 °C) pitching temperature in 30 minutes or so — just enough time to finish the cleanup!
Or, if you choose to pitch a kveik yeast, after chilling to 90 °F (32 °C) you’re done — pitch and start your cleanup.
If you’re dead set on your wort being chilled as soon as possible, you can improve the temperature differential of water vs. wort by taking a cue from professional breweries with their cold liquor tanks. Refrigerate a sizable volume of water ahead of time and then use a submersible pump (or put the water in kegs and push it).
If you’re using an immersion chiller, chill the beer first with your tap water and then as chilling slows down (~100–120 °F/38–49 °C), switch to the chilled water to drive the chilling to its conclusion. Stirring, recirculating with a pump, or even just lifting the coil periodically will also greatly improve your chilling time as you break up the layer of cooler wort that develops around the coils.
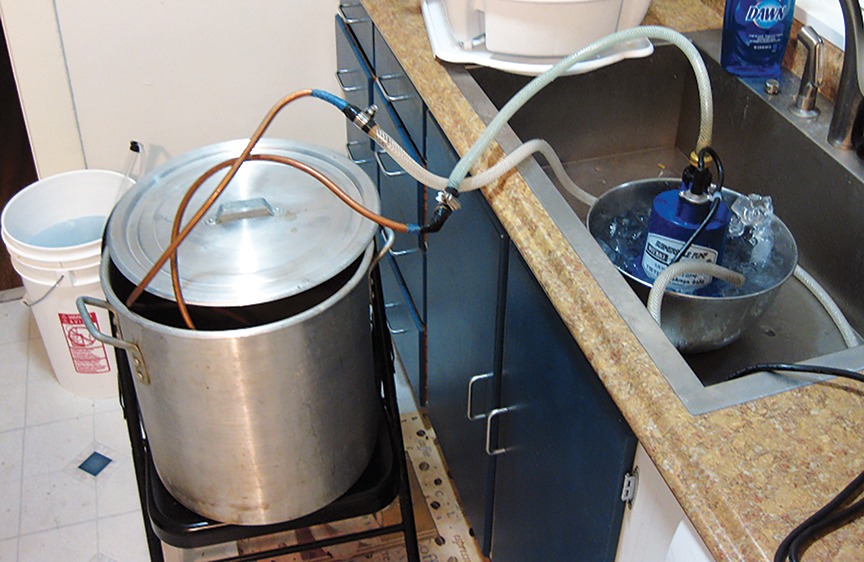
If you’re using a counterflow chiller, you can do what Drew used to do back in the day and send the output of the chiller (on tap water) into a simple immersion coil sitting in a bucket of ice water and then from there to the fermenter. And to that point, ice is your friend. If you don’t want to mess around with large volumes of water in a fridge, just make a big ice bath and use that. One of Drew’s friends in his homebrew club owns a giant ice machine and uses its output to drive his brews to completion.
Again, the whole point is to get the temperature differential as high as you can for as long as you can to get your beer chilled faster and use less water. If you’re very technically adept and have a fairly sizable glycol chiller, you could force circulate cold glycol through the chiller to drop the temperature. However, the typical homebrew-sized chiller is inadequate for this purpose and it’s much simpler to run water/ice water and then chill down with refrigeration or a big water bath.
Don’t Run Down the Drain
After you’ve found ways to reduce water consumption, the last thing to think about is reusing/recycling it, which is fairly easy. As you’re chilling, capture the water and save it for another use. The first good reason to do this is to actually get a sense of how much water you’re using. It’s incredibly important to know just how much water you’re running out to know whether or not you’re making improvements.
If you’re a hardcore dedicated brewer, the easy answer about what to do with the water is make another batch of beer! Just about any brewery that’s wanting to save money and sewer bills will capture their chilling output and save it for the next batch of beer. This is easy to do when your next brew day is tomorrow, so it’s often not the most practical step for homebrewers — but keep it in mind. Bigger brewers on 24/7 brew cycles will actually take advantage of the heating of the chilling water to get the next batch going with less delay. Assuming you’re not brewing another batch yet, look around at your household to-do list and find places that you can reuse the water.
• Clean the brew gear. Your mash tun won’t clean itself! Don’t you have kegs or bottles that need a once over?
• Fill your laundry machine — works great with top loaders.
• Wash the cars/dogs/cats/horses/pygmy elephants/kids.
• Fill your pool or pond.
• Let it cool and water the lawn/garden/house plants.
OK, these are just a few thoughts about water efficiency with brewing. No, we’ll never be as ruthlessly efficient as the big guys. We don’t have the same motivation and return on our efficiency and no one is pretending that doing all of these steps will save the environment for humanity, but a great many of these things are simple to implement and can save you time (no-chill/refrigeration after chilling part way), some will even scratch that gamer and engineer’s min-maxing itch as you try and set a land speed record for chilling a batch of beer!
Reference:
1 Walsh, B. (2013) “At the farm and the brewery, MillerCoors gets more beer to the barrel with water efficiency.” Time. Available at: https://shorturl.at/8Gmcu


