Adding Cost-Effective Equipment
You know how you caught a few fish by using worms off the dock before you worked your way up to fishing from that beautiful boat with twin outboards, depth finder, fighting chair, and trolling motor? And you know how it would seem a bit strange if somebody bought the ski clothing and top-flight skis, reserved the condo in Colorado, and bought a season pass before they’d ever been on the slopes?
Well, homebrewing is progressive like most hobbies. Brewers usually start by helping a friend or getting a minimal starter kit, then adding to it bit by bit. Sometimes the items come along by luck (like the 30-quart canning pot that your father-in-law was using to wash his truck and was willing to trade for a pickle bucket) and other means to fill a homebrewer’s specific needs.
At most brew supply stores, however, folks don’t walk in and start with the complete top-of-the-line, stainless steel, three-vessel system. Assuming you have already brewed a batch or two, here are some items that save time, reduce stress, and allow more control over the process. These items all have the significant benefit of good old-fashioned value as well.
1. A brewing journal. What made that beer so great? What went wrong? How could it be improved? If you write down everything, you’ll brew better beer. Period. Put down ingredients, techniques, any detail that could have any influence. (“I was up late last night and am extremely tired” could explain a beer that didn’t come out the way it did when you brewed it before.) Go back and add tasting notes as the batch conditions and ages.

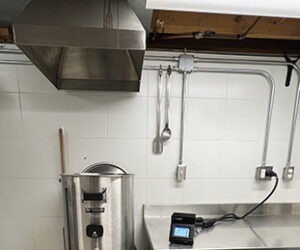
2. A large kettle. Full-wort boils will improve your break and your hop utilization, and will allow you to feed huge numbers of people corn on the cob or spaghetti. (Estimated number of good-sized Dungeness crabs that fit into a 7.5-gallon kettle: 16.) Remember that you’ll need about seven to eight gallons of capacity to yield five gallons of wort. You’ll need room for an active boil, and there is a significant volume loss due to the length of the boil.
3. An outdoor propane cooker. Another item that not only minimizes odors in the house (there are rumors of non-brewing roommates or family members who do not like the smell of brewing) but also saves time due to increased heat output. It’s also useful for the huge pot of spaghetti noodles, corn on the cob, or crabs that you may wish to prepare outdoors in your large kettle when you aren’t using it to brew.
4. An immersion chiller. Easy to sanitize (just throw it in the boil), easy to use, easy to buy or make. Consisting of 25 or more feet of three-eighths-inch copper tubing wound into a loose coil that fits in your kettle, some vinyl tubing, two hose clamps, and a hose fitting, this device will save you time and reduce the risk of oxidized flavors in your beer. (Wort should be cooled to pitching temperature before it is aerated.) A benefit that you may not have thought of: The water coming out has been heated by the wort and you can use it for cleanup. Efficiency!
5. A yeast-starter vessel with a stick-on liquid crystal thermometer. A large bottle or jug with the appropriate stopper and an airlock is pretty much a requirement for stepping up liquid yeast. Because it has a relatively small mass, the temperature of your starter may be fluctuating more than you think. Put a thermometer on there, and by moving the vessel to warmer or cooler spots you can keep your yeast in a temperature range where it is happiest.
6. A large primary fermenter. A 6.8-gallon carboy may be one thing that will lend a spring to your step and extra volume to your beer inventory. It can aid aeration (by leaving airspace when you stir or shake), it will add to your yield by reducing volume loss due to blowoff, and the brewer who racks to secondary in a five-gallon carboy can fill the five right to the top, leaving the sediment back in the 6.8. Put volume markings on the 6.8 with stickers or a permanent marker before you use it and put volume notes in your journal. Soon you’ll know exactly how to customize your recipes with additional fermentables and how much wort to add to your 6.8. Typically, 5.25 to 5.5 gallons will allow plenty of headspace for kraeusen yet still allow you to yield five full gallons in secondary.
7. A beer thief. This large-diameter tube (glass is preferred for ease of sanitation) will allow you to pull samples from your fermenter to check gravity and evaluate flavor. Works just like the straw you used to put in your milk as a kid; you lower the sanitized thief into your fermenting or lagering beer, put your thumb over the hole in the top, and remove your sample. A thief is so easy to use that it may lead you to take samples more often — and get you to better understand your yeast and fermentations.
8. Ceiling hooks or clips. When you are holding a freshly sanitized racking cane or siphon hose, there is no better place to put it temporarily than a hook above your brewing/bottling area. A clip is okay, but with a hook you can hang the sanitized item with one hand.
9. A racking-cane clip. This small clip attaches to the rim of a carboy neck or edge of a bucket and holds the cane above the sediment when you are racking out of your fermenter. It works in a bucket fermenter but really shines when you use a glass carboy as a fermenter; you can see the end of your racking cane and position it with precision.
10. Clear bottles. Yes, there is no doubt that light damages beer. However, you the brewer can keep your clear bottles (known as “flint” in the bottle trade) in a dark cupboard or in a case box and you won’t need to worry about light damage. Filling one clear bottle in each batch allows you to watch the yeast settle and really allows you to check color and evaluate chill haze even before the first beer is ready to drink. This is particularly helpful when trying a new yeast strain or technique. You will be thinking about clarity, haze, and color from the moment you cap the last bottle.
11. Appropriate beer glassware. Whether packaged in a keg or a bottle, homebrew is consumed from a glass. Several nonik pint glasses (Imperial-style glasses with a bulge near the top) for your English-style ales, some stemmed Belgian-style glasses for your homebrewed abbey beers, and a few narrow-waisted hefe-weizen glasses for your wheat beers will really complete the homebrew-drinking experience. Many homebrewers prefer glassware that is free of beer logos, but an assortment of glasses of different designs can help groups of imbibers keep tabs on which glass is whose when they get set down.
12. A paradigm shift of at least medium size. Do you put all your bottles into tight rectangular ranks at bottling time? If you fill each bottle in a single-file line with lots of room on either side, you can then take your wing capper and move right down the line, saving lots of time. You can pre-chill the water going into your immersion chiller by throwing your coiled hose into some ice upstream of the chiller. You can build a bottle-drying rack. You can brew beer during a party, to interest your guests and not miss the party. You can buy a garage-sale microscope and actually see yeast. You can rig up or invent an infinite number of little time savers that will make you more psyched about brewing and may improve your product as well. Next time you brew or bottle, take a step back and analyze the way you do things.
With the exception of the large kettle and the propane burner, these items are all cheap or even free (and the burner and kettle do additional non-brewing duty in your kitchen as well). The personal touch you put on items such as a journal are priceless. Imagine your grandchildren passing on your wort-stained brewer’s journal to your great-grandchildren.
Homebrewers today are lucky to have great suppliers, interesting and tricky new devices, fantastic literature, and excellent commercial beers to emulate. Roll these in with a little good old ingenuity and a fresh viewpoint. Refer to your journal. Try new methods. Teach friends to brew. And in your search for new items and new methods, you might just make a small unexpected discovery: some fresh brewer’s energy that will allow you to have more fun — and to make even better beer.
Sure it’s possible!