Preparing to Go Electric
I’ve had the great fortune of homebrewing since the early ‘90s. At that time brewing with cans of malt extract and doing concentrated wort boils on a residential stovetop was the norm. Only a small percentage of brewers were doing a full-wort boil in a large kettle on a propane burner. An even smaller percentage were brewing all-grain. I don’t even recall anyone using electric immersion heaters at that time. I’m sure there were, but it was certainly rare. These days, however, electric brewing has become more the norm than the exception. In fact, electric brewing is even common in commercial breweries producing up to about 7 barrels per batch, and with good reason. The advantages of electric brewing are significant:
• Nearly silent operation.
• Safer for indoor brewing from a burn, fire, and fume standpoint.
• Heating speeds can be very fast.
• Requires only a quarter of the ventilation as gas/propane.
• Less expensive to operate per batch compared to propane.
• Never run out of fuel in the middle of a brew day (assuming the power doesn’t go out), and no tanks to refill.
• More efficient use of energy: With a gas heater much of the heat is lost to the atmosphere.
• Easier to precisely control the temperature.
There are a few cons, and I’ll address those in this article as well:
• Not as portable as propane due to availability of needed power.
• Can be expensive to add the necessary power supply.
• Higher up-front costs for heaters and electrical controls.
There seems to be a perception that setting up an electric brewery is chock full of danger, mystical wiring needs, complicated terminology, and general intimidation. But, realistically, it’s like all things: If you don’t know anything about it, it can seem quite daunting. I’ll walk you through all of this and you’ll ultimately realize that while there is a lot to think about, there isn’t anything here that is terribly difficult. Even if you end up hiring a professional to do much of it, it is important to have some fundamental understanding of what is required so that you can ensure your contractors are providing what you need.
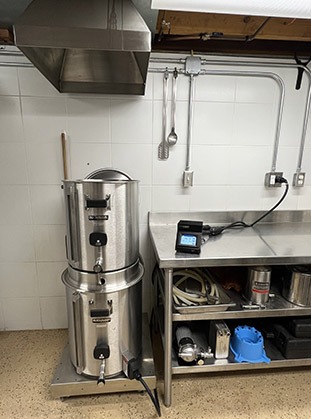
The first thing to think about with any indoor homebrewery is to make a scaled drawing of where each piece of equipment and infrastructure will be located. See the example drawing I made for my new indoor brewery above. Note where the key pieces of infrastructure are located, as those are difficult and potentially expensive to relocate. Specifically, water supply, water drains, access for ventilation, and in the case of electric brewing, access to adequate electrical power connections. If you’re lucky, they are all nearby. If not, you will need to decide which are the easiest to install, which you are willing to do without, or which you can accomplish in some other manner.
Ventilation can be one of those things that can be accomplished in another manner by using a steam condenser, discussed later in this article. Otherwise, you’ll need access to an exterior wall or the ability to run ducting to an exterior wall. Venting steam and aromas is important.
A brewery without water drains may mean hauling brewing liquor through the house and carrying soiled equipment to a sink for cleaning. Since brewing involves a lot of equipment cleaning, this should be a high priority for your brewery.
You will also want to consider dedicated space for storing brewing ingredients, measuring equipment, kegs, bottles, etc. The closer you can locate all the equipment and materials needed throughout your brew day, the less time you’ll spend moving and searching for things before you even get started brewing.

It is also highly recommended that you have easy-to-clean floors and walls. While a floor drain is nice, in a homebrewery that falls into the luxury list. White tile walls or fiberglass wall panels are an inexpensive way to make a durable, washable wall, particularly if you do the installation yourself. For floors, garage floor epoxy or slip resistant tile are both amazing choices. Both are great DIY projects that can save a lot of money. For more general details on setting up your homebrewery, I wrote an article on designing a space for homebrewing that is online at https://byo.com/article/homebrewery-design/. That article gives a lot of detailed information on infrastructure and other brewery setup topics. But the remainder of this article is going to focus specifically on the needs for creating an electric homebrewing space.
After mapping out locations, the next step is deciding what size batches you plan on doing now, and what size you foresee in the future. Are you always going to be brewing 5-gallon (19-L) batches? Or will you eventually go to 10- or 20-gallon (38- or 76-L) batch sizes, or even bigger? Will you always be using a 2- or 3-vessel system, or will you only be using a single vessel “all-in-one” type system? Will you ever transport your system to brew in another location where 240V power may not be available? The driver here is how much electrical power you will need, at what voltage, and what type of system you will be
brewing on.
Electricity 101
For the electrical novice, a great way to understand the relationship between voltage, amperage, resistance, and wattage (power) is to use a water plumbing analogy:
• Voltage (Volts) is synonymous to pressure
• Current (Amps) is synonymous to flow
• Resistance (Ohms) is the resistance to flow such as pinching a hose, or a very small diameter hose
• Power (Watts) is how fast you can fill the bucket (total amount of water flowing in a given time).
Therefore, the higher the pressure (voltage) the faster you can move the water through a given diameter of hose. And the bigger the diameter the hose, the faster you can move the water at a given pressure since there is less resistance. Not a perfect analogy, but it gives you the idea.
Mathematically: Watts = Amps x Volts, and Volts = Amps x Ohms.
Figure 1 shows the typical power needs per vessel that you intend to heat. These values are going to give you fast heating times and good boil intensity. Of course that will vary with kettle geometry and whether it is insulated.

Putting it in use, small batch sizes (5 gallons/19 L and less) can operate off a typical residential voltage (in the USA) of 120V and with the available current provided by a common 15–20A circuit. The current is limited by a circuit breaker to prevent the wires from overheating and potentially causing a fire if too large of a heater is connected. Those circuits can provide 15A x 120V = 1800W or 20A x 120V = 2400W depending on the breaker installed. In use, breakers don’t like to operate at their maximum rating, so you will typically see heaters sized to draw a few amps below the maximum rating to keep the breaker from nuisance tripping. Now you can understand why batch size is limited by 120V residential circuits. If you want faster heating speeds, more aggressive boils, or larger batch sizes, you are going to have to move up to 240V circuits. Fortunately, residential power is provided at 240V to your main breaker panel, so you do have the ability to provide 240V power.
Wiring Considerations
If your panel is near your intended brewing space, you have an easy job of installing a 240V power receptacle. If it is on the opposite side of the house or a different floor, that becomes more involved. Main breaker panels are commonly found in garages, basements, utility rooms, etc., which may or may not be in a convenient location for your brewery. That said, laundry rooms and kitchens usually have 240V outlets that can be adapted for powering your brewery, and all you may need is an adapter to match and an extension cord.
If you’re running new power to an area, consider running more than what you need to allow for future expansion. Or if running wire through conduit outside of a wall, at least leave room in the conduit for larger or additional wiring if you decide to add power in the future. It is inexpensive to run the next larger size of conduit or wire, but expensive to start over.
I highly recommend hiring a licensed electrician before doing any wiring modifications. Codes you regularly hear about in the U.S. are NEC (National Electrical Code) and NEMA (National Electrical Manufacturers Association). Every municipality and state has different “interpretations” of wiring codes, and you definitely want to follow those. Some locations prohibit homeowners from doing the work as well, so tread lightly there. Simply put, have a qualified electrician familiar with local codes do the work for you, which will save money and potential hazards if done improperly.
Choosing a Plug and Receptacle Type
There are quite a few varieties of receptacles and plugs that vary based on the intended voltage and amperage. The main reason is that it prevents you from connecting a load to an unmatched voltage and ampacity of the power source. A very common connector used in homebrewing is L6-30. The L denotes it being a locking type. The 6 generally denotes 240V (5 generally 120V) and the 30 denotes the max ampacity. The suffix R or P denotes receptacle and plug. So L6-30P is a locking 240V, 30A plug. There are a number of commercially available connectors to match what you are looking for.
You will also see 3-wire and 4-wire style connectors. A 3-wire for 120V configuration contains a ground, neutral, and one hot wire known as “line” or “leg.” If you look at a residential main breaker panel it will have two 120V sides that added together create 240V. As you move down the bank of breakers the sides alternate. The “double wide” (2 pole) breakers you see in the panel actually connect to both sides of the panel simultaneously. That is why a 240V configuration will contain a ground wire (green), and two hots, (black and red, or black and white) from the left and right of the panel. A 4-wire connector will have a ground and a neutral (white). You will also see 3-wire connectors at 240V. In those you will have a ground wire, no neutral, and two hot wires. Industrial applications usually have 208V supplied in one conductor (leg), not two. Most residences in North America use 120V, whereas most other countries have 220-240V single leg power.
And of course, receptacle types are different as well. If you are lucky enough to have an existing power supply in your intended brew space you can easily buy a mating connector at most home improvement stores and run an extension cord, if needed, to your equipment. If you need to run a cord very far, you will want to pay close attention to gauge of the cord, and make sure to check the allowable amperage. That said, it is always best to have the power hard wired where you need it.
Wall Receptacles
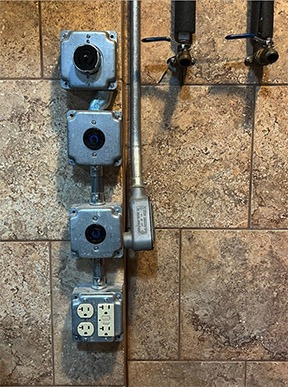
Locate the wall receptacle for your heater(s) near your brew kettles to minimize the need for an extension cord, but in a placement that inadvertent splashing or a boilover won’t get them wet. In the Blichmann brew lab, where we test a lot of different heaters, we have up to 50A of power available. The top is a single 50A receptacle, and the bottom two are 30A receptacles. We have also added a 120V receptacle for convenience.
Choosing a breaker
It is required to install a ground fault circuit interrupter (GFCI) in any area where you are close to open water. Kitchens, baths, hot tubs, and homebreweries. These breakers not only protect the wires from overcurrent, but also offer personal protection. Since water is a marginal conductor, it is possible to energize the water inside of a kettle and still not open the breaker. This can present an electrocution hazard. To help prevent this, an additional feature is added to GFCI breakers to detect current that is possibly travelling through the water and, if detected, opens the circuit. It does this by comparing the difference in current flowing in versus current flowing out. If there is even a slight difference, the circuit breaker opens. GFCI breakers are sometimes prone to nuisance tripping, but that is a small sacrifice for safety. Note that GFCI breakers can be found integral to power cords, or for 240V they are most commonly installed in your main breaker panel. 120V GFCI breakers are found in all bathrooms and kitchen wall receptacles. While 4-wire GFCI wiring is common for 240V applications, wiring a GFCI breaker in a 3-wire system is also commonly done and is most common in homebrewing setups. Your electrician can guide you in the installation of a GFCI breaker, and since that is such an important component, it is highly advised to have a licensed electrician inspect or install it. GFCI breakers are significantly more expensive than standard breakers, but are still much cheaper than a funeral. ALWAYS use a GFCI breaker.
It is also important to procure your heating elements from a reputable supplier that fully understands how the product is installed in homebrew kettles so you are sure everything is properly grounded. Water heater elements are designed for water heaters, not brew kettles, so bear that in mind. Fortunately, there are a number of reputable companies making elements specifically intended for homebrew kettles and they have a good track record of safety and reliability.
Ventilation
Of course, just because you are brewing with electricity doesn’t necessarily mean you are brewing indoors, as you could hook up an extension cord or use an outdoor outlet. But, let’s assume we’re brewing indoors, as getting out of the summer sun or avoiding the winter ice is a huge reason homebrewers choose electric brewing. One option for ventilation at a low cost, if possible, is brewing next to an open door or below a basement window with a fan blowing the steam outdoors. It’s easy, largely effective, and will save money. However, that isn’t an option for everyone, and when brewing larger batches it isn’t the best option for ventilation.
The main reason to provide adequate ventilation for indoor brewing is that you’re boiling a significantly larger volume of liquid than you typically would on a stovetop in your kitchen. Typically, you’ll boil off about 10% of the volume of your batch, so for a 5- to 10-gallon (19- to 38-L) batch that is ½–1 gallon (2–4 L) of steam entering your house. For reference, 1 gallon (4 L) of water creates 230 cubic feet of steam. In very dry climates this may not be an issue, but excessive moisture can cause condensation on windows and cause mold to form. The other main reason to ventilate is the elimination of aromas in your house. While we brewers love that fine potpourri of hops and malt, others in the household may not.
Fortunately, ventilation for electric brewing only requires about a quarter of the capacity that a similar size propane system does. Typically, you will need about 34 cubic feet per minute for each 1000W of heating element power. For detailed advice on ventilation, see “Ventilation: Proper Airflow in your Homebrewery” from the January-February 2017 issue, available online at https://byo.com/article/ventilation.
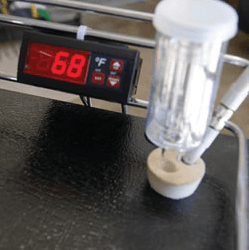
Steam condensers are another type of device used to control steam and to a large degree, aroma. These devices are great for areas where you can’t install a vent hood. They do require boiling with the lid on so that steam from the boil enters the discharge tube where it flows over a nozzle ejecting cool water mist. This causes the steam to cool, condense back into a liquid, and drain out of the bottom. Since the steam is condensing, it creates a slight vacuum in the boil kettle so no need to clamp on the lid. Another nice benefit to steam condensers is that they require about half of the power to maintain a boil than an open-top kettle. Subsequently, the amount of boil off is also reduced in half. Dimethyl sulfide (DMS) is not an issue with steam condensers as that is removed in the condensing tube. The mist used to cool the steam is generated by the high pressure of your tap water. A downside is they do use a decent bit of water, typically 1–2 times the batch size. Since the water does not enter the boil kettle you can use ordinary tap water. If you are in an area where water is scarce, it is possible to recirculate the condensed water using a high-pressure pump. However, if the water gets much over 120 °F (49 °C) it doesn’t condense the steam very effectively so you will need to change the water or add ice to it. The other drawback to a steam condenser is they do not eliminate as much of the aroma or heat as a properly designed hood.
Conclusion
Hopefully this article has demystified electrical power wiring for indoor electric brewing. While there are a lot of terms, acronyms, and potential hazards associated with electric brewing, breaking it into the fundamentals should give you the confidence to make the move to electric brewing. Whether you plan to install the infrastructure yourself or hire a professional, it’s valuable to know the basics. I can personally attest to how awesome electric brewing indoors is. No propane to buy. No blazing hot burners to deal with, whisper quiet efficient operation, and a perfect space to enjoy a homebrew with friends and family.