Ventilation: Proper Airflow in your Homebrewery

Having grown up in Northern Iowa I’ve always liked the cold winters, crisp air, and a blanket of snow covering the ground. Northern Indiana, where I live now, isn’t quite as cold but we still get the crisp winters and also the hot humid summers — neither of which are pleasant for brewing outdoors. Like most homebrewers, I started brewing on the stovetop in the kitchen — inside where there is heat and air conditioning. This was ok until I boiled over a few too many times, “stunk up the house,” and subsequently got kicked outside where I wouldn’t fill the house with amazing aromas or char wort on the kitchen stove. Unfortunately once I was outside it became a battle with the elements about half of the year. The garage provided some shelter, but it was still hot and humid in the summer, and cold in the winter even with the door cracked so that I wouldn’t get asphyxiated by carbon monoxide. Then of course there was the hauling of equipment and running in and out of the house for cleaning. So when our family grew, and it was time to move, the top feature on my list was a space in the basement for a brewery. When we finally found a place, I started the homebrewery design process. My wife’s only rule was that if it smells up the house I’m back in the garage. OK — deal accepted. So I went about doing some research on ventilation and installed a system that was fairly cost effective and worked quite well. Fortunately, I’m still brewing indoors and love it. (Although on nice days it is hard being inside!)
The goal of this article is to boil down the fundamentals of ventilation (pun intended) in easy to apply principles, and to give some straightforward construction guidance. There are massive amounts of technical documents available on the subject, and building codes galore that cover ventilation system design. And every installation is different. This article isn’t going to cover ventilation in that level of detail, but it will give you enough knowledge to install a system that will get the job done at a reasonable cost and make homebrewing indoors enjoyable.
The gist of ventilation is quite simple: Removing the aromas and harmful fumes is priority one. The second priority is to control the temperature and humidity of the work area for a comfortable brew day. Some easy to apply rules of thumb, some simple calculations, and a few examples will give you the information to install a simple but effective ventilation system in your homebrewery. Do realize that there are many local and state building codes that you may encounter when building a home ventilation project, and covering all of them is not feasible in this article. So use common sense and reach out to your local commercial heating and ventilating suppliers for additional advice on local codes and recommendations. I’ve also included a few resources at the end of the article if you’d like to dive into more detail.
The first thing to recognize when discussing ventilation is that it isn’t as simple as adding up your heat source power and multiplying by a factor. That is one of the estimations, certainly, but there are several factors that work together to develop a successful system. Proper ventilation design exchanges the air in the room frequently enough to keep fumes directed out of the room, and excessive heat at a comfortable level. In addition, you’ve also got to provide a hood that will drastically improve the effectiveness of collecting and directing the heat and fumes into the fan. And you’ll want to make sure you are exchanging the air in the room frequently enough for adequate comfort.

Factor 1: Heat Source Power
Heat load is the first factor we think of when sizing a ventilation system. There are two main ways to create heat for your homebrewery: Burners and electricity. Natural gas and propane burners are by far the most common heat source for homebrewers. But indoors, propane is a bit dangerous because of the higher quantities of carbon monoxide they create as compared to natural gas burners. Propane is heavier than air, and in a basement in particular, that represents a significant risk of explosion if your tank leaks. So never, ever store propane in a living area. Or better yet, convert to natural gas if you’re planning on brewing indoors. Most natural gas burners are low pressure and don’t create near the amount of carbon monoxide as propane. Commercial stock pot ranges usually carry certifications for indoor use, so if you’re moving indoors and want to stick with a direct fire system, I highly recommend you investigate purchasing a natural gas burner made for indoor use and plumb the gas to your brew area. Not only is it lower cost than propane, the utility is kind enough to pump it to your house, so no trips to fill up your tank before brew day.
The second option is electricity. Electric brewing is really growing in popularity as more brewers move indoors because it is thermally efficient, quiet, and very inexpensive to operate compared to propane. Electric systems also don’t require as large of a ventilation system. Why? Gas burners are typically about thermally 35–40% efficient. Meaning only 35–40% goes into your wort, and the remaining 60–65% heads directly into your ventilation system. With electric systems, virtually 100% of the energy is directed into your wort. So you’re only having to deal with fumes (aromas) and personal comfort in the room from the heat radiated off the kettle. For an example, let’s look at a typical 3-vessel 10-gallon (38-L) batch size system. For gas heat, you’ll likely have about 40,000-60,000 BTU/hr. of heat output on a typical burner for this size system. A BTU (British Thermal Unit) is the energy required to heat one pound of water one degree Fahrenheit. The rating of a burner is the BTUs of fuel you burn in an hour. This is not the amount that goes into the wort, rather it represents the power of the fuel that is burned. For the rest of the world that is lucky enough to use SI units it would be measured in kilowatts (KW). For reference, 1 KW is 3415 BTU/hr. So that 40,000–50,000 BTU/hr burner would be 11.7-14.6 KW.
The next consideration is whether you’re planning to run your HLT (hot liquor tank) burner at the same time as you heat your strike water in the mash tun, or your boil kettle as you sparge. If you do, you’ll have twice that amount of heat to ventilate. So think through your brew day and how you intend to operate the burners. Ventilation required is measured in CFM (cubic feet per minute) or M3/min. That is the volume of air that you are moving through the ventilation system. As a general rule of thumb, you’ll want to move about 1 CFM per 100 BTU/hr. based on the heat load factor. This will give you adequate ventilation. So given one 50,000 BTU/hr. burner you’ll want to have a system capable of moving about 50,000/100 = 500 CFM. If you’re running two of those 50,000 BTU/hr burners simultaneously you’ll want 1,000 CFM of ventilation.
Now let’s do the same for electric. A typical electric 10-gallon (38-L) system would be about 4,500-5,000 W per kettle. One KW is 3415 BTU/hr. So that factor becomes 3415/100 = 34 CFM per KW. So for a 5 KW electric heater that would require 5 X 34 = 170 CFM. So basically one third the amount of ventilation required! But when we finish talking about ventilation hoods and room air changes you’ll see that 170 CFM isn’t necessarily enough. That’s where the other factors come into play.
Factor 2: Air Velocity
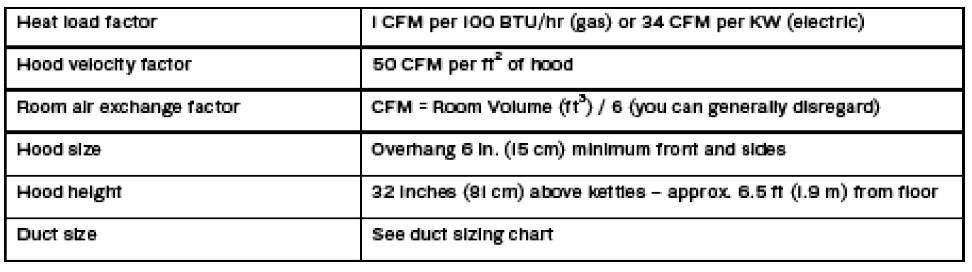
Air velocity gets the heat and fumes into the fan so we can blow it out of the building. That’s where a vent hood comes in. The purpose of a vent hood is to collect the fumes and direct them to the inlet of the fan or the duct leading to the fan. It isn’t enough to just put a fan in a window and hope the fumes find their way over to it and don’t migrate into the rest of the house. For best performance you’ll want the hood as close to the top if the kettles as possible while still having enough room to maneuver your stir paddle. In reality, though, having the hood super close is generally annoying. The typical recommended hood height in commercial applications is 6.5 feet (2 m) which avoids smacking your head or stir paddle into the hood. Ideally you’ll have about 32 inches (81 cm) of clear space above your kettle. The other rule of thumb is having the hood overhang the kettles by about 6 inches (15 cm) on the front and sides. If you can, having the sides of the hood extend down further (leaving the front higher) will increase the capture effectiveness. Note that with a gas-fired system you only need the hood to cover the heated kettles if you’re trying to keep your ventilation system size at a minimum. For electric systems, you really only need the hood to cover the boil kettle. The hood for the boil kettle will generally move enough air out of the room to carry away the small amount of radiant heat and fumes from the mash tun and hot liquor tank since they are covered almost all of the brew day. For a gas system, you’ll definitely want all heated kettles under the hood.
Once you’ve figured out your hood size we’ve got another rule of thumb to make sure the velocity of the ventilation air moving through the inlet of the hood is fast enough to capture and contain the fumes in the hood, otherwise the fumes will simply spill over the outside of the hood, enter into the room, and need to be collected again. A good rule of thumb to get the steam and heat into the hood, assuming your hood is against a wall, is to have a minimum of 50 CFM per square foot of hood. This assumes about 6.5-foot (2-m) hood height (about 32 inches/81 cm above your kettles), and 6 inches (15 cm) of overhang. So if you’ve got a 4-ft. wide by 2-ft. deep hood you’ll need about 4 X 2 X 50 = 400 CFM to keep the velocity of the air high enough that it doesn’t spill out of the hood.
Factor 3: Air exchanges
The final factor is room size to ensure you are exchanging the air in the room frequently enough for creature comfort. You’ll want to calculate the volume of your brewing room (L X W X H) in feet and divide by 6. For example, in a room that is 8 feet X 20 feet with 8-ft. ceilings (1280 ft.3) you will need 1280/6=213 CFM. My experience with homebreweries is that if you’ve sized your heat load and hood velocity factors correctly, the room factor is generally not an issue, even if you’re brewing in a large open basement. So don’t be over concerned if this factor is driving you into a much larger fan. It is OK to disregard it.
Final Sizing
Now that you’ve calculated the heat load CFM required, and the CFM required for proper velocity, choose the higher of the two for sizing your fan. Don’t add them together, just pick the largest one. And again, don’t worry too much about the room air exchanges in fan sizing. In our electric example above, we only need 170 CFM for the heat load of a single kettle but if my hood is 3 feet wide and 2 feet deep I’ll need 300 CFM to properly ventilate it. Still significantly less than that required for a gas burner.
Building Your System
Selecting a fan isn’t too difficult, nor does it need to be very expensive. A brand new duct blower can be had for $200–400 and can handle temperatures up to 140 °F (60 °C), which is generally adequate. Fantech and Vortex are a couple of manufacturers that provide duct fans. We installed a used furnace blower in our Blichmann Brew Lab and it works great! If using a furnace blower, note that they aren’t usually fully enclosed motors so do make sure you select a unit where the motor is externally mounted and not in the exhaust stream. Otherwise, you’ll burn your motor out quickly from the heat and steam. So keep your eyes open for a deal. It is important to know how much restriction a fan can handle and still put out close to its rated flow. If the fan output is borderline it is always best to oversize than to undersize. Some fans are also variable speed capable so you can easily dial down the flow if needed.
The next step is sizing the ductwork, which is fairly simple. Keep the distance from the hood to the exterior of the building as short as possible. The more restriction you have, the lower the actual flow from the fan will be. Avoid using flexible ductwork as the restriction is fairly high. Also, minimize bends as they increase restriction significantly.
Most blowers coupled with a proper duct size will handle about 100 feet (30 m) of equivalent lengths with minimal reduction in air flow. So add up the straight run lengths and the equivalent lengths of each elbow and make sure it is 100 feet (30 m) or less. If you have one 45-degree elbow, two 90-degree elbows, and 35 feet (11 m) of straight duct the total equivalent length is 5+10+10+35 = 60 feet (18 m). If you exceed the 100-foot (30-m) target, you’ll need to move up a duct size. The chart also includes the maximum recommended flow by round duct diameter. Some other considerations are to wrap all seams with duct tape (the aluminum foil type is best). Never use a bare joist cavity as a duct. While this is common with residential heating ducts, the steam and heat from your brewery will damage the wood over time. So always use a metallic duct inside the joist cavity. When exiting the building, you can install a large vent similar to your clothes dryer, but you can also install a simple door that can be latched closed to keep critters from entering. Another thing to consider when you design your duct system is noise. Duct fans tend to be a bit noisy. Duct silencers are available and they do an amazing job of quieting the fan noise traveling down the duct and into your brewery. You’ll want to install the silencer on the inlet side of the fan.
When looking for a hood, again, you have a number of economical choices. Commercial range hoods can be found used at commercial kitchen supply stores, but they are quite big and bulky. A mid-priced option is to have a sheet metal hood fabricated at a local sheet metal shop that does duct work. Galvanized steel is more than adequate. If you’re on a tight budget you can fabricate one from plywood, but do give it several coats of durable enamel so that the plywood doesn’t delaminate over time. Where possible slope the top so that it directs the fumes to the discharge duct. It’s even possible to use Plexiglas to fabricate a hood.
One thing that often gets overlooked is makeup air. If you’re moving 500+ CFM of air, that air has to come from somewhere. And that somewhere is the inside of your house. Unless you have a makeup air duct. Ideally you’d want to draw 80–90% of that air from an inlet air duct in the brewery that draws in outside air. That’s fine if you’re willing to spend a lot of money on a heat recovery exchanger and ducting to heat/cool the incoming air. Otherwise your brewery will get a little cool in the winter and hot in the summer — which defeats the whole point of brewing indoors! Since we aren’t operating a commercial brewery or kitchen in our homes, the best option is to have a small window or opening in your basement or brew room that you can crack open to let in some makeup air. This will relieve the vacuum created by your ventilation fan to allow the fan to move adequate air and not draw it all from your home. If the door to your brewery space is difficult to open, or slams with gusto, or you’re not getting the airflow you expected, you probably need more makeup air. It really doesn’t take much. I’ve never noticed a significant change in the temperature in our house while brewing, although the furnace or AC may run a little more than usual. Ideally you’ll locate a dedicated inlet duct a few feet or a meter from the hood, but this may not be practical or necessary in a residential installation. The other reason to keep the vacuum in your house down is a matter of safety. A negative pressure (vacuum) in your home may draw fumes from your furnace or water heater vent (for gas fired furnaces and water heaters), which will contain carbon monoxide. If you have a high efficiency furnace or water heater, the blower in them will create a forced draft and prevent that from happening. All that said, it is always a good idea to have a carbon monoxide detector and a fire extinguisher in your house, particularly if you’re using gas burners in your brewery or you have a gas furnace or water heater.
Pulling it all together, it sure seems like there are a lot of things to consider with brewery ventilation. But now that you’ve got a better understanding of the why and how of ventilation, and some simple rules of thumb, you can approach them one at a time and it isn’t that difficult. Brewing indoors was a game changer for me and I really enjoy the brew day much more. So roll your sleeves up and dig in.
Top: Once you’ve figured out your hood size, you need make sure the velocity of the ventilation air moving through the inlet of the hood is fast enough to capture and contain the fumes in the hood. Here is a diagram of hood velocity.