Hitting Target FG, Knowing Your OG and Magnesium Salts in Beer
Q I recently brewed a Pilsner using all-grain in a two-step brewing process. My two temperature points were 144 °F (62 °C) (beta-amylase) for 75 minutes and 158 °F (70 °C) (alpha-amylase) for 60 minutes. I used a pumpover with a stirring extraction method.
I used Wyeast 2278 (Czech Pils). The beer’s final gravity (FG) was 1.006 and it tasted excellent, but lacked body. The original Gravity (OG) was 1.042, and the fG was meant to be 1.010.
I was trying for a thinner beer but not this thin! Can you guide me on how long you should mash at 144 °F (62 °C) and 158 °F (70 °C) to manipulate the body of the beer? I fear I might be looking at this quite simplistically. Does the body of a beer have more to do with the type of grain used or possibly the yeast?
Greg Gibson
Gisborne, Australia

A It’s always great reading questions for brewers in other countries and doing a bit of traveling with the internet. Gisborne looks like a beautiful place to enjoy a nice Pilsner and hopefully some of the information here will help you out on your next brew.
For starters, your 1.042 OG is a bit low for classic Pilsners. Bumping the OG into the 1.048–1.050 range may be something to consider unless you specifically want a lower ABV and lower calorie beer. Alcohol and residual extract are both related to body, so simply increasing your wort’s OG will help some.
Now onto addressing your relatively high apparent degree of attenuation (ADF) of 86% (calculated by dividing the gravity points fermented by points in the wort, or 36/42 x 100). Reducing the length of your beta-amylase rest at 144 °F (62 °C) from 75 minutes to about 20–30 minutes should reduce your ADF into the low 80s. Rests ranging from 60–180 minutes are commercially used to increase the ADF for styles like dry and light lagers, where approximately 92% ADF can be achieved without using exogenous enzymes or diastatic yeast. For this brew, if your ADF had been 82% your finish gravity would have been 1.008, which is still lower than your target of 76% ADF (1.010). Looks to me that the target is not aligned with the recipe. 80% ADF is not uncommon these days for infusion-mashed brews. And that brings up the next topic.
Mashing profiles do different things to different malts. The two main factors in malt that influence how mashing affects wort are the degree of malt modification and the malt’s enzymatic strength. Modification is the malting term used to describe all changes occurring as barley is transformed from a dormant seed into malt and can be categorized using general terms: Poorly modified, under-modified, lightly modified, well-modified, and over-modified are useful for discussion purposes.
The two main factors in malt that influence how mashing affects wort are the degree of malt modification and the malt’s enzymatic strength.
Poorly modified malts are generally not acceptable for brewing purposes unless the malt is used like an adjunct, chit malt for example, or if the malt is a functional special malt, such as a foam-promoting malt. Meanwhile, over-modified malt is not something maltsters want to sell because over modification results in unacceptably high malting losses from excessive growth during germination. This leaves brewers with under-, lightly, and well-modified malts in grain catalogs.
Globally, most malt is either lightly or well-modified because these types work well in the brewery and can be consistently produced from modern barley. Breeding programs over the last 50 years or so have increased barley yield, enzymatic potential, disease-resistance, and overall agronomics. Many of these changes have allowed maltsters to deliver malt to brewers that is simply easier to use in the brewery.
Mash profiles these days are typically shorter and have fewer steps because malt modification within the kernel is more uniform, modification between kernels and batches of malt is more consistent, and enzymatic strength is generally higher than it was in the past. A real consequence of these changes is misalignment between modern raw materials and practices discussed in the brewing literature.
Let’s switch back to your question. You want to brew a Pilsner wort with about 76% ADF. Although yeast don’t define wort fermentability, strains that ferment maltotriose ferment more sugars than those that only ferment glucose, fructose, maltose, and sucrose.
Wyeast does not provide information about maltotriose fermentation, however, based on the typical ADF range for Wyeast 2278, it’s reasonable to assume that this strain does not ferment maltotriose. This means that mash control should allow you to limit ADF to under 80% using this strain. Modern malts being what they are, and assuming you are using a modern base malt, means that you may find skipping your beta-amylase altogether will get you close to where you want to be.
Yep, I am suggesting trying out a modern twist on the infusion mash. Aim for a mash temperature of about 153 °F (67 °C) for 45–60 minutes, then mash-off at 169 °F (76 °C) to denature enzymes and reduce wort viscosity. The main benefit to mashing-off is preventing enzymatic reactions from occurring during wort collection.
If infusion mashing is too extreme for Pilsner brewing, start your mash at 122 °F (50 °C), decoct about 50% of your mash, and jump from 122 °F (50 °C) to 158 °F (70 °C) to limit beta-amylase activity. The decoction is not needed for lightly or well-modified malt, but it is a handy way to blow past beta’s happy place while holding onto the tradition of decoction-mashed Pilsner.
Another way to dilute enzymes, essentially what happens during a decoction boil, is to use adjuncts like maize and rice. I’ll just drop the mic with that suggestion before I anger traditionalist brewers! Thanks for the great question.
Q I am a little bit obsessed with hitting targets, aka precision; some may call me a little anal retentive. Once I have something to aim towards, I want to hit the bullseye every time. One target, other than a flagstick on a golf green, that is frustratingly hard for me to hit is starting wort gravity. I’m an all-grain brewer of about 5 years and sometimes I can be within a point or three off, other times I can find my wort 10 points off from where I want to be. Can you suggest some things that may help me out?
Bob Anzalone
Mystic, Connecticut
A This is a tough one. I had to put my thinking cap on before sitting down to write this response out. I need to get one thing clarified before I jump into my suggestions. It’s tempting to jump down the rabbit hole of brewing efficiency when discussing nailing target gravity, but being efficient, or not, has nothing to do with hitting the OG target. There is a foolproof method to achieve your goal that only requires a good hydrometer or refractometer, a calibrated wort kettle, a uniform sample, and some simple math. Let’s tackle this task one layer at a time.
But before I jump into my method to hitting target original gravity readings I need to take a brief moment to discuss grain crush and mash uniformity. If you’re an all-grain brewer buying grains already crushed or crushing your own grains, just note that how fine your malts are crushed as well as grain size will have an effect on your mash efficiency. Consistency is key here so you have a general sense where you should land. Also, make sure your mash is well stirred when mixing brewing water into the grains. Dough balls will have a negative impact on your brewing efficiency.
Step 1
Do whatever you do to prepare your wort before boiling. Whether that’s a partial mash with extract added, a triple decoction, or an infusion mash with a few pounds of sugar added to bump your OG, do it. After you have all extract-contributing components added to your wort and all water in the kettle, including any last runnings dripping in from the mash tun, thoroughly, and I do mean thoroughly, mix your wort with a spoon or paddle. The goal is to make sure there are no dense pockets or weak pockets of wort. No need to splash about or make a big to-do while you stir, just be thorough.
Step 2
Take a sample of wort and measure your pre-boil volume. I am old-school and have three hydrometers, each with an 8 °Plato range (0–8, 8–16, and 16–24/gravity point equivalence: 0-32, 32–66, 66–102) and each with a built-in thermometer. Did I mention I like hydrometers? Once you take a sample, cool it down to room temperature or whatever temperature your device requires for proper use. While your sample is cooling, go ahead and begin heating your wort to boiling. Ideally, you want to cool your sample before you start boiling so you can adjust your hop weights if required or desired, but if you don’t plan on tweaking your hop calculations the wort sample and pre-boil volume is all you need.
Step 3
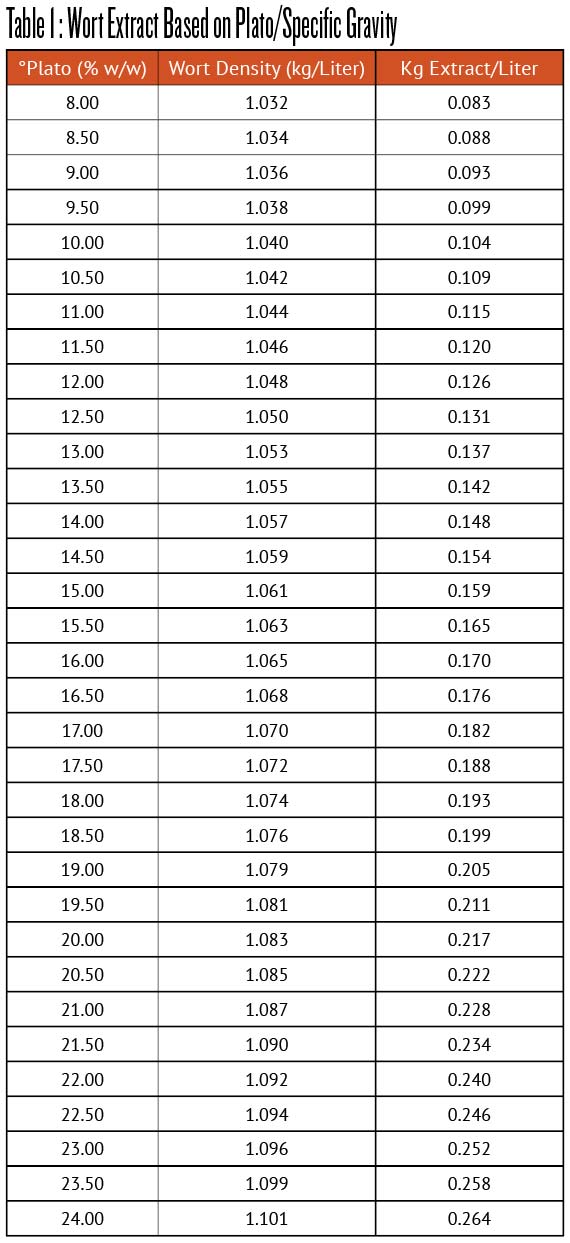
Calculate how much extract is contained in your kettle. This value is a constant and does not change during boiling unless you add malt, sugar, or extract, or spill part of your kettle. If you followed the directions in Step 1, the only reason your extract will change is through a spill. Let’s just agree that it’s a safe assumption that extract is a constant. An easy way to determine extract is by referring to the handy data shown in Table 1 and multiplying kg extract per liter by liters of wort (1 gallon = 3.785 liters; if your kettle is calibrated in gallons just divide your volume by 3.785 to convert to liters or calibrate it in liters).
If you want to do this long hand or write a spreadsheet, kg extract = (wort density) x (wort °Plato) x (liters of wort). Note that mathematical products of wort volume and wort strength (Plato), and products of wort volume and wort density don’t work as shortcuts for calculating extract; density and strength are both required.
Here is an example. Before the boil, you have 22 liters of wort, and your hydrometer reading is 10.5 °Plato/1.042; how much extract is in the kettle? We can see from the data table that the wort sample contains 0.109 kg extract per liter. And multiplying this by 22 gives us 2.4 kg of extract. We’ll come back to this value in a bit.
Step 4
Determine your final wort volume before boiling. To nail the target gravity, the only variable we can change is wort volume because extract is constant at 2.4 kg in our example and we want to hit our target, which, by the way, is 12 °Plato/1.048. Start by using the data table to determine that there is 0.126 kg extract contained in a liter of 12 °Plato/1.048 wort. We know we have 2.4 kg extract in the kettle and can determine the wort volume at 12 °Plato/1.048 wort by dividing 2.4 kg extract by 0.126 kg/liter. We want 19 liters after the boil. There are a few tips to make this all work out.
Tip 1 – Wort contracts when cooled but it’s easier to measure volume when it’s hot when we are still brewing. Nineteen liters of 68 °F (20 °C) wort equates to about 19.8 liters of 208 °F (98 °C) wort (19 ÷ 0.96).
Tip 2 – It’s a lot easier to add water at the end of the boil to bump up wort volume than it is to boil excess water away because too much was added in Step 1. This is where experience comes into play and helps determine how much wort to collect before boiling. And when cool water is added to hot wort, the wort contracts some and makes it hard to estimate cool wort volume. Using hot water to top up your kettle helps hit your wort volume and gravity targets when things cool down.
Conclusion
That’s it to this nailing your gravity discussion. If you have a well-mixed, pre-boil wort sample and know your pre-boil wort volume, you can determine your extract. Armed with this information and your target gravity you can determine how much wort you need to produce. Consistent brewing practices help keep adjustments minor and you can decide whether hop additions should be changed to track with changes in wort volume versus the recipe. But that’s a discussion for another day. Happy brewing!
Q I recently was told by another brewer I should not be adding magnesium to my brew water because of its laxative effects. Is this true? I’ve never heard of this being an issue. Also, how much magnesium does a person need to consume for that effect to kick in?
Anonymous Professional brewer
via Email
A According to the article “Can You Take Too Much Magnesium” published on the Medical News Today website, the National Institutes of Health recommends 310–320 mg as the daily magnesium allowance for adult women and 400–420 mg as the daily magnesium allowance for adult men. Although typical diets may naturally contain sufficient magnesium to satisfy daily recommendations, some people take dietary supplements for a variety of reasons including magnesium deficiencies associated with the modern diet.
The NIH recommendation for all people older than 9 is to limit magnesium supplements to 350 mg per day (this is above magnesium ingested from food and beverages). I don’t offer medical advice because I am a brewer, so please read up on magnesium if you want to know more about how it’s used by the body and why there is a recommended daily allowance.
It is well known that magnesium has a laxative effect on people when ionic magnesium, for example from salts like magnesium chloride and magnesium sulfate, is ingested above about 350 mg/day. And higher consumption rates above 350 mg/day usually leads to diarrhea. That’s why my friend does not want to add magnesium to brewing water. The related questions are: 1) how much magnesium is normally present in beer and 2) how much magnesium needs to be added to water to affect beer flavor?
Commercially brewed beers typically contain between about 40–150 ppm (mg/L) of magnesium. It’s hard to know how much of this magnesium is from the brewing water, but levels in water are typically below 40 ppm, meaning that the balance originates from other brewing ingredients, primarily malt. That’s a good thing because yeast do require magnesium for certain enzymatic reactions, and water devoid of magnesium need not be a concern.
The reason I am a fan of magnesium in brewing water is that it adds to the flavor of beer. At low levels, magnesium is hard to pick up, but is known to make water more refreshing. That may be why Dasani water adds a magnesium salt to its water. But when the concentration in water is increased to 20–40 ppm, magnesium adds a distinctive bitter-metallic flavor that can be detected in the finished beer. Why do all beers not taste like magnesium given the concentration in malt? It’s likely the form; magnesium in malt is largely bound or associated with proteins, nucleic acids, and bran. Plant physiology aside, magnesium added to brewing water affects beer flavor.
The easiest way to understand how magnesium influences beer flavor is to buy Epsom salt (magnesium sulfate heptahydrate) without any aromatherapy additives. Make up a solution in water and add a few drops to a beer for tasting. If you like what a bit of magnesium adds to your pint of beer, this salt may be a water treatment you should try in your next brew.
Back to the original concern, how much magnesium-spiked beer can the average beer lover consume without having gastric issues? Referencing the NIH recommendations, the maximum intake from supplements is 350 mg/L. If we consider magnesium added to brewing water as a supplement and set our level in brewing water at 35 mg/L, which is on the high side, a beer drinker would hit this maximum intake after consuming 10 liters, or (28) 12-ounce bottles of beer.
Like I stated earlier, I don’t provide medical advice. But I will wager a guess that most people will have problems much worse than a touch of the runs after consuming 28 beers in a day. Therefore, I suggest that adding a touch of magnesium to brewing water is not likely to cause gastrointestinal problems for the typical beer lover, even if your nickname is Joe Six-Pack. That’s my answer and I am sticking to it!