Hows and Whys of the Wort Chiller
When a bottle of homebrew fills a glass, the first impression of a well-carbonated, brilliantly clear beer fixes a warm smile upon the homebrewer’s face. Homebrewers constantly struggle to assure that the bright clarity of the boiling wort transforms time and again into sparkling beer. Quick and proper cooling of the wort after boiling will help the transformation from clear, boiled wort to crystalline, tasty beer.
In addition to aiding clarity, force cooling the wort has two other important benefits: reducing the chance of contamination and reducing the effects of DMS (dimethyl sulfide), which can contribute cooked-corn aromas to beer.
Time Is of the Essence
After the wort temperature falls below 140° F (60° C) and before fermentation activity can be observed (60° to 75° F) marks the most dangerous time in the beer’s life cycle because of the high risk of contamination by wild yeast and bacteria. To reduce the risk, the wort should spend as little time as possible in this stage. Force cooling the wort quickly so yeast can be immediately pitched lowers the risk of contamination.
The hot wort must also be quickly cooled to lower the production of DMS and the possible off-flavors it can contribute. Large amounts of DMS are produced during the boil but evaporate into the air with the hot gasses. When boiling stops, so does the removal of DMS. However, DMS continues to be generated in the hot wort. DMS produces an aroma and flavor like sweet canned corn. The longer you wait before cooling and the longer cooling takes, the more DMS will linger in the finished beer.
Clearing the Wort
Controlling break material during the brewing and chilling process is the trick to maintaining consistent clarity in the finished product. Without proper control this material will remain in the beer, creating a chill haze in which the beer appears slightly cloudy when held to the light. Chill haze is formed when protein and tannin molecules break out of solution to form particles that dispel light when viewed. Unless gathered in large, coagulated lumps during the boiling and cooling process so that it can be removed from the wort, this material will remain in the beer.
Almost immediately after the rolling boil begins, you can see the hot break formed as chunky gray matter in the wort. A vigorous, rolling boil is very important at this stage to force protein molecules and tannins to bounce into each other, slowly coagulating and forming the hot break.
The cold break, formed during the cooling process, can be seen as the cloudy plumes of material that waft down to the bottom of the fermenter immediately after transfer. All
coagulated material formed during the hot and cold breaks is called trub (pronounced troob). If possible, do not transfer trub into the fermenter with the wort.
Force cooling the wort to at least 60° F (15.5° C) maximizes optimum break. The quicker and colder you force cool the beer, the more proteins and tannins are precipitated out of solution into break material.
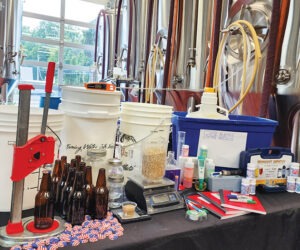
Homebrewers primarily use three different methods to cool wort: ice bath, immersion chilling, and counterflow chilling. Some homebrewers use a combination of the three for rapid cooling. All three methods use cold water in some fashion, and it is very important to ensure that the water, which has not been sanitized by boiling, never comes in contact with the wort.

Ice Bath
Placing your kettle in a tub of ice-filled water is the cheapest and easiest form of chilling. Wort cooling occurs as the sides of the kettle are cooled by the cold water that surrounds it. The water needs to be stirred so that a constant flow of cold water surrounds the hot kettle. Cooling from 210° F (99° C) to 60° F (15.5° C) takes about 11/2 hours.
Advantages to using the ice-bath method are that it is inexpensive, it is relatively simple, and it can result in the cleanest bathtub in town.
One drawback to the method is the relative length of cooling time, during which DMS production continues and the risk of contamination is high, compared with the other two methods. With ice baths both the hot and cold break usually end up in the fermenter, which can lead to chill haze from the large amount of trub. These drawbacks compel homebrewers to choose either counterflow or immersion wort chillers because they are more efficient and reliable than the elementary method of ice bath.
Immersion Chilling
Immersion wort chillers are made from 20 to 40 feet of copper tubing coiled in a circle with in and out fittings rising up, resembling two snakes somewhat entwined. A garden hose is attached to the in fitting and another garden or plastic hose to the out fitting. The assembly is placed in the wort and then cold water is run through the chiller.
To maintain sanitary conditions, clean the outside of the chiller with a reliable cleanser, such as trisodium phosphate (TSP), rinse, and immerse the chiller in the just-boiled wort. Placing the twined copper tubing, empty of water, in the boiled wort for 10 minutes will sanitize the chiller.
The in- and out-fitting tubes are intentionally long at one side so a cover can be secured to the kettle to lower the risk of contamination by airborne contaminants. Stirring the hot wort with the chiller assures that the chiller comes in contact with all the hot wort. Use a hot pad on the out tube, which becomes quite hot.
Cooling from 210° F (99° C) to 60° F (15.5° C) with an immersion chiller takes about an hour. Many homebrewers combine ice bath with immersion to lower the cooling time to 30 minutes.
You can make your own immersion chiller. Check your local homebrew retailer for examples, instructions, or advice. The only things you’ll need to purchase are 3/8-inch-outer-diameter copper tubing, two fittings, and enough basic plumbing equipment to bend the copper into coils and attach the fittings. The amount of tubing you need depends on the size of your kettle and on your pocketbook — 40 feet twisted into coils will chill wort faster than 20 feet. Immersion chillers are somewhat inexpensive; the tubing averages $1 per foot at homebrew stores.
One of the largest advantages of immersion chillers is the simplicity of sanitizing the chiller in the hot wort. Once the wort is cooled and transferred and yeast pitched, cleaning only requires rinsing the outside of the chiller while emptying the tubes of water. Immersion chillers work in kettles with and without a welded gravity line-out to the fermenter.
Drawbacks include the length of time to cool the wort and the difficulty of assuring that most of the hot break will not end up in the fermenter. A line-out (spigot) welded to the bottom of the kettle to gravity feed the cooled wort to the fermenter helps control break material. Stirring the hot wort for about three minutes immediately after the end of the boil will generate a whirlpool that will cause the precipitated break material to settle into an island that should fall just below the line-out.
Counterflow Chilling
Counterflow chillers run hot wort through a coiled copper tube usually lined out from the kettle while cold water runs in the opposite direction within a larger plastic hose surrounding the copper tube. A garden hose attaches to a line-in to force cold water through the plastic hose and around the copper tube containing the wort. A line-out attaches to another garden hose dispensing the water. One end of the copper tube drops the cooled wort into the fermenter.
Cooling from 210° F (99° C) to 60° F (15.5° C) with a counterflow chiller takes 15 to 20 minutes.
But first, the chiller must be properly cleaned and sanitized for each use. The simplest method involves forcing a gallon of boiling water into the copper tubing with the plastic hose empty of water and letting the water sit in the copper for 15 minutes to effectively sterilize the inner surface of the chiller. To use the chiller turn on the water, fix the line-out end of the copper tube into the fermenter, and cool the wort.
Once the wort is cooled and transferred and the yeast pitched, cleaning requires running another gallon of hot water through the copper tubing. This removes all traces of wort, eliminating the risk that future brews will be contaminated by the chiller.
Mechanically inclined homebrewers can manufacture a counterflow chiller by purchasing a long list of fittings, hoses, copper tubing, plastic tubing, copper end caps, and hose clamps. Some homebrew stores sell kits containing two “T” fittings and four hose clamps. Only copper and plastic tubing are required to complete the assembly. Because the counterflow chiller is the most difficult chiller to manufacture from scratch or with a kit, the mechanically disinclined might consider purchasing one ready to use.
While siphoning hot wort through the chiller into a fermenter is possible, the counterflow method really requires a line-out from the kettle. The whirlpool effect described above will assure that little if any hot-break material enters the fermenter. Because the wort will be rapidly cooled, cold-break material will gather in large clumps at the bottom of the fermenter.
Advantages of the counterflow chiller include rapid force cooling of the wort. For pilsners and light lagers counterflow will bring the wort to optimum pitching temperature fast while limiting DMS production below the taste threshold. Break material is contained and controlled more than with any other chilling method.
Drawbacks include the sanitation issue. Many homebrewers will not use a counterflow chiller because a trace of wort, and possible contamination, could remain behind in the lines after repeated use. The equipment is somewhat difficult to make from scratch and the most expensive when purchased retail, including the added cost of a line-out kettle, which is
practically mandatory.