Lager Tools and Techniques: Techniques

Most homebrewers ferment their lagers at 50–55 °F (10–13 °C), although some lager yeast strains will perform well at temperatures as low as 46 °F (8 °C). In addition, “steam” lager yeasts can be used up to 65 °F (18 °C). Later, you need to condition, or lager, it at below 40 °F (4.4 °C) for a few weeks.
An unfrozen freezer
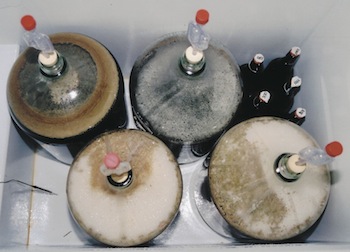
One solution to the problem of maintaining proper fermentation and lagering temperatures is to get a dedicated brewing fridge or freezer. Most full-sized refrigerators will hold two carboys or three Cornelius (“Corny”) kegs. Chest freezers vary in size and can hold from one to several carboys and cost less than a fridge. The only disadvantage of a chest freezer is that you have to bend over to move full carboys in or out of the freezer. There are, however, carboy parkas or strap haulers that make this easier. When using a chest freezer for brewing, you should apply waterproof caulk to the bottom, inside edges of the unit. This will prevent rust from forming in the seams due to condensation runoff.
Refrigerators or freezers, however, can’t maintain temperatures in the 50–55 °F (10–13 °C) range. To use them, you need to override their built-in thermostat with an external unit. I have a Johnson Controls thermostat, sold at many homebrew shops for around $50 (U.S.).
More Yeast
When brewing a lager, the first thing in your procedure that is different is the volume of yeast starter you need to make. Lagers require more yeast than an ale does to ferment properly. The optimal pitching rate for a lager is twice that of an ale. To get this many yeast cells, make a 1 gallon (3.8 L) yeast starter by boiling 12 oz. (0.34 kg) of dried malt extract in a gallon of water for 15 minutes. This makes a wort of SG 1.035. Cool the wort to 70 °F (21 °C) and pour it into a clean, sanitized jug. After aerating well, pitch the yeast and let it ferment for 3-4 days at room temperature. On brewday, decant the beer from the starter and pitch the yeast sediment.
More cooling
On brew day, the first procedural difference you will encounter — unless you do a step mash or decoction mash, which are used in the production of some lagers — comes at the wort cooling stage. Lager fermentation temperatures are much cooler than that of ales and thus you need to cool your wort more. If your tap water is at least 10 °F (5 °C) lower than lager fermentation temperatures, this is no problem — just leave the immersion chiller submerged awhile longer or slow the flow of wort through your counterflow chiller. If, however, your tap water is equal to or warmer than lager fermentation temperatures, you will have to cool it before you run it through your wort chiller. The easiest way to do this is to use a pre-chiller. A pre-chiller is simply a separate immersion chiller that precedes your main wort chiller. Dunk the pre-chiller in an ice bath once you reach the point that your tap water is no longer effectively cooling the wort. Swirling the pre-chiller around in the ice water — or circulating cold water with a pump — increases the effectiveness of the pre-chiller.
When you first put your carboy in your lager fermentation chamber, take care to avoid suck back in your fermentation lock. When you put a carboy in your fridge or freezer, the air in the headspace will likely be warmer than its surroundings (unless you are brewing outside in cold weather). Once in the fermentation chamber, the air will cool down and contract. This can pull liquid from your fermentation lock into the beer. To avoid this, use a sideways “S” shaped lock instead of the three-piece “jiggle hat” lock. And, use only a small amount of water in your “S” lock. If you add just enough to barely seal the bottom of the lock, it will gurgle backwards instead of pulling the column of water into the beer. Once fermentation starts, add a little more water to the lock.
More stink
Once you’ve pitched your yeast, fermentation should begin within 24 hours. At that time, you will notice something you didn’t when brewing ales — lager stink. Lagers give off an unpleasant sulfury smell as they ferment. Don’t panic, as some first-time lager brewers have done, and pour out the beer because you think it’s contaminated. It’s supposed to smell that way.
Keep the temperature constant during fermentation and the yeast will steadily reduce the beer’s specific gravity. Near the end of fermentation, however, the rate of attenuation may slow a bit. This is a good time to raise the temperature and perform a diacetyl rest.
Reducing diacetyl
As beer ferments, yeast excretes a molecule known as alpha acetolactic acid. In wort, this molecule gets oxidized to diacetyl — a substance that lends a buttery or butterscotch character to beer. In some ales, this is a desired (or tolerated) trait; in lagers, diacetyl is undesirable. (Note: because Pilsner Urquell currently shows a bit of diacetyl, some people think it belongs there. Others believe the brewery has a contamination problem they haven’t fixed yet.) In most ales, the yeast absorbs diacetyl such that it is below the flavor threshold at the end of primary fermentation. In many lagers, however, this is not the case. They are noticeably diacetyl-laden after primary fermentation. The traditional way of dealing with this problem was to kraeusen the beer, then lager it for extended periods of times, with 3 months being typical. Kraeusening is the process of adding vigorously fermenting wort to nearly fully attenuated beer. Typically, brewers would add an extra 10% of fermenting wort to their almost fermented beer. The wort added was at or near the most vigorous stage of fermentation and the active yeast helped to both absorb diacetyl and to fully attenuate the beer.
Few homebrewers perform kraeusening because it requires some extra planning. If you want to, siphon roughly 2 qts. (2 L) of cooled, unaerated, unpitched wort to a sanitized container. Cap lightly enough so that air can get in and out of the container and put it in your refrigerator. The next day, tighten the cap. Three or four days before you kraeusen, take the wort out of the fridge, let it warm to lager fermentation temperatures, then aerate and pitch the wort with the yeast you used in your main batch of beer. Put a fermentation lock on the “kraeusen starter” and put it in your lagering chamber. Add it to your beer when it’s vigorously fermenting.
The modern approach to diacetyl reduction is to use a diacetyl rest. To do this, allow the temperature of your lager to rise to 60 °F (16 °C) before cooling the beer for lagering. The amount of time spent in a diacetyl rest varies, typically from 2 to 4 days. The ability of lager yeast to absorb diacetyl is somewhat unpredictable. Sometimes they do so quickly; other times it takes longer than expected. It’s better to take a small sample and taste for diacetyl than simply relying on timing. Once you can no longer taste diacetyl in your beer, you are ready to lager.
Racking to secondary
Once your diacetyl rest is complete, rack the beer to your secondary fermenter and prepare for lagering. You may notice a couple differences from racking ales. Because lagers are fermented colder, they retain more carbon dioxide (CO2) than ales do. They aren’t carbonated to the level a finished beer is, but you will probably see bubbles breaking out of solution as you transfer. I tap my racking cane to dislodge these bubbles clinging to the inside of the tubing. I do not want them to “grow” and break the siphon. Another difference I’ve noted is that sometimes the tubing on my racking cane gets very rigid as the cold beer moves through it and this makes it harder to get the outflow end of the tubing to the bottom of the receiving carboy. If this happens, tilt the receiving carboy to receive the first bit of beer with a minimum of splashing. This only happens when I use “hard” vinyl tubing I get at the hardware store, not the “soft” tubing usually sold at homebrew stores.
Since the lager is going to condition for at least a few weeks, it’s best to rack it to a carboy with as little headspace as possible. This lowers the amount of oxygen that will come in contact with the beer. Once you’ve racked the beer to secondary, it’s time to begin cooling. Optimally, you want to cool the beer down by a couple degrees Fahrenheit per day. This is easy to do with a chest freezer and external thermostat; just change the set point on the thermostat once a day. If you can’t cool gradually, crash cooling will also work.
Once you reach lagering temperature — below 40 °F (4.4 °C), but as low as 30 °F (-1.1 °C) — let the beer sit until it has conditioned. During this time, many things happen to the beer. However, as the brewer, there is nothing to do except wait. You can accelerate conditioning time slightly by fining for proteins or tannins, or filtering out the beer’s chill haze, once it has formed. Most commercial lagers spend less than a month at the brewery. As a homebrewer, you can let your beer age a little longer — from around 6 weeks for average-strength beers to several months for big lagers such as doppelbocks or Baltic porters.
Once the beer is lagered, you can rack it over to a keg. As it was stored cold, it will likely have retained some carbonation and will only take a day or so under CO2 pressure to be ready to serve. If you bottle condition your beers, you will need to store them at room temperature for a few weeks. Test for carbonation by opening one bottle before refrigerating the remaining bottles.


