Lautering Techniques
Whatever type of mashing you use, the end result is the same — you end up with wort (unfermented beer). Problem is, your wort is combined with the spent grains and — to paraphrase the band Offspring — you gotta get ’em separated. The process of separating the wort from the spent grains is called lautering, from the German word for clarifying.
Lautering Options
When lautering, there are three options a brewer can choose from: no-sparge lautering, batch sparging or continuous sparging. Sparging is the process of adding water to the mash during the wort collection process. Sparge water rinses sugars from the grain bed and allows the brewer to get more extract from his mash.
As the name implies, when no-sparge lautering the brewer does not rinse the grain bed with sparge water. Instead, he or she simply drains the existing wort from the mash and brews with that. No-sparge brewing is quick and simple, but not as efficient as using a lautering program that includes sparging. It also requires you to adjust your recipes to account for the loss in efficiency. For a complete discussion of the no-sparge method, see John Palmer’s article, “Skip the Sparge!” in the May-June 2002 issue of BYO.
Batch sparging is the process of adding sparge water only after the lauter tun has been run dry (or nearly so) of wort. In a typical batch sparge brew, the brewer will drain the initial wort from the mash (called the first wort) and begin heating it. He will then add hot water to the grain bed, stir it up and draw off a second wort. The specific gravity of the second wort will be considerably lower than that of the first wort. This second wort can be added to the first wort, or used to make a second, lower-gravity beer. Batch sparging is often used when brewing a high-gravity beer, such as a barley wine, as a way to use sugars from the mash that would otherwise go to waste.

Most homebrewers use the continuous sparging method when they brew. Unless otherwise noted, all-grain recipes assume that the brewer will use this method. In continuous sparging, hot water is added to the top of the mash at the same rate wort is drawn off from the bottom.
Getting started
If you have a separate lauter tun, you will need to transfer the wort to your lauter tun first. Either scoop your mash with a large scoop, such as a beer pitcher, or simply pour it into the lauter tun. In commercial breweries, the mash is usually pumped to the lauter tun.
Most homebrewers, of course, use a combination mash and lauter tun. Picnic coolers, modified with slotted manifolds, are a common choice for many homebrewers. Brewpots or kegs modified with false bottoms are also popular. For 5-gallon (19-L) batches, it’s best to have at least 10 gallons (38 L) of space in your lauter tun. If you commonly brew high-gravity batches, you will need more room.
The grain bed depth during lautering should optimally be 9–12 inches (23–30 cm), with 20 inches (51 cm) being the maximum depth. If the depth is greater than this, you can collapse the grain bed and stop the flow of wort.
Your lauter tun should have a valve that controls the flow of wort out of the vessel. During lautering, this valve will only be partially open. Most homebrewers use Tygon tubing to direct wort from the valve to their kettle (or to an intermediate vessel that is then dumped in the kettle when full). Tygon tubing is heat resistant.
Recirculation
In the first stage of lautering, the brewer draws wort from the mash and adds it back on top to recirculate the wort through the grain bed. This allows the grain bed to filter out particulates. Recirculation should proceed for about 20 minutes. During this time, you should aim to recirculate 50% or more of the wort. For an average- strength 5-gallon (19-L) batch, this means circulating at least one half gallon (1.9 L) of wort every six minutes or so. Commercial brewers also recirculate for about 20 minutes, but they typically only recirculate around 20% of the wort.
I recirculate by running the wort into a beer pitcher and pouring it carefully on top of the mash when the pitcher is full. A second pitcher collects the run-off while I’m pouring with the other. I begin by opening the valve and adjusting the flow rate until I’m gathering wort at the rate I desire. Some brewers recirculate using a pump to move the wort.
As you recirculate, your wort should change in appearance from cloudy to mostly clear. After some recirculation, you may notice some gray “fluff” on top of your grain bed. Don’t worry, this is normal. The fluffy material is actually a mixture of proteins and lipids.
Initial Wort Collection
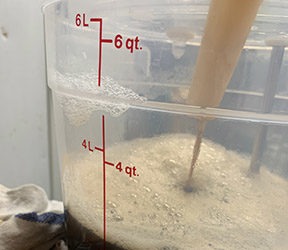
Once recirculation has finished, you are ready to start collecting the wort. The total amount of time it takes to collect your wort should be about 90 minutes. For an average strength five-gallon batch, this means collecting about 7–9 ounces (207–266 mL) of wort per minute. For higher-gravity beers, you will run off more wort per unit time. To figure out the rate at which you should collect wort, divide the amount of wort you will collect by 90 minutes. For example, if you are going to collect 5.5 gallons/704 oz. (21 L) of wort, you will need to collect 7.8 ounces (233 mL) per minute.
If your wort collection takes less than 90 minutes, you’ll lose efficiency and leave some wort sugars behind in the grain bed. Slowing the flow of wort and drawing out your wort collection past 90 minutes will increase your efficiency, but only slightly. As you run off your wort, taste a little bit of the early run-off — it should taste malty sweet.
To begin collecting wort, adjust the valve so you slow down the flow of wort and direct the wort to your kettle. If your mash tun is situated above the level of your kettle, you can simply run the wort straight into the kettle. If not, you can collect the wort in a beer pitcher or other container and add it to your kettle. Keep the outflow end of your tubing under the liquid level in your kettle or intermediate container to avoid splashing the wort. As you begin collecting wort, the liquid level above the grain bed will start falling. Before it falls below the top of the grain bed, it will be time to start rinsing your grains with water (sparging).
Sparging
Your sparge water should be heated to 168–170 °F (76–77 °C). The hot water keeps the grain bed warm and effectively washes sugars from the grain bed. Over 170 °F (77 °C), however, and tannins from the grain can be extracted by the hot water. Excess tannin in a beer causes an undesirable grainy, puckering flavor. Excess tannin extraction is most likely to occur towards the end of wort collection, when the pH of the wort in the grain bed has risen to around 5.6–5.8. So be very careful to watch the temperature of the sparge water towards the end of your sparge.
You will need an amount of sparge water roughly equal to the amount of wort you expect to collect. As such, you should begin heating the water while you are recirculating. On your basic stovetop, it can take as long as two hours to heat five gallons (19 L) of water to 168 °F (76 °C). If you have a propane burner, it may only take 20 minutes or less.
You can apply sparge water by carefully pouring it on top of your grain bed as you proceed. I sometimes use a beer pitcher to apply sparge water. Pouring the sparge water by hand has the benefit of making it easy to get an even flow through the mash bed. For every pitcher of wort I run off from the grain bed, I add a pitcher of sparge water on top. Simple.
You can also apply sparge water with a “sparge arm.” A sparge arm is a device that acts as a sprinkler. The sparge arm is connected to a hot water tank and applies sparge water at an even rate. My sparge arm is a spinning, upside down “T.” I connect it via Tygon tubing to my bottling bucket, which I fill with hot water. I regulate the rate of water flow by a clamp on the tubing. The benefit of a sparge arm is that you can “set it and forget it.” Once you get the flow rate adjusted, you can just let it sprinkle water over your grain bed as you collect wort. The drawback of a sparge arm is that you can lose a lot of heat as the water travels through the tubing and falls through the air. Also, it can take awhile to get the flow rate adjusted.
You can also direct hot water to the top of your mash by simply laying the outflow end of your Tygon tubing on top of your grain bed.
When to Stop
As you continue to collect wort, the wort will get lighter in color. It will also drop in gravity and raise in pH. There are two different signals that it is time to stop collecting wort. You should stop when the specific gravity of the run-off drops below a specific gravity of 1.008-1.010. (You will need to cool your wort sample when using a hydrometer.) Alternately, you can quit collecting wort when the pH rises to 5.8. At pH values higher than this, the extraction of tannins increases.
You can estimate how much wort you will collect before you hit the cut-off point. This will help you plan your run-off rate and the amount of sparge water to heat. I collect about 1 gallon of wort per every two pounds of grain (about 4 L per kg) before I hit the cut-off point. (So, for example, for 10 pounds (4.5 kg) of grain, I’d collect 5 gallons (19 L) of wort.)
For high-gravity beers, your cut-off point may come at a volume much greater than your batch size. If this is the case, you have a couple options. You can collect all your wort and boil it until you reach your batch size. Alternately, you can quit sparging when you reach your batch size plus the amount of liquid you expect to evaporate in the boil.
If you brew lower-gravity beers, you may have less volume of wort than your batch size when you stop sparging. If this is the case, add water to make your batch size plus about 10–15%. For example, if you quit collecting wort and have 4.5 gallons (17 L) collected, add a gallon of water to the wort and begin boiling. The liquid volume above your batch size is what you expect to evaporate during the boil.
I usually heat my wort to just short of boiling as I collect it. Then, when the last drops of wort are run off, I can turn up the heat a bit start boiling almost immediately. I use the time during the boil to empty and clean my mash tun. Trust me, you do not want to smell a mash tun full of day-old grain.
Stuck mash
It is possible, in some circumstances, for the mash to become stuck. When a stuck mash occurs, the grain bed is compacted and the flow of wort from the grain bed slows and stops. Although there are a variety of ways to get a stuck mash flowing again, it’s best to simply avoid the situation to begin with. Usually, a stuck mash is the result of running off the wort too quickly. If you collect your wort at a slow, steady rate (as given above), you should have no problems. Your extraction efficiency will suffer of you collect your wort too quickly, so what’s the hurry? In addition, if your grain bed cools significantly while you are collecting your wort, you will increase your chances of a stuck mash.
Some grains, such as wheat and rye, have the reputation of contributing to stuck mashes. When using these grains, some brewers recommend adding a small amount of rice hulls to the mash, usually one or two cups per five gallons (19 L). However, this really isn’t necessary if you simply go slow.
If you do end up with a stuck mash, there are a couple fixes. First, try to reverse the flow of wort through the grain bed. You can take the outlet tubing and blow into it to attempt to back up the wort a small amount. If this doesn’t work, you can cut the grain bed. Take a big knife and cut a criss-cross pattern across the top of the grain bed. If this doesn’t get the mash flowing, stir the mash thoroughly and begin lautering over. You will need to recirculate again, so stirring the mash should be a last resort.
The flow of wort can also slow or stop if the valve gets clogged. If this happens, simply open the valve all the way until wort starts flowing again. Then, quickly adjust the flow rate to it’s proper level.
Between recirculation and sparging, lautering occupies a large portion of an all-grain brew day. Plan for success by calculating the amount of water you’ll need, and taking your time when collecting your wort, will help things go smoothly. If you do this, you will have — to once again paraphrase Offspring — one fine brew day.