Make Your Plastic Bucket Fantastic
When it comes to choosing a primary fermenting vessel for your carefully planned and executed recipes, plastic buckets are often at the bottom of many homebrewers’ lists. Buckets are widely regarded as inferior to glass carboys for a number of reasons: you can’t see what’s going on during fermentation, airlock activity is hit-or-miss due to a lack of an airtight seal, interior scratches could lead to contamination, the lids are difficult to remove, etc.
There are, however, also some compelling reasons to use plastic. It is much lighter than glass and handles rapid temperature changes without cracking. More importantly, if you drop a plastic fermenter, the worst that can happen is a big mess. A dropped glass carboy, on the other hand, can be very dangerous and may result in nasty cuts or trips to the emergency room. (The next time you visit your favorite online homebrew forum, ask about glass carboy horror stories.) Plastic buckets are also easy to clean because you can reach in and wipe down the interior. Plus, it’s easy to take gravity and tasting samples with such a wide opening compared to the thin neck of a glass carboy. They are also pretty darn cheap.
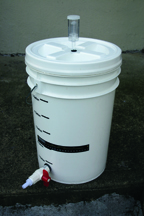
But while the pros and cons of plastic buckets are fairly evenly split for most brewers, a few simple and inexpensive modifications can eliminate a few of those negatives and make buckets an attractive option for primary fermenters. By adding an airtight, easy to remove lid and a plastic ball valve, the lowly bucket gains a lot of utility and gets a real boost in street cred, and it looks cool.
Necessary Components
• A 6.5-gallon (25-L) brewing bucket (if starting from scratch)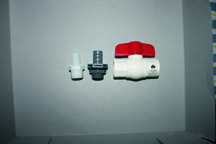
• Gamma Seal lid
• 1⁄2-inch plastic ball valve
• 1⁄2-inch plastic bulkhead fitting
• 1⁄2-inch nylon threaded hose barb
• Teflon pipe tape
• Bucket lid grommet or rubber stopper with hole (if starting from scratch)

Gamma Seal lids are widely available online and cost about $8 plus shipping. The other items are readily available at your local homebrew or hardware store. The ball valve and hose barb fitting can be found in the plumbing department, while the bulkhead fitting (grey plastic) will be found in the outdoor electrical wiring section near the waterproof switch boxes.
You’ll need a drill and bits capable of making a 1⁄2-inch and 7⁄8-inch hole. A rubber mallet and Dremel tool are also handy, but aren’t required.
Make it Airtight!
The stock lid that comes with the standard brew shop bucket can be . . . not so effective. These lids generally do not sit totally flush on the bucket, leading to small leaks during fermentation. This doesn’t cause sanitation problems, but it does dramatically reduce or totally negate the frequency of bubbles going through the airlock. Many brewers use the rate of bubbling through the airlock as a way to measure the progress of primary fermentation. On top of being relatively leaky, stock lids are also notoriously difficult to remove.
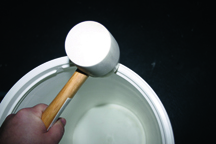
Enter the Gamma Seal lid, which comes in two pieces: the snap-on base and the screw-in lid. To install, press the base onto the rim of your bucket until it sits flush. Press down hard all the way around the base to insure a tight seal. If you have a rubber mallet, lightly tap along the top edge of the base. Using a mallet will guarantee a tight fit without damaging the base.
The Gamma Seal was not designed for homebrewing, so the lid does not have a hole for an airlock. No problem. Drill a 1⁄2-inch hole in the lid wherever you prefer. Now, if you’re converting your old bucket, hijack the rubber grommet from the lid and slip it in the hole you drilled in the Gamma Seal lid. If this is a new project, use a tapered stopper with a hole, or a new bucket lid grommet (available at some brewing supply and hardware stores).
Ball Valve
Using a bottling bucket as a primary fermenter is nothing new; homebrewers have been doing it for years. But a ball valve adds a little something extra in the form of more precise flow control, a sturdier contruction than bottling spigots, and the ability to use screw-in attachments (such as a hose barb or quick disconnect fitting). The biggest advantage of a ball valve on your bucket is that you can forget all about racking with a cane and siphon. Just open up the valve and let gravity pull your sweet brew to the secondary fermenter or bottling bucket. Keep in mind, however, that long-term storage (months) of beer in a plastic bucket may lead to oxidation.
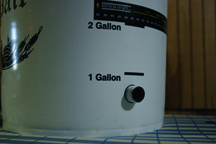
First, mark a dot about 1.5 to 2 inches (3.1 to 5.1 cm) up from the bottom lip of the bucket with a permanent marker. By setting up the valve at this height, the trub and yeast that settle out during fermentation will be below the valve’s intake and won’t be disturbed when the beer is racked. If you want maximum wort-saving efficiency (at the expense of clarity), mark the hole a little lower. Now drill a 7⁄8-inch hole, using the dot as the center point.
Unscrew the nut and remove the rubber O-ring from the bulkhead fitting. Wrap the bulkhead’s threads with a generous amount of teflon pipe tape. From inside the bucket, insert the threaded end of the bulkhead through the hole. If the hole isn’t quite large enough, widen it with a Dremel tool with a sanding drum.
With the threads through the hole, slide the O-ring over the threads and push it flush with the bucket. Screw on the nut and tighten it until the O-ring gets slightly flattened. Do not over tighten. When the bulkhead is installed, wrap the threaded end of the nylon hose barb with pipe tape and screw it into either end of the ball valve. Now screw the ball valve into the bulkhead until it is snug. Hand tighten only. Plastic is more delicate than brass or stainless steel. Too much torque will break the threads. Given the low cost of a bulkhead fitting (about $2.50), it’s a good idea to buy an extra just in case. Be sure to test the integrity of the ball valve by filling the bucket at least half way and letting it sit with the valve closed for about half an hour to check for leaks.

Before and after each use, it’s a good idea to break down the valve and soak it in a sanitizing solution. Taking a few minutes to sanitize the parts helps mitigate potential contamination. Most ball valves have a threaded end (called a Dutchman) that must be “broken” with a very large wrench the first time. This should be done PRIOR to mounting it on your bucket. Once you disassemble the valve, reassemble it hand-tight, then attach to the bucket with this end out. Cleaning becomes easy — close the valve, un-screw the Dutchman, drop out the ball and flush.
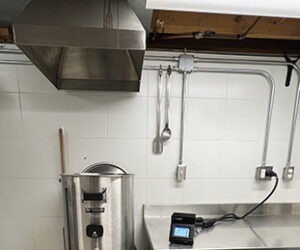
Add a stick-on thermometer and the bucket is ready to go with all the pros and very few of the cons of plastic. No longer will you wonder if fermentation has started (or finished), and your racking cane will gather dust as you let gravity do the work for you. Additionally, sampling will be simple thanks to the large, easy-to-open lid.
Design Alternatives
As with just about any DIY project, parts substitutions are practically unlimited. A Gamma Seal lid is a required part, but they are available in a wide array of colors to suit your brewing attitude or match your official brewhouse logo and color scheme.
The ball valve components, on the other hand, are considerably variable. For starters, the grey plastic bulkhead fitting is also available with a longer, curved intake pipe, making for an excellent dip tube with no added work. Or, you could use a spigot designed for bottling buckets, but this requires a larger-diameter hole than specified in this project.