Wort Chilling Advice
It’s one of the fundamental rules of brewing that, “you must chill your wort!” Why? How? What do you need to do to make your beer the coolest in town?

Let’s explore the benefits — why do all the texts insist that chilling your wort is what you need to do as a top-notch brewer? To start, you get to your yeast pitch that much faster. Less time without our yeasty buddies in play means less time for microbes to establish themselves. If for no other reason, getting your currently sanitized wort inoculated with yeast before anything else can be established is worth knowing how to quickly chill.
The second reason — break. Wort is a complex soup of sugars and proteins. In a perfect brewing world, we’d bring all the sugar and needed nutrients over to the fermenter and leave the extras behind — who needs them when they could be causing haze, staling, and other off-flavors and impacts. When you get a good strong boil going, you start seeing clumps and sheets of protein. A strong chilling phase can help set these protein globs and allow them to precipitate and not head into the fermenter.
There’s a big debate about how assiduous to be about removing kettle break from the wort prior to fermentation. Some break going over to the fermenter is actually a good thing for yeast health. Some brewers even let it all flow. We both do what we can to get solid break formation and a relatively clear wort, but we certainly don’t try and do anything weird to only grab sweet, crystal-clear wort!
As with all things brewing, there are about 101 different ways of accomplishing the goal of chilling your wort. They vary by cost and efficacy — all the way from the available to everyone to the “wow, you really like this hobby and want to spend money on it.”
When you look around your home and think about making food cold, there are very few folks who wouldn’t think first, “Hey, I’ve got a big dang fridge! Let’s use that!” Don’t! Your fridge is absolutely lousy at cooling down very hot things. Even commercial fridges are terrible at it. Air as a cooling mechanism is lousy with low heat capacity. We don’t even recommend putting a batch of soup in the fridge to chill. Putting a whole 5-gallon (19-L) batch of wort in the fridge would yield an overworked fridge, softened butter, questionable food, and still-warm wort after hours and hours.
Don’t Chill
Your first chilling thought as a new homebrewer may be “don’t chill.” Australian homebrewers have perfected the art of “no-chill” brewing where they transfer the still near-boiling wort to a heatproof container, seal the liquid in and then let it chill naturally overnight before transferring to the fermenter. The process works on the principle that hot wort in a sealed container will stay sanitary for a while. It’s cheap, it’s easy, and it requires little additional work/gear. You do have to think about your hop additions though as they will continue to add bitterness for several hours.
In a way, this is a neater version of the oldest method of cooling wort — letting it sit in a shallow pan overnight, exposed to the air (aka a coolship). At our volume scale, (e.g., 5 gallons/19 L) we can safely bundle everything up in an HPE water cube and let it sit. Can’t do that at larger commercial sizes! (But it’s great for holding wort warm for a kettle sour . . .)
There’s a lot more to say about how to do no-chill, but suffice to say, it’s very easy and it gets the job done. It has the advantage of speeding up your brew day (or just spreading out your hours) and is greatly advantageous from a water conservation angle since it uses no water for cooling. But it has its downsides with regards to speed and hop utilization.
Use What You’ve Got
If you want to actively chill the beer instead of depending on the laws of overnight thermodynamics, then you’re going to need a lot of cold water. Water has incredible heat density (but wort more), so you’ll need a fair amount to make a dent in all those BTUs you pumped into the kettle. The easiest way to start is a big, ice-cold water bath.
When Drew first started brewing, he’d turn off the boil and pop his lidded boil kettle into a sink full of ice-cold water and give the kettle a shake for a bit until the wort was sufficiently chilled with the addition of chilled water to dilute (he was brewing strong batches with extract). Some folks have recommended adding ice directly to the beer, but ice isn’t microbe free and the stuff from your freezer can pick up funky flavors.
Others opt for a big bathtub of water to serve as a heat sink, and this is perfectly workable. And given that Drew lives in Southern California, he knows plenty of folks who use their swimming pools (yes, really). If you live somewhere less pool-prone and more snow inclined — there are plenty of folks who use Mother Nature and a snowbank to cool. A word of advice though, snow actually works as an incredible insulator due to trapped air, so you’ll want to move your pot around.
Getting Mechanical
Given the problem of beer spoilage via coolships, you can imagine that as beer became big business, there was incentive to make the process faster, more efficient, and more surefire. One of the big innovations was the Baudelot Cooler created by Jean Louis Baudelot in the 1850s. It flowed boiling wort down a copper sheet that rippled over a set of chilled water pipes. As the wort cascaded over the bumps in a waterfall-like fashion, it rapidly cooled and was aerated.
Mechanical chilling, these days, is not quite as open a process, but it’s kind of a shame because a Baudelot Cooler is a beautiful piece of equipment. Drew recalls De Halve Maan in Brugge, Belgium, having an old Baudelot, unused, in the brewery bar/tour area.
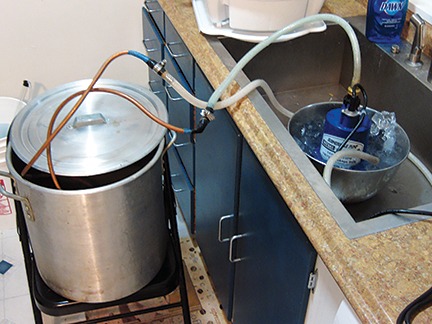
For homebrewers, there are two primary choices for forced chilling: Immersion or counterflow. There are lots of variations on the themes but those are your two primary means. The principle behind both remains the same — force cold water through a tube in contact with wort and let the metal piping conduct heat from the ultra-hot wort to the cold water. For homebrew use, we recommend copper for its ease of use and high thermal conductivity. Stainless steel is pretty and has high corrosion resistance, perfect for lots of use and cleaning, but copper is more thermally efficient and for our needs, we feel it’s better.
Immersion coils (IC) are the easiest to use with loops of copper piping that sit in the wort and suck heat away. To prevent wort spoilage, just keep the copper clean and set it in the boiling wort for the last 15–20 minutes. From there, it’s a matter of connecting your water hoses to feed cold water in and whisk hot water away.
Make sure the coil is sized to your brew pot — too much copper sitting above the wort doesn’t do you much good! We’ve both been using chillers from JaDeD for years because they build much better gear than either of us could from the hardware store, but even the least expensive chiller will beat the pants off the sink/tub/pool/overnight methods. The immersion method of heat wins on ease of use, but it’s not the most efficient.
Counterflow chillers (CFC), whether a coil with a copper wort tube running inside a water pipe or a plate chiller that feeds wort on one side and water on the other, work quickly on a small segment of the wort. The term counterflow is because the coldest water is injected into the chiller at the end where the cooled wort exits.
It’s very efficient, but at the cost of additional maintenance and cleaning. The interior of a counterflow chiller, where you’re pumping sticky and vulnerably cool wort is a perfect breeding ground for mold and microbes. You must rigorously clean it out to prevent contamination. It’s part of the reason we both moved back to immersion chillers after years of using CFCs. We’ve never trusted plate chillers for homebrewers because you can’t disassemble the plates for periodic scrubbing like commercial chilling systems.
To best clean a CFC, flush the chiller path with hot water and then recirculate cleaner through the chiller and rinse as per cleaner instructions. Plate chillers should be rotated and backflushed to remove as much debris as possible. Flush the chiller with sanitizer and then drain completely. (Drew blows CO2 to force as much liquid out as possible) Store dry to avoid weird chemical interactions. Before using, repeat the cleaning and sanitizing cycle and then use. (Now you see why ICs are generally easier for homebrewers?)

Speeding It Up
Minimizing your chilling time with your selected gear comes down to two things — temperature delta and preventing thermal jackets.
When we say “temperature delta,” what we mean practically is colder water. The greater the difference between your wort temperature and your cooling water temperature, the faster heat can be transferred into the cooling water. As the difference gets smaller, it will take you longer to chill (lots of science-y handwaving there!).
Denny’s well water pours from the faucet in the 50s °F (~12–13 °C), whereas Drew’s tap water is a balmy 76 °F (25 °C) during the summer. Denny can swing a beer to target temperature with little worry, but Drew sees a dramatic slowdown in chilling below 100 °F (38 °C). One way to combat that is to chill your water with ice. For IC users, chill the beer with tap water until the cooling slows down and then pump ice water through the chiller to finish. CFC users would need a ton of ice or they can chill with tap water and flow the mostly chilled wort through a coil sitting in ice water.
The other key is to prevent thermal jackets by agitating the wort. This is more an immersion problem. As the wort cools around the coil, the local delta-T is reduced, and chilling slows. By moving the wort, you break up the cool zone and get back to chilling.
The simplest way? Shake the chiller. Pick it up slightly and put it down gently. Put your hand on the output side of the chiller and notice the immediate rise in output water temperature. Use a sanitized spoon and give it a stir for the same effect. And if you’re fancy and tired of manual labor, use a pump to move the wort in a constant flow from the output of the kettle back to the top. Whirlpooling the wort with a pump is effective both in chilling improvements and in collecting the trub for easier/cleaner wort pick up.
One Last Cheat
Back at the start of this we told you — don’t use your fridge! Now, we’re going to tell you “No, use your fridge.” If, like Drew, you can’t chill the wort all the way to pitching temperatures (mid 60s °F/upper teens °C, for example), but you can get down to 80 °F (27 °C) – throw your fermenter into a fridge/chest freezer for a couple of hours and let the fridge do the decidedly easier task of dropping those last few degrees. (Drew uses a Grainfather glycol chiller to cool the fermenter directly, but the idea remains the same.)
Once you’ve sufficiently chilled out, time to get those yeast cells into the pool to do their job and make you some great beer!


