Make A Yeast Starter
This content appears courtesy of Wyeast Labs. For further info https://www.wyeastlab.com/
Basic Guidelines for A Yeast Starter
Many brands of yeast for homebrewing are designed to directly inoculate 5 gallons (19 L) of standard ale wort (OG less than 1.060, fermentation temperature 65– 72 °F/18-22 °C). However, high gravity worts (OG greater than 1.060) or cold fermentation temps (less than 65 °F/18 °C for lagers or hybrid ales) require a higher pitch rate than can be achieved with a single pack of yeast. Making a starter culture prior to brew day is an economical way to increase pitching rate and ensure consistent results in your brewing.
Determining Pitching Rate
First, determine the appropriate pitching rate for your beer. Once you have a target pitching rate, plug the numbers into an online yeast calculator to determine the starter volume needed to achieve the target pitching rate.
Timing a Starter Culture for Brew Day
Because starter cultures are inoculated at high cell densities, growth is usually maximized within 24–36 hours. Preparing the starter one to two days prior to brew day is ideal. Starter cultures should be used immediately, or stored refrigerated for up to one week. Cell viability will decrease rapidly if the starter culture sits unused, especially if left at ambient temperatures for extended time.

Preparing a Starter Culture
The optimal media for cell growth and health is a malt-based wort of about 1.040 OG, fortified with yeast nutrients. Dried malt extract is ideal for starter culture wort, since it’s readily available, easy to measure, and the leftovers store well for use in future starters.
Build Your Yeast Starter
Equipment Needed
- Sanitized Erlenmeyer flask or jar, sized for the required volume of starter culture (optional) (see photo step 1 in photo gallery below)
- Sanitized cover for the flask or jar — aluminum foil, foam stopper, or loose-fitting lid
- Oven mitts for handling hot liquid
- Magnetic stir plate and bar (stir bar pictured in the step 1 in the bottom of the Erlenmeyer flask) (optional)
- Foam control drops, such as Fermcap, (optional)
Basic Recipe (scale as needed)
- 3.5 oz./100 g plain dried malt extract (DME) (approx. ½ cup). Tip: measuring into a plastic cup (as seen in step 2) makes transfer into the flask easier as you can crease the side of the cup (see step 3 below).
- ½ tsp. yeast nutrient
- 1 qt. (1 L) H2O
Basic Procedure
- Mix DME, nutrient, Fermcap and water. Shake or stir to dissolve.
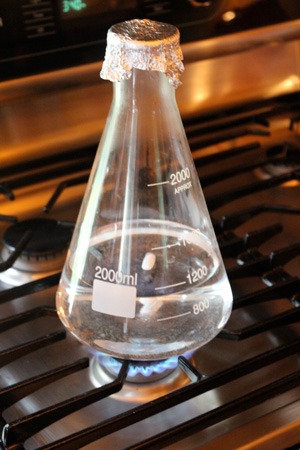
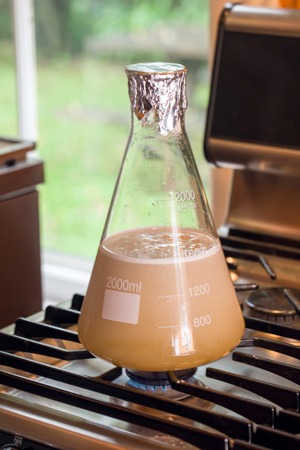
- Boil starter wort 20 minutes to sterilize. Use a saucepan on a kitchen stove; if using a laboratory-grade glass flask, you may be able to boil directly in the flask (as seen in step 5) — double check with your supplier or the manufacturer first. Use foam control drops (step 4) to prevent foam from boiling up in the flask.
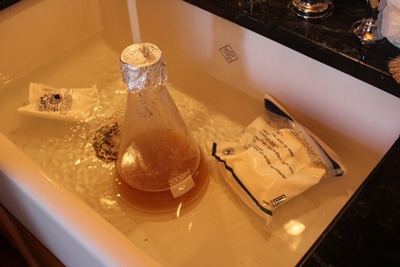
- Cool to 70 °F (21 °C). A cold-water bath will help speed things along (step 6).
- Transfer to sanitized flask or jar if you are not using a flask. Carefully pour the cooled starter wort into the sanitized flask or jar.
- Add yeast pack. Cover loosely with sanitized aluminum foil, a foam stopper, or the jar’s lid and swirl gently to mix (see step 7).
- Incubate 24–36 hours at 70 °F (21 °C). Agitate the starter culture periodically, or use a stir plate for constant, steady agitation and aeration (step 8).
- Pour the starter culture into the cooled, aerated wort in your fermenter (step 9); the entire volume of starter may be added to the main batch, or you may prefer to decant some of the spent wort first: chill the starter during brew day to encourage cells to settle, then decant the top layer into the sink, pouring just the yeasty bottom layer into the fermenter.


Propagating a Starter Culture
Any yeast strain, including lagers, should be incubated at 70 °F (21 °C) to ensure rapid growth. It’s not uncommon for a starter culture to display less visible fermentation activity (kräusen, etc.) than a full 5-gallon (19 L) batch; due to the high pitching rate of a starter culture, fermentation can more or less happen while we’re not looking. Just as with a full-sized batch of homebrew, the best indicator of activity is a gravity reading; also look for CO2 bubbles coming out of solution (especially if using a stir plate), “yeasty” rather than “worty” aromas, and turbidity — starter cultures will usually look milky or cloudy while fermenting, and clear with a layer of whitish-tan sediment when finished.
Stirring and O2
Agitation of the culture aids in removing inhibitive CO2 from suspension as well as adding small amounts of oxygen. Small additions of oxygen periodically throughout the growth of a starter will replenish sterols and improve cell yield. Stirring or shaking the starter periodically, or using a stir plate, will improve cell growth in a starter culture. The use of stir plates has been shown to increase cell growth 25–50% over a non-stirred starter.
Two-Stage Propagation
To increase cell count even further, brewers making strong lagers or very high-gravity beers, or those brewing 10-gallon (38-L) (or larger) batches can opt to make a two-stage starter culture: Allow an extra 24–36 hours before brew day and follow the basic procedure; when the initial culture is fermented out, chill and decant the spent wort, then replenish the flask or jar with another volume of fresh starter wort and repeat the incubation process.
Caution
Sound sanitation practices are critical when propagating a starter culture. It is important to understand that creating a starter can increase the risk of infection by undesirable organisms. A small level of contamination in a starter culture can multiply to unacceptable levels in the main batch, creating undesirable effects in the finished beer. – This content appears courtesy of Wyeast Labs. For further info • https://www.wyeastlab.com/
