Cylindroconical Fermenters
I fermented my first homebrews in a bucket. And, I still use bucket fermenters for my sour beers, fruit beers and the occasional quick turnaround ale. After my first few batches, I picked up a glass carboy and over the years I’ve assembled a small fleet of them. Last year, after thinking about it for a couple years, I broke down and bought a stainless steel cylindroconical fermenter.
A cylindroconical fermenter is a scaled-down version of what commercial brewers call a uni-tank. The “uni” refers to the fact that the beer can undergo primary fermentation and conditioning in the same tank. With flat-bottomed fermenters, the beer needs to pumped from the fermenter to a conditioning tank. Uni-tanks are very popular in brewpubs and microbreweries — and a few years ago, homebrew-sized conicals started appearing on the market.
The shape of a cylindroconical fermenter is a cylinder with a cone attached on the bottom. A port at the bottom of the cone lets you dump the yeast (and any other sediment) from the bottom of the vessel. Another port is found a little higher on the cone. This one allows you to draw of samples of beer or transfer the beer to another container.
There are many advantages to a stainless conical fermenter. The primary reason I bought mine was the ease of separating the yeast from the beer. With a bucket or carboy, you need to clean and sanitize a secondary fermenter and a racking cane. With a conical, you just open the dump valve for a second or two. Likewise, taking hydrometer samples is as easy as opening the transfer valve.

Another advantage is that most conicals are made from stainless steel. Plastic bucket fermenters eventually get scratches and stains to the point that normal homebrew cleaning and sanitation practices may not render them sanitary. In addition, bucket fermenters may also start to retain some smells that won’t wash off. As such, bucket fermenters need to be replaced every so often. A stainless conical should remain re-usable “forever,” won’t absorb odors and can be cleaned completely — leaving an inert surface that won’t react with or taint wort or beer. Finally, unlike stainless steel, the plastic in buckets is slightly permeable to oxygen, making them a poor choice for long-term conditioning (unless you’re making sour beers).
Like stainless steel, glass is inert. It can be cleaned and reused endlessly and won’t ever absorb any smells. It is also impermeable to oxygen (although the rubber stopper, plastic airlock and the water filling it are not.) However, glass is also breakable. This can not only cause some big, disappointing messes from lost batches, it can also be a source of injury.
Glass has a history in commercial brewing — remember “the glass-lined tanks of Old Latrobe.” These days, though, almost every brewery on the commercial side is a farm of bright, shiny, stainless steel tanks. Conicals also usually have handles welded on, making them much easier to transport than trying to lift and hang onto a breakable cylinder — that may be slippery when wet.
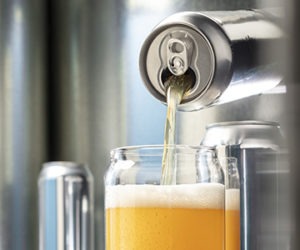
A final advantage is that with some conicals, you can do pressure transfers. When it comes time to rack the beer to keg, you can apply a little CO2 pressure to the airlock vent and push the beer out the transfer port, through some Tygon tubing to your keg — and not expose the beer to oxygen to boot.
The biggest disadvantage of conicals is the cost. Even the most bare-bones conical model costs over $400. Buckets and carboys cost about 1⁄20 of this. Given the price differential, many homebrewers will choose to just clean the racking cane and second carboy when it comes time to separate the yeast from their beer. But, for those thinking about making the move up to a conical, here’s a quick rundown of what you can do with them.
How to use
When you get your conical, save the assembly instructions because you will need to disassemble your fermenter every time you clean and sanitize it. Fortunately, assembly and disassembly is easy — removing the two ports is all you are doing — and this allows you direct access to every surface that your beer will touch. My procedure for cleaning is to disassemble the tank, clean the small parts and remove any visible gunk from inside the tank with a sponge. Then I reassemble it, fill it with a hot (160 °F/71 °C) PBW solution, let it sit for 15 minutes, then run the solution out of both ports. The heat of the solution will do some sanitizing along with the cleaning. (I save the hot PBW solution and clean other stuff.) Next, I fill the fermenter with a sanitizing solution. After the required contact time, I drain this out (often into another carboy or bucket I need sanitized).
Filling
When filling your fermenter with chilled wort, you want to leave enough room for the kräusen to rise. (You also want to make sure the valves on your ports are closed before you start transferring the wort.) Once the fermenter is filled, close and seal the lid and affix a fermentation lock or blowoff tube. The latter will often save you a couple inches in height, and this can be important if your fermenter needs to fit in a chest freezer. To use the blowoff tube option, connect an “L” tube fitting to your drilled stopper, then connect Tygon tubing to the “L.” Run the tubing to a glass of water and submerge the end under the liquid level. A benefit of using a blowoff tube instead of a fermentation lock is it will prevent airlock “suck back” if the fermenter is being cooled.
Once fermentation starts, you have a couple options. Most homebrewers will simply want to keep the blowoff tube attached and conduct a closed fermentation. However, you can also do an open fermentation in a conical (as you can with any homebrew fermenter). Anecdotal evidence suggests that a lot of the popular Belgian strains of yeast perform noticeably different in closed and open fermentation, and some homebrewers are experimenting along these lines. Once fermentation slows and the kräusen starts to fall, put the lid back on the fermenter and attach the blowoff tube.
If you are using a true top-cropping yeast, you can have easy access to it whether or not you’re doing an open fermentation. Just open the top, as you would with a bucket, and harvest the yeast with a sanitized measuring cup.
Dumping yeast
OK, so primary fermentation is done, a day or two has passed for the yeast to settle and now it’s time to dump your yeast. This is what you bought the thing for — do you just open the bottom valve and let ‘er rip? Before you do, there are two considerations.
The first thing you need to consider is that the fermenter is a sealed environment. If you open the bottom valve and material moves out of the fermenter, the pressure in the headspace is going to drop. If you have an airlock attached, the liquid is going to get sucked back into your fermenter. If you have a blowoff tube attached, water is going to climb up the tube.
The solution to this problem is easy — either remove the airlock or take the end of the blowoff tube out of the liquid. In both cases, you’ll be sucking a little air into your fermenter, but — at this stage of the fermentation — there are still plenty of yeast cells in suspension to take in the oxygen once the fermenter is sealed again. And, if you had racked from a bucket or carboy to secondary, you’d have exposed the beer to a lot more oxygen.
The second thing you may need to consider is that the yeast doesn’t always slide down to the bottom of the fermenter as it should. Some strains seem to cling to the sides of the cone. Opening the dump valve pushes a small plug of yeast out, but then beer just rushes by the ring of yeast clinging to the cone. There are a variety of ways to get cleaner separation of your yeast and beer.
First off, don’t ever think that you’ll open the valve and get a plug of pure yeast, leaving behind nothing but beer. When you open the dump valve, you’ll always get a mixture of yeast and beer — and you’ll always leave some yeast behind. One simple solution to getting better separation is to dump your yeast a few times over a couple days. Open the valve and get a small bit of yeast. Then, let the beer sit and more yeast slide down to the bottom of the cone. Repeat two to four times. Remember, though, that a little yeast left behind isn’t going to hurt anything. Don’t drain half your batch because a little yeast comes out every time you open the valve.
You can also help the yeast get into position by “bringing the hammer down.” A few hours before you plan to harvest the yeast, gently tap the cone of your fermenter with a soft mallet (not a metal hammer). Tap the cone just enough to spur a little “yeast avalanche” inside the fermenter. Since you can’t see inside, you’ll have to develop a feel for this over a few batches. Do not pound on the fermenter so hard you dent it. Likewise, be aware that overly aggressive tapping can cause carbon dioxide to break out of solution, especially in lagers (which have more dissolved CO2 due to being fermented at colder temperatures).
Once your airlock or blowoff tube is disabled, simply place a large measuring cup or bowl under the fermenter and attach a length of clean tubing to the port. Quickly open the dump valve all the way and . . . be prepared to wait a couple seconds. Depending on the yeast strain and fermentation temperature, it may take a second for the yeast plug to start sliding. You’ll see it when it enters the clear tubing. Let the plug slide out and quickly close the valve.
The first bit of the plug will be almost solid yeast and appear that distinctive beige yeast color. But following right behind that, you’ll see a mixture of yeast and beer that get’s more “beery” the longer you leave the valve open. I usually aim to collect about 1 quart (~1 L) of yeast and sediment the first time I dump the yeast. The second time, I collect about half that much. If I collect a third time — which I usually don’t — I would half that volume again.
Sampling beer
If you want to take a hydrometer sample, all you need to do is attach some clean tubing to the transfer port, open the valve and run some beer off. As with the dump valve, you’ll need to ensure you don’t suck water into your beer through your airlock or blowoff tube.
Transferring beer to keg
At some time your beer — conditioned and (mostly) separated from the yeast — will be ready to rack to a keg. There are two ways you can accomplish this transfer, gravity or pressure. For a gravity transfer, lift your conical to a surface such that the transfer port is higher than the top of your carboy. Clean and sanitize a length of tubing long enough to run from the transfer port to the bottom of the keg. Remove the airlock or blowoff tube and open the valve. That’s it.
Some conicals will allow you to do a pressure transfer. If yours allows for this, it will say so explicitly in the directions. There will also be a pressure relief valve on the lid of the fermenter. The idea behind a pressure transfer is that you hook your CO2 tank up to the “L” tube that ran to your blowoff tube. Applying a small amount of pressure, you open the transfer port valve and push the beer to your keg. There are two benefits to this. First, you do not need to lift your conical. It can stay where it is — perhaps inside a chest freezer — and your keg does not need to be below the fermenter. Secondly, your beer is not exposed to any air during the transfer. There are a couple ways you can perform a pressure transfer.
Remove the blowoff tube from your fermenter and attach a length of tubing from your CO2 tank to your fermenter. Make sure the gas is not on and pressure on your regulator is dialed down to zero. Attach sanitized tubing to the transfer port and run it to the bottom of the receiving keg. Or, have the tube run from the fermenter transfer port to a “beer out” keg connector, attached to the “beer out” post on the keg. (If you fill the keg with water first, then push out that water with CO2, you’ll have an air-free vessel ready to receive your beer.) Turn the gas on and slowly dial up the pressure. Your manual should give the maximum pressure the fermenter can withstand. (On mine, it’s 3 PSI.) Once you’re a little below the desired pressure, open the transfer valve and you should see beer start to flow. Adjust the pressure, if needed, to regulate the flow of beer. If you’re running the beer into a sealed keg via the “beer out” post, you will need to vent the keg so the beer can keep flowing. The simplest way is just to connect a “gas in” connector to the “gas in” post. (Don’t worry, the CO2 won’t rush out of your keg and equilibrate with the outside air instantly, it takes time for gases to diffuse.) If you want to get fancier, you can attach some sort of check valve to the “gas in” post, or run a length of tubing from the connector to a glass of water (just like the blowoff tube for your fermenter).
So, if you’re looking for a versatile, and professional-looking, piece of equipment for your brewery, a conical fermenter may be just the thing.