Small-Scale Brewery Steam Condenser
Unequivocally, the evolution to electric power from traditional propane-based homebrewing has been the most significant advance for homebrewers. Electricity is quieter, more efficient, readily available, cleaner, and less expensive than propane. As a result, one of the major opportunities electric power offers homebrewers is to move their breweries indoors, eliminating the variabilities mother nature brings as a brewing partner: Temperature, wind, precipitation, and bugs!
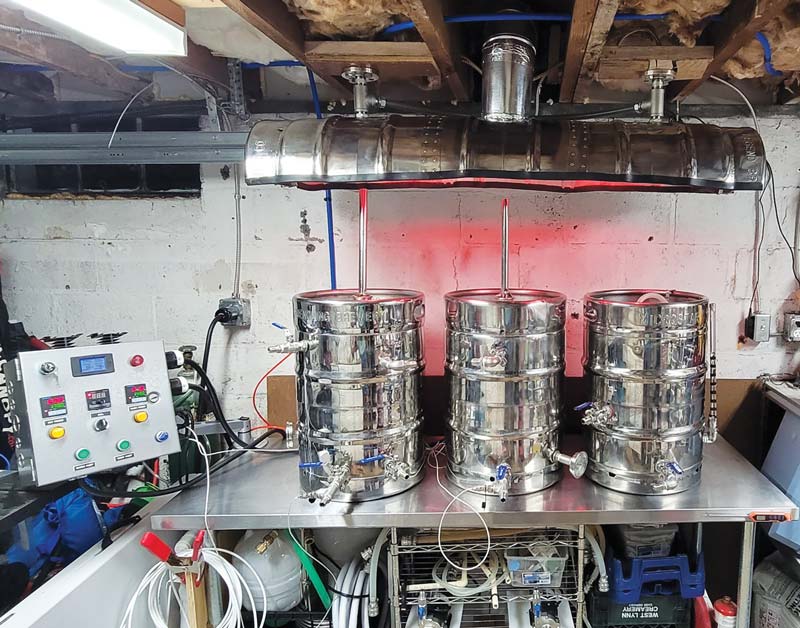
One of the major headaches with indoor brewing, however, is the need to exhaust the steam generated during the boil. A typical ten-gallon (38-L) batch may expel as much as two gallons (7.6 L) of moisture into the surrounding atmosphere during the boil — enough to saturate even the most expansive basements! Electric brewing pioneers, such as TheElectricBrewery.com, implemented a ventilation system consisting of a hood, fan, and ducting to exhaust the hot vapor outside. A proper ventilation system must also return fresh air to eliminate placing a load on the home’s HVAC system. These can work well, but a great amount of hardware, planning, and funds are required — and for many brewers, the need to bore holes in their homes’ exterior walls is a deal breaker!
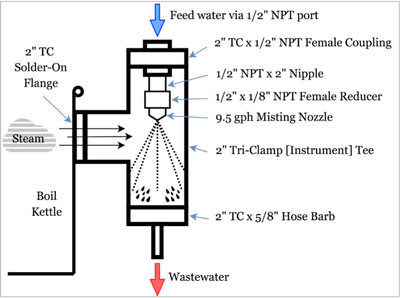
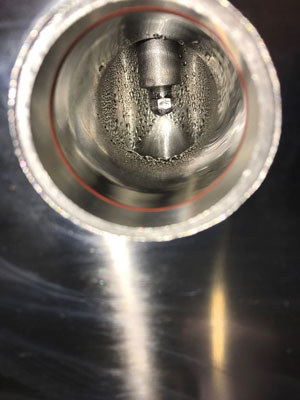
Borrowing a page from some industrial applications and pro brewing systems, I created a homebrew version of a steam condenser to mitigate the steam from the boil kettle. The concept is based on the principle that cooling steam below its phase-change temperature, while providing nuclei for condensation, will convert it back to water. Spraying cold water into a steam chamber serves this function, and both the condensed steam and spray water can be drained away together. The vapor’s volume contracts about 1,500 times from the phase change, which in turn creates a local vacuum, pulling in new air/steam and continuing the cycle without forced air.
The homebrew assembly is made by using a simple water-misting nozzle spraying inside a tee. The tee is mounted upright to the side of the kettle, so the lid can be used normally. The steam enters the tee and is cooled by the mist water there. The mist water and condensed steam flow down and out the bottom of the tee under gravity and is piped away with a drain tube.
The trade-off of this design is the ~7-10 gallons (26-38 L) of spray water which is dumped during its operation. Many may feel this is wasteful, but I chose to collect the water into five-gallon (19-L) buckets, which I will water my lawn with it. Since it contains the volatiles boiled off from the brew, including DMS, I suspect it cannot be repurposed for much else. Speaking of DMS, none of the beers made to date by myself or others using this steam condensor system have any detectable “cooked corn” or other off-flavors.

Parts
2-inch tri-clamp radius solder-on flange
(3) 2-inch tri-clamps
(3) 2-inch tri-clamp gaskets
2-inch tri-clamp x 1⁄2-inch NPT female coupling
2-inch tri-clamp x 5⁄8-inch hose barb
2-inch tri-clamp tee
9.5 gallons per hour misting nozzle (McMaster Carr)
1⁄2-inch x 1⁄8-inch NPT female reducer
1⁄2-inch NPT x 2-inch pipe nipple
3⁄4-inch OD silicone tubing
Step by Step

1. COOLING CAPACITY CALCULATION
I initially conducted calculations to determine the rate of spray water which would be needed to eliminate the steam generated during a brew boil. The goal was to determine how much energy is stored in the total “steam chamber”, then determine how much spray water would be needed to lower the steam’s temperature to induce its phase change back to liquid. The combined steam and spray water would be a final product of sub-boiling water. The calculations assume the steam is not heated above its minimum vapor temperature since it is not under pressure. Over the course of a one-hour boil, the total amount of steam contains almost 9 megajoules of energy. Using spray water at 68 °F (20 °C), it can absorb approximately 290 kilojoules per kilogram before reaching a sub-boiling temperature of 194 °F (90 °C). Working backwards, I determined that it would take 7.7 gallons (29 L) of spray water to absorb the steam energy produced by the kettle. Warmer or cooler spray water would require more or less spray water volume, respectively.

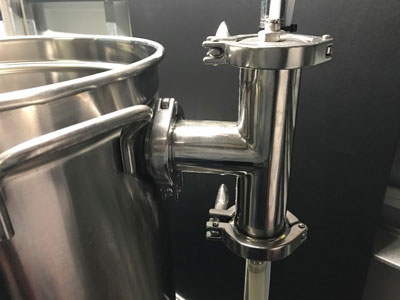
2. DRILL HOLE AND MOUNT THE FLANGE
Select a location as high as practical in the side of the kettle, and mark with a center-punch. Drill a 50-mm hole using a carbide-tipped hole saw.

Deburr until smooth with a file or appropriate abrasive tool. If using a tri-clamp radius solder-on flange, mount it with silver-solder or appropriate food-safe epoxy such as JB Weld Steel Stik. Be sure to prepare the surface for bonding prior by roughening it with a non-plain steel abrasive and clean the residue with acetone. If using a weld-less flange, install it according to the manufacturer’s instructions.

3. ASSEMBLE CONDENSER COMPONENTS
Place thread seal tape on all threads prior to assembly. Thread the 1⁄2-inch NPT pipe nipple into the 2-inch tri-clamp x 1⁄2-inch NPT female coupling. Thread the 1⁄2-inch x 1⁄8-inch NPT female reducer onto the other end of the nipple, and thread the misting nozzle into the reducer. Tighten lightly using a pipe or hex wrench. Using tri-clamps and tri-clamp gaskets, attach the 2-inch tri-clamp tee to the flange, the misting assembly to the top port of the tee, and the 2-inch tri-clamp hose barb to the bottom of the tee. (Note: Prototype parts in picture include the coupling, nipple, and reducer which are replaced by press-in fittings and tube.)
4. ADD FEED AND DRAIN TUBING
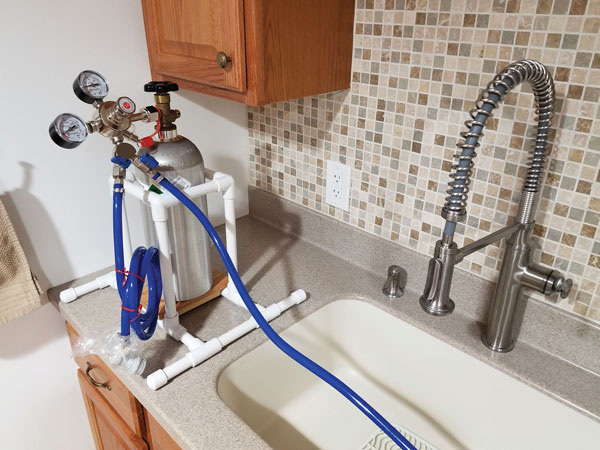
Place thread seal tape on the 1⁄2-inch NPT end of a garden hose adapter (or other feed adapter of your choice) and thread it into the top of the tri-clamp coupling. Note that this fitting will have high water pressure on it; so all fittings and hardware must be pressure rated. Add a 1⁄2-inch OD silicone tube to the drain. Place the other end of the drain into a bucket, sink drain, floor drain, etc. and make sure there is an air gap to allow for pressure equalization.
5. TEST THE CONDENSER
Connect the garden hose or other feed water to its respective adapter and turn on the water. Check for any external leaks. Check that the misting nozzle generates a proper conical spray pattern. Do not use a valve to regulate the flow into the misting nozzle — it must have full pressure. Ensure that the water drains properly out of the drain tube without any leaks.
6. BREW AND ENJOY!
Brew beer! Once the wort reaches boiling temperature, place the lid on the kettle and turn on the condenser. The power required to maintain a gentle rolling boil will be drastically reduced, as much as half, so be sure to check it every few minutes until an appropriate power setting is found. In addition, the boil-off rate will be significantly less, so recipes should be adjusted to accommodate this reduction.