Build Your Own Glycol Fermenter
Professional brewers control the temperatures of each of their individual fermentation vessels. To accomplish this, homebrewers are typically stuck using multiple chest freezers or refrigerators to control fermentation temperatures.
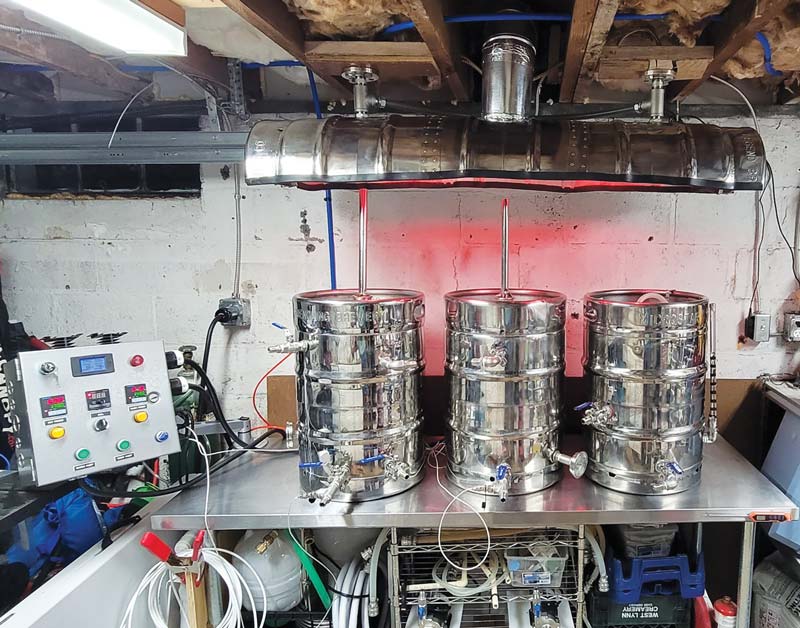
I wanted to have temperature control over each of my fermenters like the pros, to store them within the confined space of my garage, and also still use my garage for its intended use . . . to park cars. So with a little research, welding, design and patience I built this temperature controlled fermenter.
This project does not require a lot of space to build or store. I built it in my garage and store it along one side next to my brewing system. All of the materials can be easily obtained and the whole thing can be built for about $2,000. You can ferment a lager in one vessel and an ale in the other; raise the temperature for a diacetyl rest and even crash cool to near freezing before kegging to help clear your beer.

I am a makeshift welder, and I’ve always wanted to learn how to weld stainless and aluminum. My solution was to take a TIG (tungsten and inert gas) welding course at the local vocational school. This is where I actually came up with the idea of a jacketing system for my Sabco fermenters. You may choose to do this as well or, armed with a six-pack of your favorite homebrew, you can find an experienced welder that will weld this part of the project for you.

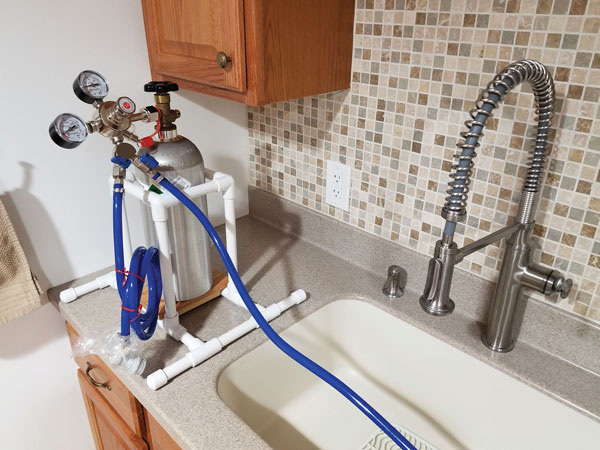
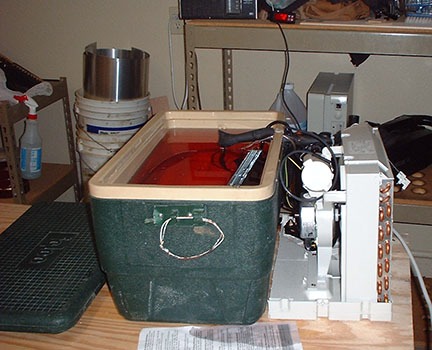
With a good understanding of how the chiller is going to work and look, this project will come together in a snap. I used a 5000 BTU window air conditioner and a standard size ice chest for the chiller unit. The air conditioner’s evaporator coil is immersed in a glycol bath to cool the glycol. A small fountain pump is used to constantly circulate the glycol solution inside the cooler.
Two slightly larger fountain pumps are used to circulate glycol through copper tubing that is wrapped around each fermenter underneath an insulated jacket. These larger pumps are switched on and off by a temperature switch that is monitoring the temperature inside each fermenter.
The Ultimate Chiller provides great temperature control. I set the glycol temperature to 30 °F (-1 °C) during primary fermentation, which allows adequate cooling so I can set the fermentation vessels at either lager or ale temperatures. After primary fermentation is complete you can raise the temperature for a diacetyl rest then lower to near freezing to help settle the yeast and clarify the beer before racking.
Step by Step

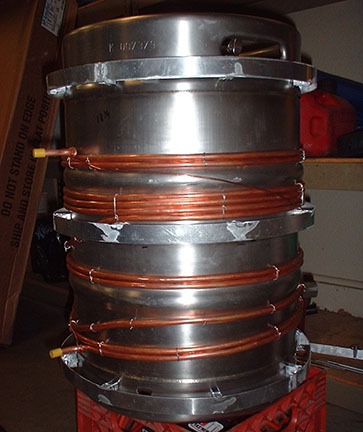
1: Cooling jacket
I used 60 feet (18 m) of 3⁄8-inch copper tubing for the cooling loop on each fermenter. I used a 12-gauge copper wire in between the copper tubing loops as they wrap around. This wire has two functions. First, it will increase the surface area contact between the copper tubing and the stainless vessel. This helps to transfer the temperature of the cold glycol to the fermenting beer. Secondly, the copper wire also provides a way to pull the copper tubing tight and hold it in place on the fermenter.
2: Wrap the copper tubing
Each fermenter uses 60 feet (18 m) of copper tubing and 65 feet (20 m) of 12-gauge copper wire. Roll out the tubing and the wire in a straight line. With some help from a friend, and a lot of patience, wrap the copper tubing and the wire around the vessel at the same time.
Use a tubing bender to bend the end of the tubing so it faces outward from the vessel. I used a ratchet strap hooked on this bent part of the tubing to hold the first wrap in place until I got all of the tubing and wire wrapped around. Slowly work your way around until all of the tubing and wire are wrapped around and in place.
I used some stainless steel picture hanging wire to keep the copper tubing pulled together, with the copper wire in between to hold it in place. At the top, bend the tubing out again and use another ratchet strap to pull the copper tubing tight. With everything in place you can use the same 12-gauge wire to attach the ends of the tubing and pull them tight. Just wrap the wire around the end at the top. Wrap it all the way around one time and attach the other end to the tubing at the bottom and twist the wire tight.

3: Insulated jacket
The aluminum bands that I built in my welding class are used to house the insulation and provide something ridged to attach the outside aluminum jacket to. Start by rolling the 1-inch x 1⁄8-inch (2.5 x 0.32 cm) aluminum strap around a bucket or empty keg to make a circle that is about 18 inches (470 cm) in diameter. Cut the first strap about 55 inches (1.4 m) long; this is a rough length but when you finish the first strap you can use it for a pattern to build the others.

4: Cut the standoffs
For the standoffs, cut a 1⁄2-inch x 1⁄2-inch (1.3 x 1.3 cm) aluminum channel into 1-inch (2.5 cm) pieces. You will need a total of 108 (2 x 9 x 6 = 108) pieces for the six bands. The standoffs are made by welding two pieces of the 1⁄2-inch (1.3 cm) aluminum channel together. It takes nine of these for each of the six bands. Weld each of the standoffs in place, evenly spaced along the inside circumference of the strap. Before welding the last standoff to the end, check the length of the strap by putting it on the vessel and marking the correct length, about 1 inch (2.5 cm) shorter. All of the other straps can be cut to this same length.
My straps are 54 3⁄4 inches (139 cm) long. This allows for a 1-inch (2.5 cm) space between the two end standoffs. Drill a 3⁄16-inch hole in both of the two end standoffs. Use a #10 x 2 1⁄2-inch machine screw and nut through the 3⁄16-inch holes to draw the bands tight and hold them in place

5: Install insulation
Before installing the standoff bands, cut the Armaflex insulation to fit around the vessel on top of the copper tubing. The insulation can be held in place and firm using nylon string. With the insulation in place, install each standoff ring securely in place. Just slice a small opening in the insulation at each place the standoffs need to contact the vessel. Also, and this is important, cut small pieces of insulation and stuff in the openings formed by the aluminum channel on each standoff. The outside of the fermenter will sweat any place that is not properly insulated!
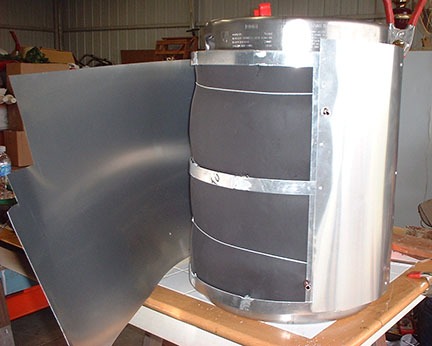
6: Install the outside skin
Now attach the aluminum sheet metal to the outside of the bands using 1⁄8-inch x 3⁄16-inch pop rivets. Rough cut the sheet metal about 1-inch (2.5 cm) longer then the actual outside circumference of the bands. Attach one end at the inlet and outlet of the copper tubing and work your way around. You can make the final cut at the end to fit perfectly using a good pair of scissors or tin snips. I just lined the bottom up evenly as I attached the sheet metal then trimmed the top to fit along the top band after all of the riveting was finished. These made a nice even-looking finish around the top and bottom. The next step is to build the glycol chiller.
7: Glycol chiller
The glycol chiller is made using a 5000 BTU window air conditioner and a 61⁄2 gallon (25 L) ice chest. Take the outside housing off of the AC unit and remove any screws holding the evaporator coil. The evaporator coil should have enough freon tubing so it can be bent to position the coil inside of the ice chest. Be careful not to kink the tubing as you position the coil. Using a jigsaw, cut a notch at the top of the cooler for the freon lines to go through. The fan that blows air across the evaporator coil is no longer needed. Remove the fan blade and cut the motor shaft off with a hacksaw. Now trim the outside housing with tin snips and reinstall it.

8: Harvest the AC unit
The temperature control thermostat on the AC unit can be removed and the two wires to it twisted together with a wire nut. This will cause the unit to run any time it has power. The glycol temperature will be controlled using one of the Love temperature switches by monitoring the temperature of the glycol bath. I made a thermal well out of a piece of 3⁄8-inch copper tubing to support the Love switch temperature probe in the side of the cooler.
I drilled a 3⁄8-inch hole in the side of the AC unit housing and reinstalled the high/low switch there. The power to the AC unit will be switched on and off with temperature switch. As the glycol warms up the AC unit will come on; when the glycol cools to your set temperature, the AC unit will kick off. That is cool! (Be sure to keep pets and children away from the glycol; it tastes sweet but is toxic.)

9: Temperature control
The Love Digital Temperature Switch comes complete with a temperature probe and is pretty much ready to use right out of the box. If you have never used this type of control, you may spend a little time learning the basics, but the instructions provided with the controller have all of the information you need.
I mounted the three temperature controllers across the front panel of my shelving unit. The center control has its temperature probe in a homemade thermal well inside of the ice chest. The other two controllers turn the large fountain pumps on and off, as each of the two fermenters requires cooling. Their temperature probes are mounted inside the thermal well on the Sabco fermenters. I had to drill the factory thermal well out slightly on the Sabco fermenters so the probe would fit inside. Use a 9⁄32-inch bit and be careful, stainless steel can be very hard to drill.

10: Assemble the system and pumps
Three fountain pumps control fluid movement through the system. The smaller pump has a short hose connected to the outlet and simply circulates glycol around the coil inside the ice chest. This smaller pump runs continuously. The other two larger pumps have their outlet connected to a section of 3⁄8-inch PVC hose. The other end of the pump outlet hose is connected to the top copper tubing on the fermenter. The bottom copper tubing on the fermenter is connected to another 3⁄8-inch hose that dumps the glycol back into the ice chest. I drilled 5⁄8-inch holes in the side of the ice chest, above the liquid level, for the lines to go through. Plastic wire ties hold the lines securely in place.
The Love temperature switch provides power for the large pumps. The probe for the temperature control monitors the temperature inside the fermentation vessel. If the vessel needs cooling, the pump comes on and circulates glycol around the vessel until the set temperature is reached, at which point the pump kicks off.

11: Wiring
If you are not comfortable working with electricity, get a professional to help you wire this project. I used the Ground Fault Interrupter (GFI) plug that came with the air conditioning unit to power everything. The GFI has a 20-amp circuit breaker built in. I use Test and Reset buttons to switch everything off and on manually when I am not using the system. Each of the larger fountain pumps is controlled off and on by their own Love temperature switch. The probe for this switch is inserted into the thermal well on the fermenter. As the fermenter requires cooling, the temperature probe will signal the switch to turn on the pump. When the fermenter temperature reaches the set point on the Love switch, the pump turns off.
The air conditioning unit is connected to it’s own Love temperature switch. The probe for this switch is in a thermal well inside the ice chest. As the glycol heats up, from being circulated around the fermenters, the switch tells the AC unit to come on. When the glycol in the ice chest reaches the set point on the Love switch, the AC unit turns off.

12: Test Run
Use water in the cooler for testing the system, but don’t set the temperature to go below about 35 °F (2 °C) with water or everything will freeze solid. After everything tests out, replace the water with a glycol mixture. I use a 40/60 mixture of pure propylene glycol and water. This mixture will provide a freeze protection to about -10°F (-23 °C). You will need this much protection because the actual temperature of the fluid directly in contact with the cooling coil in the ice chest is most likely well below freezing temperatures. I run my chiller at 30 °F (-1 °C) during primary fermentation, then I lower it to 20 °F (-7 °C) to crash cool before racking. If you don’t run enough glycol in solution you risk the mixture becoming thick and slushy at lower temperatures.