The WashAll System: Not your everyday keg washer
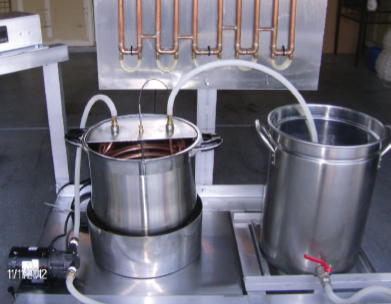
I started brewing 5-gallon (19-L) batches about 15 years ago. One of the best things about a system that size is that cleaning it is for the most part pretty easy. Over the years I expanded my system to do 10-gallon (38-L) batches, switching to all-electric and upgrading to a heat exchange recirculating mash system (HERMS). I expected cleaning to be a bit more work than cleaning the 5-gallon (19-L) equipment, but the reality was the upgrade made the task much worse. Now I have expanded even more to 20-gallon (76-L) kettles and a 15-gallon (57-L) fermenter and, without a doubt, the cleaning effort and time has gone up exponentially rather than linearly!

I had seen numerous single-purpose corny keg cleaning projects, both homemade and commercial, and decided to build one that increased its capabilities exponentially as well — to help match my efforts. This design can clean large kettles, fermenters, corny kegs, picnic taps, hoses, pumps, chillers, buckets, and my HERMS coil just by changing a few “cleaning tools,” built with common ½-inch NPT landscape irrigation fittings including unions. The unions make tool change out quick and easy.
You should be able to build one for less than $200 and after that it’s like having an extra unpaid helper on brew day!
In use, I save all my used chiller water in the muck bucket, other plastic buckets, and my hot liquor tank (HLT). I start by removing as much of the spent mash as possible from my mash tun by hand. I find a large square recycled plastic food container works the best since it gets into the corners and also works well on the flat false bottom. Then I wash the mash tun on the WashAll with no sprayball connected, just the open plastic riser. If you use the sprayball right away it will get plugged with small pieces of mash that you missed. I do the same with the boil kettle. Once they are partly cleaned I pump the muck bucket out and clean it to get rid of all those particles of mash and boil kettle hops and break. I refill the bucket with fresh hot cleaning solution and run with the sprayball attached. The pump is connected to an inexpensive wireless remote control switch for AC power to make turning on/off quick and easy.

You can clean carboys and flasks with just the open PVC riser, with no sprayball attached, since it’s too large to fit through the opening. But care is needed for this task since carboys will also fill faster than they drain. You will need to cycle the pump on and off. You can also place smaller items on the hardware cloth while a pot is getting cleaned. It’s also an ideal time to clean, and dry by hand, the exterior of any equipment such as kettles, fermenters or corny kegs while they are upside down on the washer.
After everything is clean, all the WashAll parts fit into the muck bucket and it’s stored away. You should be able to build one for less than $200 and after that it’s like having an extra unpaid helper on brew day!
Step by Step

1. Pump
I started by buying a stainless steel sump pump rated at 3⁄4 HP, 24-ft. (7.3-m) head and up to 2,250 gallons/hr (8,520 L/hr). The pump will also handle particles up to 0.2 in. (5 mm) in diameter. The ratings sound impressive but the way the specs are defined is if you try to pump up to 24 ft. (7.3 m) you’ll have zero pressure at the top and flow-rate is rated for zero head. You’ll end up using the pump somewhere in between those maximums and also likely need to reduce the pump outlet size down to ½-in. NPT. If you can’t get threaded fittings to make the reducer you may have to use PVC primer and glue and use “slip” fittings.
This pump has a top outlet, which makes it a bit easier to center in the tub. It also has a float switch, which allows it to shut off if the water/solution level gets too low.
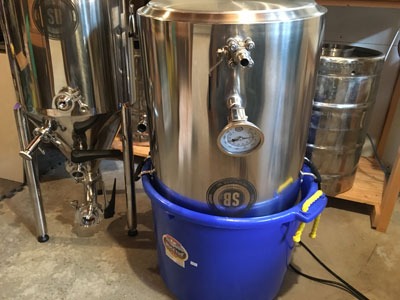
2. Muck Bucket
The next key item to buy was a large plastic “muck bucket” to put the pump in and to easily accommodate my kettles and fermenters. Mine is 70 qts. (66 L) with a top inside diameter of 20 in. (51 cm) and it’s 15 in. (38 cm) tall.
I usually only fill it 1⁄4 to 1⁄3 full with water then add a brewery cleaner such as PBW™ or substitute with T.S.P. and OxiClean™ combined.
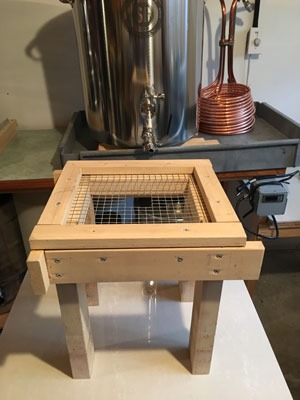
3. Stand
The wooden stand sits a few inches lower than the top of the muck bucket (to help contain the dripping solution). It has a hardware cloth top to let the liquids through and also support corny kegs or other small items for cleaning. I cut a square opening in the hardware cloth for the risers and sprayball to get through. You could also just use wood slats or some other grill instead of hardware cloth. The stand has short arms that go right to the inside edge of the muck bucket since it has sloped sides. Stand dimensions are about 12 in. (31 cm) x 12 in. (31 cm) x 14 in. (36 cm) high, not including the short arm extensions.
My 20-gallon (76-L) kettle handles rest on the rim of the muck bucket. You should check where your handles might rest before you build the stand. The top of my 15-gallon (57-L) fermenter rests on the stand.

4. Spray Ball Assembly
This is good for cleaning my mashtun, boil kettle, fermenter, immersion chiller, cornies, and buckets. My PVC riser is 10-in. (25-cm) long using the top outlet pump. You can adjust that length depending on your kettle dimensions.
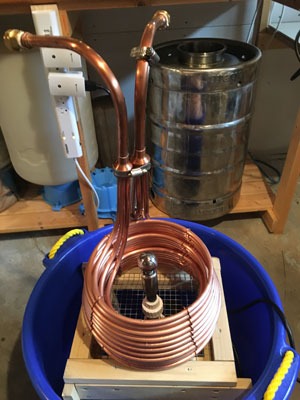
To clean my immersion chiller, I put it on the stand and cover it with a large plastic bucket after switching to just a short 2-in. (5 cm) riser on the sprayball.
Depending on what cleaning chemicals you use you will get some foaming after running the WashAll sprayball for a while. Don’t go have a long lunch and leave it running unless you also want to wash the floor!
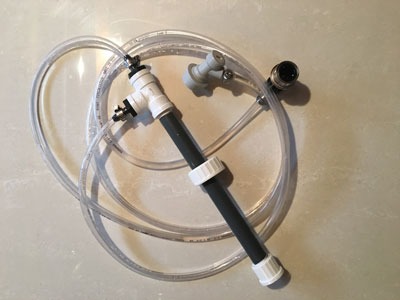
5. Corny Keg Dip Tube Adapter
I usually start cleaning my corny kegs with the sprayball then switch to the dip tube adapter to clean the dip tubes.
To clean a picnic tap attached to the “beverage out” post I connect the grey corny fitting from the pump to the “gas in” on the corny, which is sealed and vertical on the floor. I run the pump briefly to pressurize the corny with cleaning solution and get the level above the bottom of the diptube, then open the picnic tap into the muck bucket.

6. Pump Out/Cleanout Assembly
To clean my hoses, pump, and HERMS coil I attach them in series to my “pumpout” tool, which is just a union, riser, and garden hose adapter to tubing and a male quick connect since my hoses have female quick connects. There is a fair bit of pressure so hold on to the end of the last hose (I learned the hard way)!
You may occasionally get an airlock in the pump. To clear it just shut off the pump, unscrew the union a bit, then retighten. This breaks the airlock and gets enough liquid back into the pump to prime it.
Because the muck bucket is quite heavy when full you can pump it out with this tool when done. The sump pump will pump down to about ¼ inch of liquid remaining in the muck bucket.